

Hello again, and welcome back to my blog! I’m joining Amy Koenders and the rest of my Stampin’ Up team for Stamp with Amy K’s Tuesday Blog Hop group—and this month we’re celebrating spring with our cards! (Spring IS on its way, right? It may look all green right now in Ohio, but we’ve been fooled before!) One of the things my husband watches for as spring breaks is how high the grass grows (read: how soon he’ll have to mow). And what comes with the growing grass but dandelions? Sometimes lots of them, if you put off the mowing! 🙂 I always liked it when they turned white and round and seedy when I was a kid, but I’m featuring the younger yellow kind on my card today. 🙂
My card also works for the Paper Players challenge this week, as they are focusing on spring cards as well. I’m linking my card to their challenge too. 🙂

I started making my card a couple of weeks ago, but the blog deadlines pushed me to finish it. I knew what I wanted to do; I just picked up other things first. (In between, I made a baby card, a wedding card, and the Alice in Wonderland “Hello there” card I posted on Instagram [see it at annegirl77!].) Does anyone else work on several cards at once, or is it just me? My attention wanders where it wills, creatively, and then I finish a bunch of cards at once. I didn’t set out to do anything specific with this card. It was just that the scraps from the last couple of posted dandelion cards were still sitting nearby and I wanted to use them up. I was merely playing around with the products and liked what was developing. I do love those yellow dandelions on the blue background, though. 🙂
For this card, I started with one of the Assorted Memories and More Cards and Envelopes (item 159234). I’m still using up my old Whisper White ones, so since I was just playing and didn’t know what I was making, I didn’t intentionally grab one of the yellow-and-white card bases in the Dandy Garden Memories and More Cards and Envelopes. So you might decide to change that if you make a similar card.
I made my bottom background layer out of a piece of Misty Moonlight Cardstock (item 153081). It measures 6″ by 4″. I didn’t adhere it right away, though. I built my scraps of Dandy Garden 6″ x 6″ Designer Series Paper (item 154297) on top of it instead. One side of the card, the DSP is 1.75″, and the other side is 2.25″. I love the Braided Burlap Trim I put with it, but it is retired. If you want to stay current, you could try the 3/8″ Fine Art Ribbon (item 154561). I used my burlap ribbon to cover the seam where the two papers met. When I did adhere the background assortment to the card base, I popped it up onto Foam Adhesive Strips (item 141825) so that the thickness of the Braided Burlap Trim wasn’t an issue with the papers below it in terms of bulges or strain on the pieces. The dimensional foam strips allowed me to tuck the ribbon under the cardstock without any worry that something would tear later or look funny.

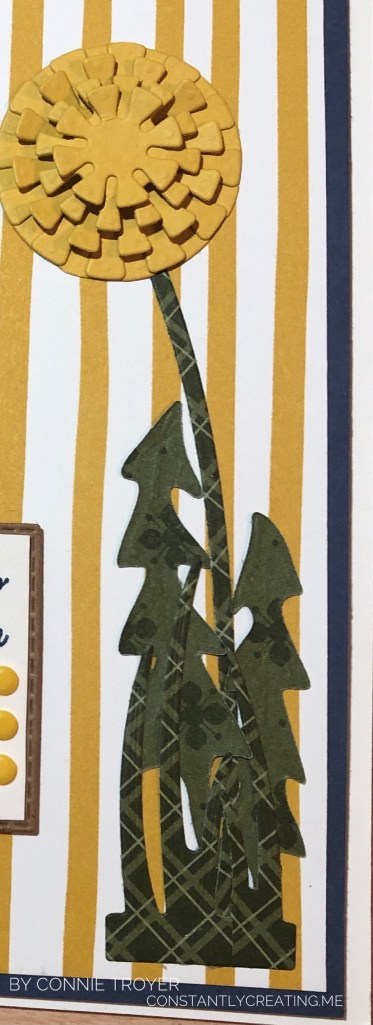
Then I got to wondering what to put on the yellow-and-white striped DSP. I hadn’t used my Dandy Wishes Dies yet (item 154315), so I made a yellow dandelion to match the other side of the paper, which has three. I cut the five layers of the blossom from Bumblebee Cardstock (item 153077) and layered the two largest graduated sizes together, gluing them completely flat. But for the next three layered sizes, I curved the little squares of the outer rims (I’m sure there’s a better name for this) in opposite directions, and I put one Stampin’ Dimensional (item 104430) in between the middle layer and the second from the top. With my fingers, I curved the middle layer (the largest of the top three) up toward me, then the next smallest size down toward the card, and then up toward me again for the smallest layer. The smallest is about 3/4″ across. The bending of the square “petals” gives it a 3D look as it pops out at the recipient yet isn’t too high to mail. When I glued them, I made sure to stagger the squares onto the empty spaces of each layer under it. It looks pretty cool in person.

I cut the stem and the leaves of the dandelion from a double-sided piece of Mossy Meadow DSP from the Neutrals 6″ x 6″ Designer Series Paper (item 155226). This was one of the five DSP packs that new demonstrators got as their free gift when they joined during this passed Sale-a-Bration. One perk of already being a demonstrator is that we get to order these kinds of products too. 🙂 There are several great designs in the pack of ten colors (times five), so I will be using them a lot. (I’m sorry that this is now two non-current items on my card, but I didn’t have any blogging intentions at the time of creation. I’m sure that whatever you use will look wonderful too!) I wish I had reversed the direction of the two taller “toothy”-looking leaves, though, because I feel like they’re too close to the stem this way. Dandelions spread out more, I think. (Of course, since my husband is the one who mows the lawn, I haven’t had to look at dandelions recently. :-D) If I make the card again, I will switch them. I do like how the two different patterns give definition and individuality to the bunch. Everything blended in too much when they were all the same pattern. I cut and glued the two grass dies on and under the leaves for an illusion of dimension.
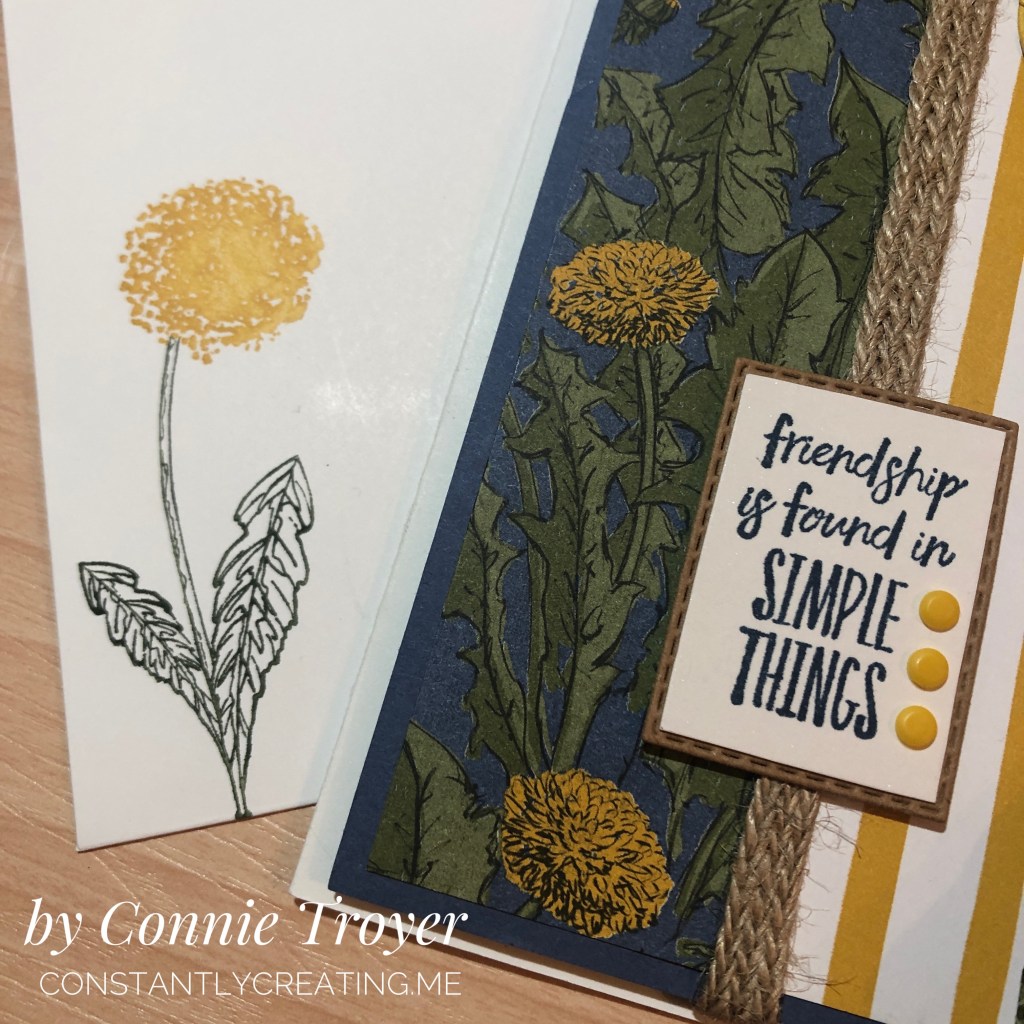
For the sentiment, I held up several and determined that the friendship one from Enjoy the Moment (item 154452) fit best in the die I’d already selected from the Rectangle Stitched Dies (item 151820). I didn’t want one that was too tall or too wide, just something that nestled in there quietly between the art elements. I stamped the sentiment in Misty Moonlight ink (pad item # is 153118) on Shimmery White Cardstock (item 101910) because I just love the sparkle in the latter! I use it often. I die-cut the white cardstock and also decided to die-cut one in kraft cardstock (another retired item). Then I manually cut off the stitched border of the white, along with a bit more with my Paper Snips (item 103579) so I could layer the two cardstocks together. I thought the kraft cardstock looked nice against the burlap ribbon and gold/brown tones of the card. Last, I added three of the smallest Playing with Patterns Resin Dots (item 152467) in Crushed Curry on the sentiment. I almost went with two, but three filled up all that white space beside the sentiment. You may choose to do something else.

I guess that’s it for how I did the outside. I made the inside sentiment (“I’m So Happy I Found You”) from the Friends Are Like Seashells stamp set (item 154368) on Shimmery White cardstock, which was stamped in retired More Mustard ink since I don’t own the In-Color Bumblebee ink pad or refill yet. I also matted the white piece with Misty Moonlight cardstock so it would pop off the page better. I cut out the words with the smallest longest die in the pack and chose the next size up for the Misty Moonlight layer. I off-centered them against the middle to save some room. On my border piece, the blue cardstock was left over after I cut two horizontal edges to use on other projects. It was tidy enough that I thought I could use it here too. I used stickers from the sticker packs in the Dandy Garden Memories and More Card Pack (item 154302) to decorate the inside border.

I also decorated the envelope by stamping two pieces of flowers from the Garden Wishes stamp set item (item 154408) with my Stamparatus (item 146276). I used my Stampin’ Write markers to color them since I only have the Bumblebee color in a marker (it’s a current In-Color, and I purchased that set of five markers). I stamped on the front of the envelope, which I rarely remember to do, because the matching 6″ x 6″ DSP was not large enough to cover the entire flap in this size of a card. 🙂
Well, that’s all I have for you today. This card was pretty easy overall. I hope you enjoy making one of your own. Thank you for visiting my blog today; I love readers! Be sure to hop down the list of my teammates to see the beautiful “spring” cards they’ve made for you!
- Jaimie Babarczy: https://wp.me/p79UhD-4VN
- Karen Ksenzakovic: https://wp.me/paaNf4-4e9
- Mary Deatherage: https://wp.me/p5snyt-h1y
- Sue Prather: https://wp.me/p5yitZ-2tQ
- Donna Leonard: http://stampdabbles.com/?p=4619
- Connie Troyer: https://constantlycreating.me/2021/03/09/3d-enjoy-the-moment-with-dandy-wishes-for-stamp-with-amy-ks-tuesday-blog-hop/
- Jillian Good: http://dyedwith.love/?p=139
- Tara Carpenter: https://tarabethstamps.blogspot.com/2021/03/stampin-up-arrange-wreath-happy-easter.html
- Leslie Larkin https://leslielarkin.com/ice-cream-corner-suite/
- Terry Lynn Bright: https://tlsbrightspot.com/2021/03/09/stampin-up-celebrate-spring/
- Akiko Sudano: https://wp.me/paOv8E-2ww
- Karen Finkle: https://karenscardkorner.blogspot.com/2021/03/stampin-up-wildly-happy-for-amys-inkin.html
- Amy Koenders: https://wp.me/p2SFwf-moQ
- Krista Yagci: https://www.thestampingnook.com/post/stampin-up-jar-of-flowers-welcome-spring-card


So pretty Connie! The dandelion die cuts are perfect, love the designer paper too! 🙂
LikeLike
Thank you so much, Amy! I love this blue dandelion paper. Probably my favorite of the bunch (I’m not really a yellow fan). 🙂
LikeLike
This is so pretty!! I love your dandelion and I really love how you used the different papers for the leaves! 😊
LikeLike
Oh, thank you, Akiko! ♥️ I so appreciate your comment!
LikeLiked by 1 person
This is so pretty, Connie! I love the dandelion paper and your big dandelion! The perfect sign of Spring! SO happy you joined my challenge at The Paper Players!
LikeLike
Oh, thank you so much, Claire! I’m glad you like it! I haven’t done many challenges. I was happy yours fit the bill to try to start doing them! ♥️
LikeLike
Pretty card, Connie! Love the layers on the dandelion leaves.
LikeLike
Thank you, Donna! ♥️ Thanks for linking to me too!
LikeLike
Your dandelion is perfect for a spring card! There’ll be here before we know it! Such a great card.
LikeLike
Thank you so much, Jaimie! ❤️
LikeLike
So pretty Connie 🙂 Love how you used the striped DSP. I couldn’t figure out how to used it and you used it perfectly.
LikeLike
Oh, thank you, Karen! What a nice compliment! Glad I could show you something new. 🙂
LikeLike
I just love this! Awesome card. Thanks for joining us at the paper players!
LikeLike
Thank you so much, Laurie! It’s been fun to play along! I hope to do more in the future. Glad you liked it!
LikeLike