
One more in this series. Thanks for working through them with me.
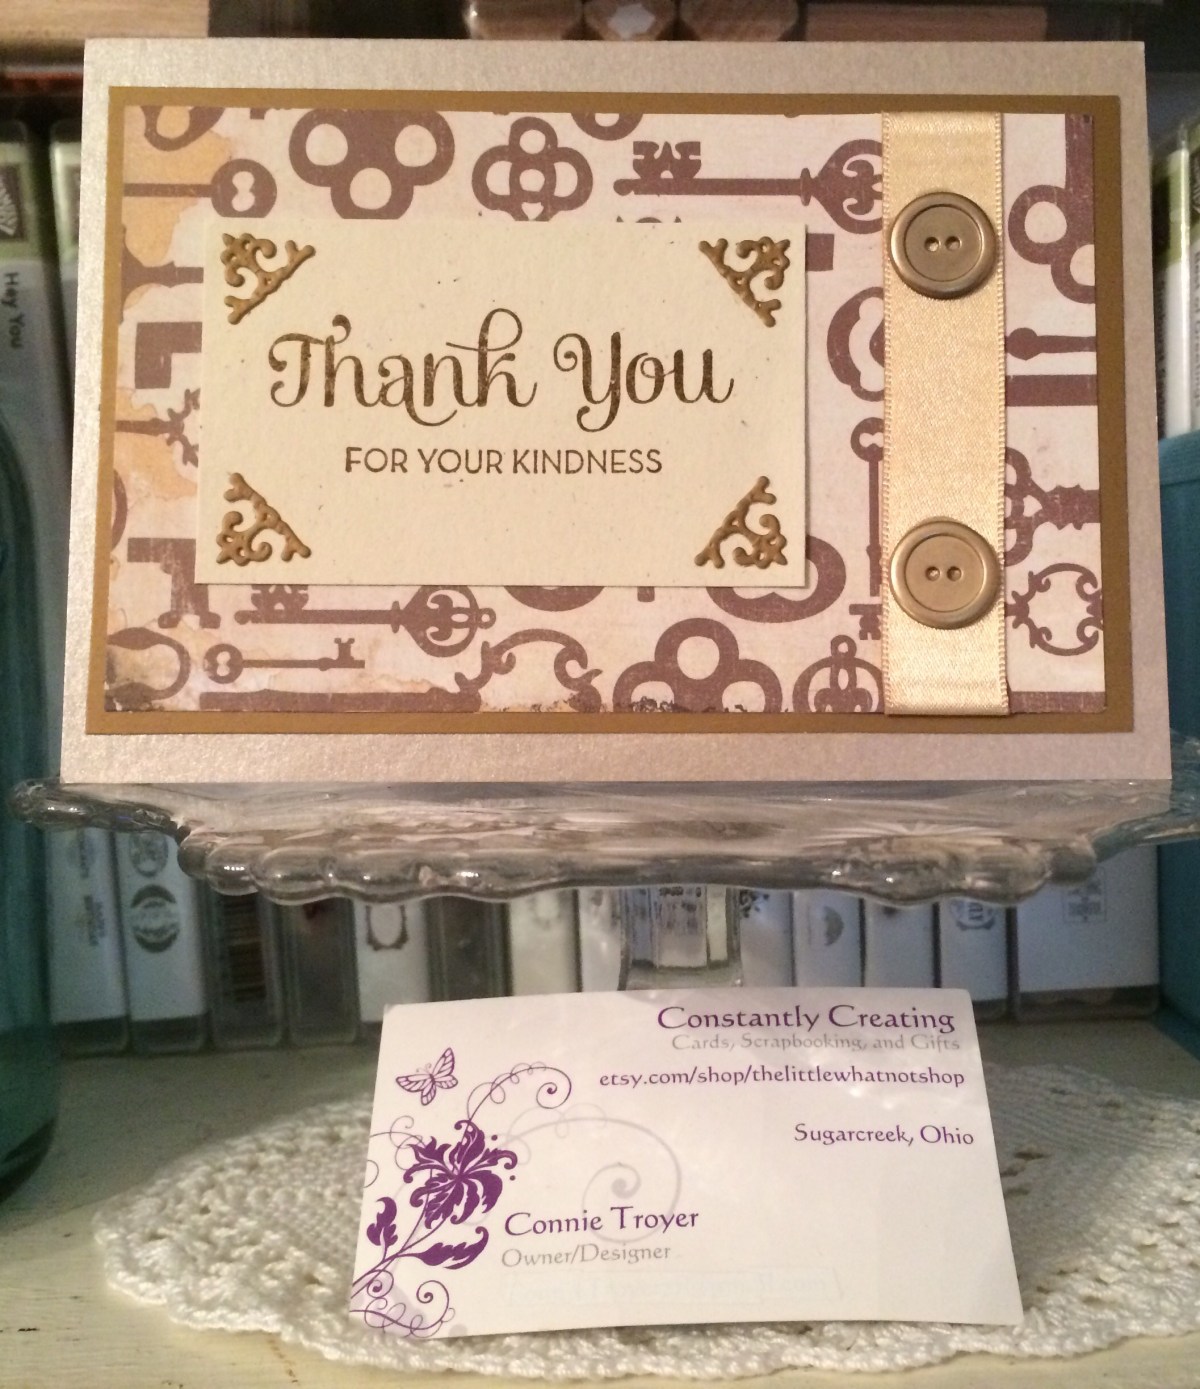
I used “Brushed Gold” (retired) cardstock from Stampin’ Up as a base for this one. I have a partial pack of 8.5 x 11 cardstock and cut one sheet down to an A2 size before scoring it in half with my scoring board (wonderful invention, and so much easier than trying to fold it in half without creasing it where you don’t want to, which was the way I used to do it). I’m not really a “gold” person, but I do like this cardstock and wish it was still current. It has a beautiful shimmer in the light and isn’t too gold for me.
The same double-sided Martha Stewart brown/blue-and-pink-flowered patterned paper came into play for the matted layer, as on “Cards 2 and 3,” detailed here. I still hated covering up those beautiful flowers. I might just have to make a new card with it as penance. 🙂 On top of that solid brown, I put another section of the DCWV key paper – finally going back to the moving idea. It has a deliberate “stained” or distressed kind of look around the edges of the 12×12 sheet. This particular piece was from a corner, so that’s why it looks the way it does. I could have added ink on the border of the other “key” pieces to get the same idea (or the right-hand edge of this piece – which I just now realized), but I didn’t think it was all that necessary at the time. You can see in the close-up of the picture that the browns aren’t an exact match, but I’m reminding myself that people don’t usually look that closely – or hold it to their face. No one will know, right? 😉
When I remember to do it, I wait until I have most of my pieces ready or a solid idea of what I want to do before I start gluing layers together, so I can do things like wrapping this ribbon around part of the paper. Wrapping it is better than cutting it off, which will cause it to fray (and then get too short despite your initial measuring). Trust me on this. 🙂 I mean, yes, you can cut it with pinking shears, but you won’t always want that particular look. And you can use Fray-Check or another glue, as I used to, but then the ribbon will darken or even harden where the liquid was applied. And that’s not very pretty. So for me, wrapping works…when I plan ahead or stop to think about how to put everything together. The ribbon in this particular case is a retired 5/8″ Gold Satin ribbon from Stampin’ Up, and the flattish buttons are SU Gold Metallic Buttons (also retired – notice a theme yet?).
I thought about using another fancy die for the sentiment block, but time was growing short and I wondered whether the curves of the die might conflict with the shapes of the keys. When I found this scrap of Naturals Ivory (Stampin’ Up, retired) that was already cut down, that settled the debate. (This is one reason why I keep scraps with their pads.) This cardstock has little random flecks of color in it in keeping with that “natural” look.
I decided not to use the gold embossing powder on this card. It was late, T was sleeping, and my heat gun, since it’s almost twenty years old, is not the quietest. I hear the newer versions are much better with that – but mine works just fine, so I’m not going to invest in another one until it dies. Probably. So for this sentiment I just used my Soft Suede ink pad (Stampin’ Up, current). Stamps are also SU and from the “One Big Meaning” (current) and “So Very Much” (SAB, retired) sets.
The last step – and the one I find the most fun – was finding embellishments to pretty up the front of the card. This is actually when I found and placed the buttons, but the sentiment needed something too. Most company’s adhesive jewels and “dots” are rather raised, which sometimes requires a thin piece of cardboard in the envelope with the card so they don’t burrow through the envelope. I was trying to avoid that, but my best options were still problematic in that area, so I thought about photo corners or turning it into some kind of frame. I could have rooted through my photo corners tray, but as it was late and I needed to get the order packaged up, I chose the faster route of going to my die wall where I knew I had this tiny corner die. I have to cut it individually, four times, but sometimes it’s still the best choice. The size was perfect, so I cut it out of a metallic gold sheet of cardstock from a DCWV Metallics Stack. That pad is just beautiful, with many shades of metallic colors. Now that I’ve broken it open and used a bit of it, I may go back to it more often. (I’ve been trying to curb my “hoarding” urge; there’s always new stuff to buy as trends and preferred colors in the industry change. Not that I really need to buy much…but telling myself that does help me work through the fact that I should use up my stash. 🙂 )
So that’s it for this card and my five-note thank-you set. Which one was your favorite? This one might be mine, as it was both easy yet somewhat detailed. Thanks for reading! Feel free to “follow” me for more card ideas and tips in future posts.


So pretty Connie! Another fantastic design, love those gold touches! 🙂
LikeLike