A “throwback” card I didn’t blog about, using the retired Timeless Tulips and Tranquil Thoughts stamp sets from Stampin’ Up.
I discovered some untitled, unposted posts in my WordPress tonight, ones I thought posted already. But as I’ve mentioned, I’ve had trouble getting some of my automatic posts to bounce around to the various apps I initially sent them to. So now I have a “throwback” card, I guess, to share with you (that I thought I’d already shared). And evidently there will be more to come.
This was a make-and-take idea from the 2019 Stampin’ Up OnStage before Covid hit, which I took home that weekend and made almost a year later. I used a retired Naturals cardstock that has little colored flecks in it for the base, with Pear Pizzazz ink and cardstock and Fresh Fig for the tulip blooms. I popped up some of the blooms with Dimensionals (foam dots). “Hello” is also from the retired Timeless Tulips stamp set, but the inside sentiment, “I thought of you today,” came from the Tranquil Thoughts stamp set. I took the completed card to the gift shop that sells my cards, and it did indeed sell quickly. Many thanks to Stampin’ Up for the fun idea.
Join me for a team blog hop creating birthday cards using many current Stampin’ Up products!
Hello again to my readers! And happy Valentine’s Day! Did you think I forgot about you? It’s been a little while since I’ve posted…but not quite as long as my blog is saying. I’ve had some trouble staying connected to some automatic sharing helps, so I have some snags to fix…but I’m back for now! Today I’m joining several of my Stampin’ Up team members on a birthday blog hop for Stamp with Amy K/Amy’s Inkin’ Krew (yes, even though it’s the day of love and all that). My schedule has been better recently, as I’m off work for a few more weeks yet (I think), so I figured I had no excuse not to join this time. 😉
Honestly, I’m still in the middle of a massive craft-room reorganization and other house projects (attempting to make good use of my time off), so I’m really thankful right now that I bought Annual and Mini shares from some of my teammates, because I can just peek into the Priority packages I haven’t organized and fish out something that inspires me. 😀 I hope to offer those some day myself….
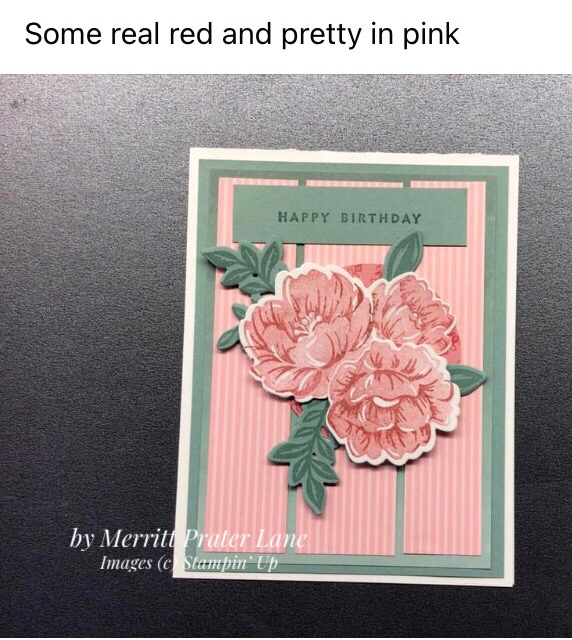
I wasn’t sure what I wanted to make for the hop until a saw a card that my new downline Jennifer Thornton made (go check out her brand-new Instagram or Facebook business pages and give her a follow if you’d like to see more as she continues to add content!). I usually design my own cards rather than CASE someone or use sketches, unless I’m running short on time or creativity, but her card just spoke to me with both the detail and the simplicity I saw. I chewed on that image for a couple of days, thinking about how I’d change it up, and I was still percolating over it when I saw a card my teammate Merritt posted in our Amy’s Inkin’ Krew group. Right away I knew I wanted to combine elements from both cards to create something new—and I’ve put my own ideas in there too. 🙂
So that you know where I was starting from, here are Jennifer and Merritt’s cards. Aren’t they lovely?
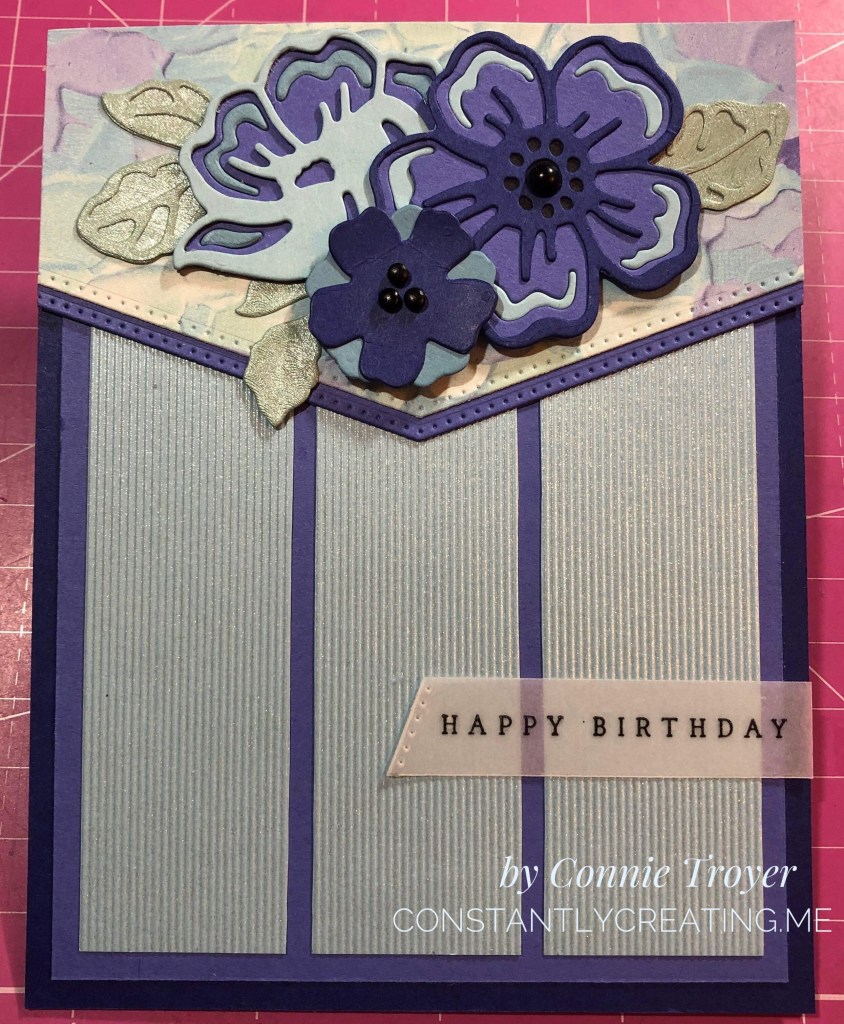
I decided to rotate the vee on Jennifer’s to a portrait-style A2 and add the three sections on Merritt’s underneath the vee (where Jennifer had the embossing). I actually thought about heat embossing the dots background from the new Hand-Drawn Dots stamp in VersaMark, so I might try that sometime—but I found paper from the Fancy Flora DSP pack that coordinated with the gorgeous Balmy Blue sheet in the Textured Shimmer Specialty Paper samples I was working with, and that matched my deadline better. I planned on adding Merritt’s flowers to the top of Jennifer’s vee, and I chose the striped paper for the bottom because Merritt’s paper there had stripes as well (though I wrestled with the latter decision for a bit).
By the way, the papers in that Textured Shimmer Paper pack are just so beautiful. Yes, they actually shimmer, and there’s a faint “other” color in between the textured stripes. It looks like a gold or champagne color in the Balmy Blue sheet.
The die that makes the vee is one of six borders from the Basic Border Dies. I wanted to be precise with where I placed it on the 6×6 sheet I had because I wanted more Balmy Blue than either purple color. I guess that’s how I ended up having a slightly wonky piece once it was cut, which played tricks with my eyes as I tried to decide how large the banner should be. Be careful with how you line up the edges of these dies; it was very easy to think it was straight when it wasn’t because I was working on the 4.25″ side. On the longer 5.5″ side, the edges wouldn’t have been so far away from the paper and thus easier to visually line up. (I did use grid paper underneath my DSP while I was die-cutting but something still wasn’t right.) Use washi tape or Post-it Note tape or a magnetic mat to keep it where you want it on the paper once you decide where you’re cutting. A 6×6 card plan would be much easier to use with these dies.
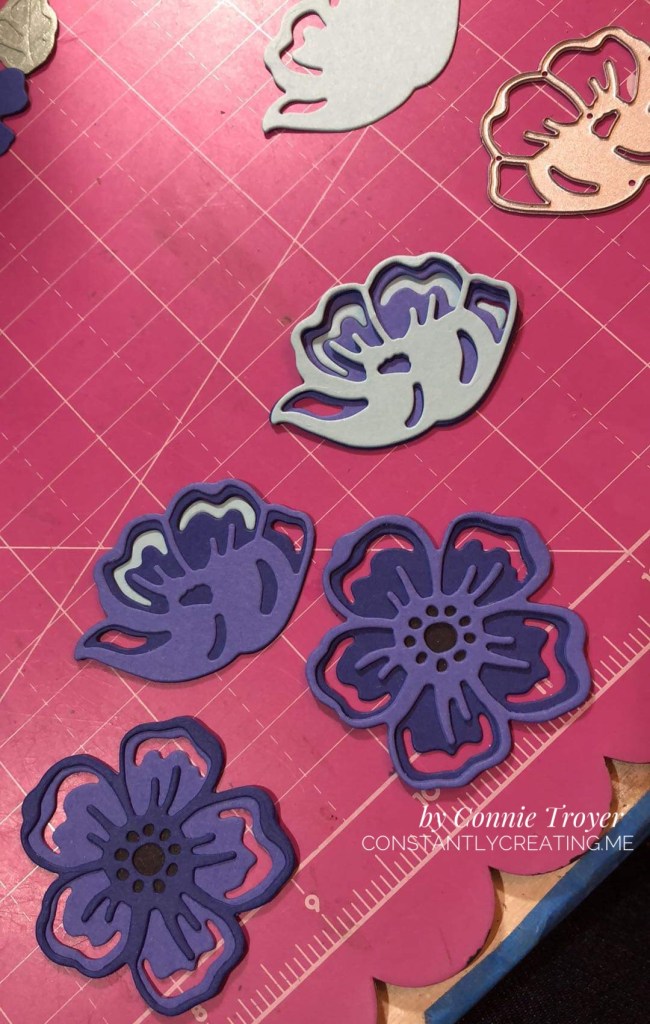
This card had a lot of decisions with it, some of which I’ve already mentioned. I also had to decide whether to use the same amount of layers as Merritt’s, whether to add a solid border underneath the patterned paper (where the black edge is on Jennifer’s), the size of the three sections, which colors of flowers would look best against the Fancy Flora DSP, and more. Finally, things looked “right,” but it took time and video calls with two crafty buddies to get me there. (Aren’t crafty friends the absolute best for brainstorming? I’m thankful for T & E with this round.) Sometimes it just helps to take pictures and talk things through. I ended up with one less layer than Merritt’s; flowers using Balmy Blue, retired Marina Mist, and In-Colors Starry Sky and Orchid Oasis with leaves of IC Soft Succulent from the Brushstroke Specialty Paper; a solid border under the banner, and striped sections that are 1-1/8″ across. And no vellum after all.
I was initially going to place some vellum atop the Fancy Flora DSP, because the more I looked at that piece of paper, the less I liked it (sorry, honesty warning). I was afraid it would be too bold or contemporary against the beautiful flowers I was planning from the Summer Shadows Dies. But once I had more of the final pieces together and ready to glue, I thought the vellum muted the pattern too much—almost like a white-out, with a sheet of blue on the bottom. Off it went, as I played with which colors to put where on those die-cut flowers and how exactly to arrange them.
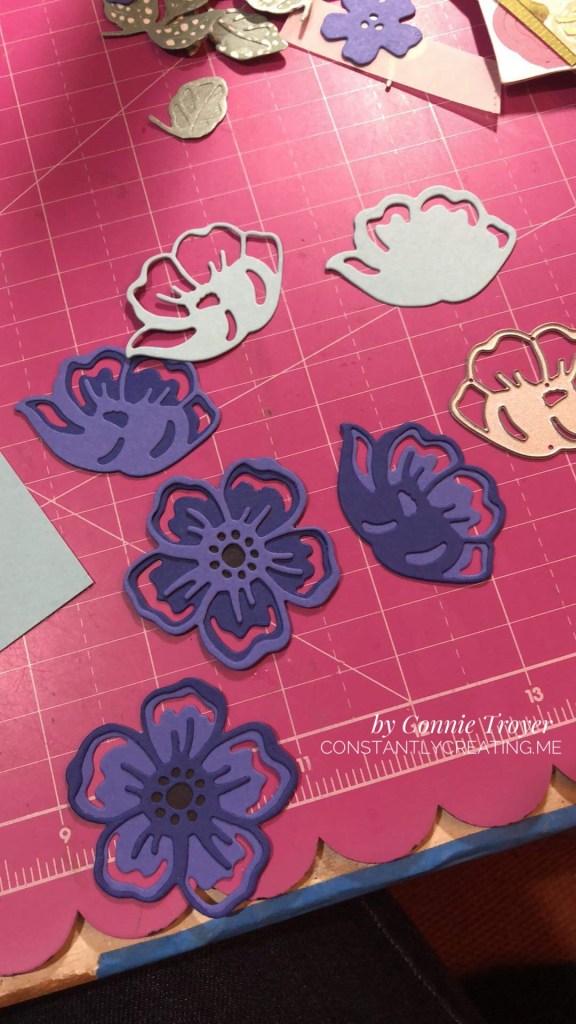
I ended up inlaying Marina Mist into the double-stacked side flower of Balmy Blue and Orchid Oasis and then placed Balmy Blue into the Starry Sky/Orchid Oasis petals. I colored the center of the largest flower with my black Ultra Fine Retractable Sharpie and placed a large dot from the Matte Black Dots in the middle. The smallest flower is Starry Sky cardstock backed by Marina Mist and filled with three Classic Matte Dots. Though I should have used them earlier, I used our Adhesive Sheets to provide a base for my die-cut flowers so that I could add the insides of those petals. In the photo below, I’ve cut around the Adhesive Sheet flowers so that I could move them around as I tinkered with the placement of them on the banner. They are on top of the vellum in that photo.
I also had to find the right sentiment and size since my banner was only so big. I decided to go with the “Happy Birthday” sentiment from the Waves of Inspiration stamp set. I almost cut it out with one of the Something Fancy Dies, but I ended up having a scrap of vellum that I’d cut off the sides of the banner somewhere in the middle stage of cardmaking. It fit the sentiment perfectly and even had the dotted perforation from the vee. I stamped the sentiment in Staz-On Jet Black ink because it was on vellum, after all. I glued it with tiny little dots of my Art Glitter Glue behind each letter so that not much would show through.
For the inside of the card, I used a sentiment from the Inspired Thoughts stamp set in Memento Tuxedo Black ink and two leftover strips from the Textured Shimmer Paper and Fancy Flora DSP, with an Orchid Oasis single flower. I used a large sequin from the Pastel Adhesive-Backed Sequins pack on top of that flower, but it wasn’t quite large enough to cover the three holes in the center, so I took my ordinary office hole punch and punched a circle out of the Fancy Flora DSP, glued it first, and then added the flat sequin on top. Plus one leaf from the Soft Succulent Brushstroke paper.
I hope you’ve enjoyed seeing this card today. There were times it was challenging, but I love how it turned out. I am going to try it again using two flowered pieces of Fancy Flora DSP, so you may see more like this in the coming weeks. If you have any questions or thoughts, please feel free to leave me a comment! You can find the Stampin’ Up products I used in my online store: https://constantlycreating.stampinup.net.
Thanks for “hopping” with me today. (I feel like a spring bunny every time I say that!) You can see what the rest of my teammates have created by going through the list below or just using the team’s Previous and Next buttons on each post. Click Previous on my post to go to Karen Finkle’s blog or Next to go on to visit Carol Buckalew and see what they made! Happy crafting until I blog again!
I feel like I’ve been here, there, and everywhere (or my bed) for the last six months. Crafting times have been random and unplanned. I’ve been trying to reorganize my stamps (and keep my desk clear) too. This is a card I made one night after vacation and before I hit the deer.
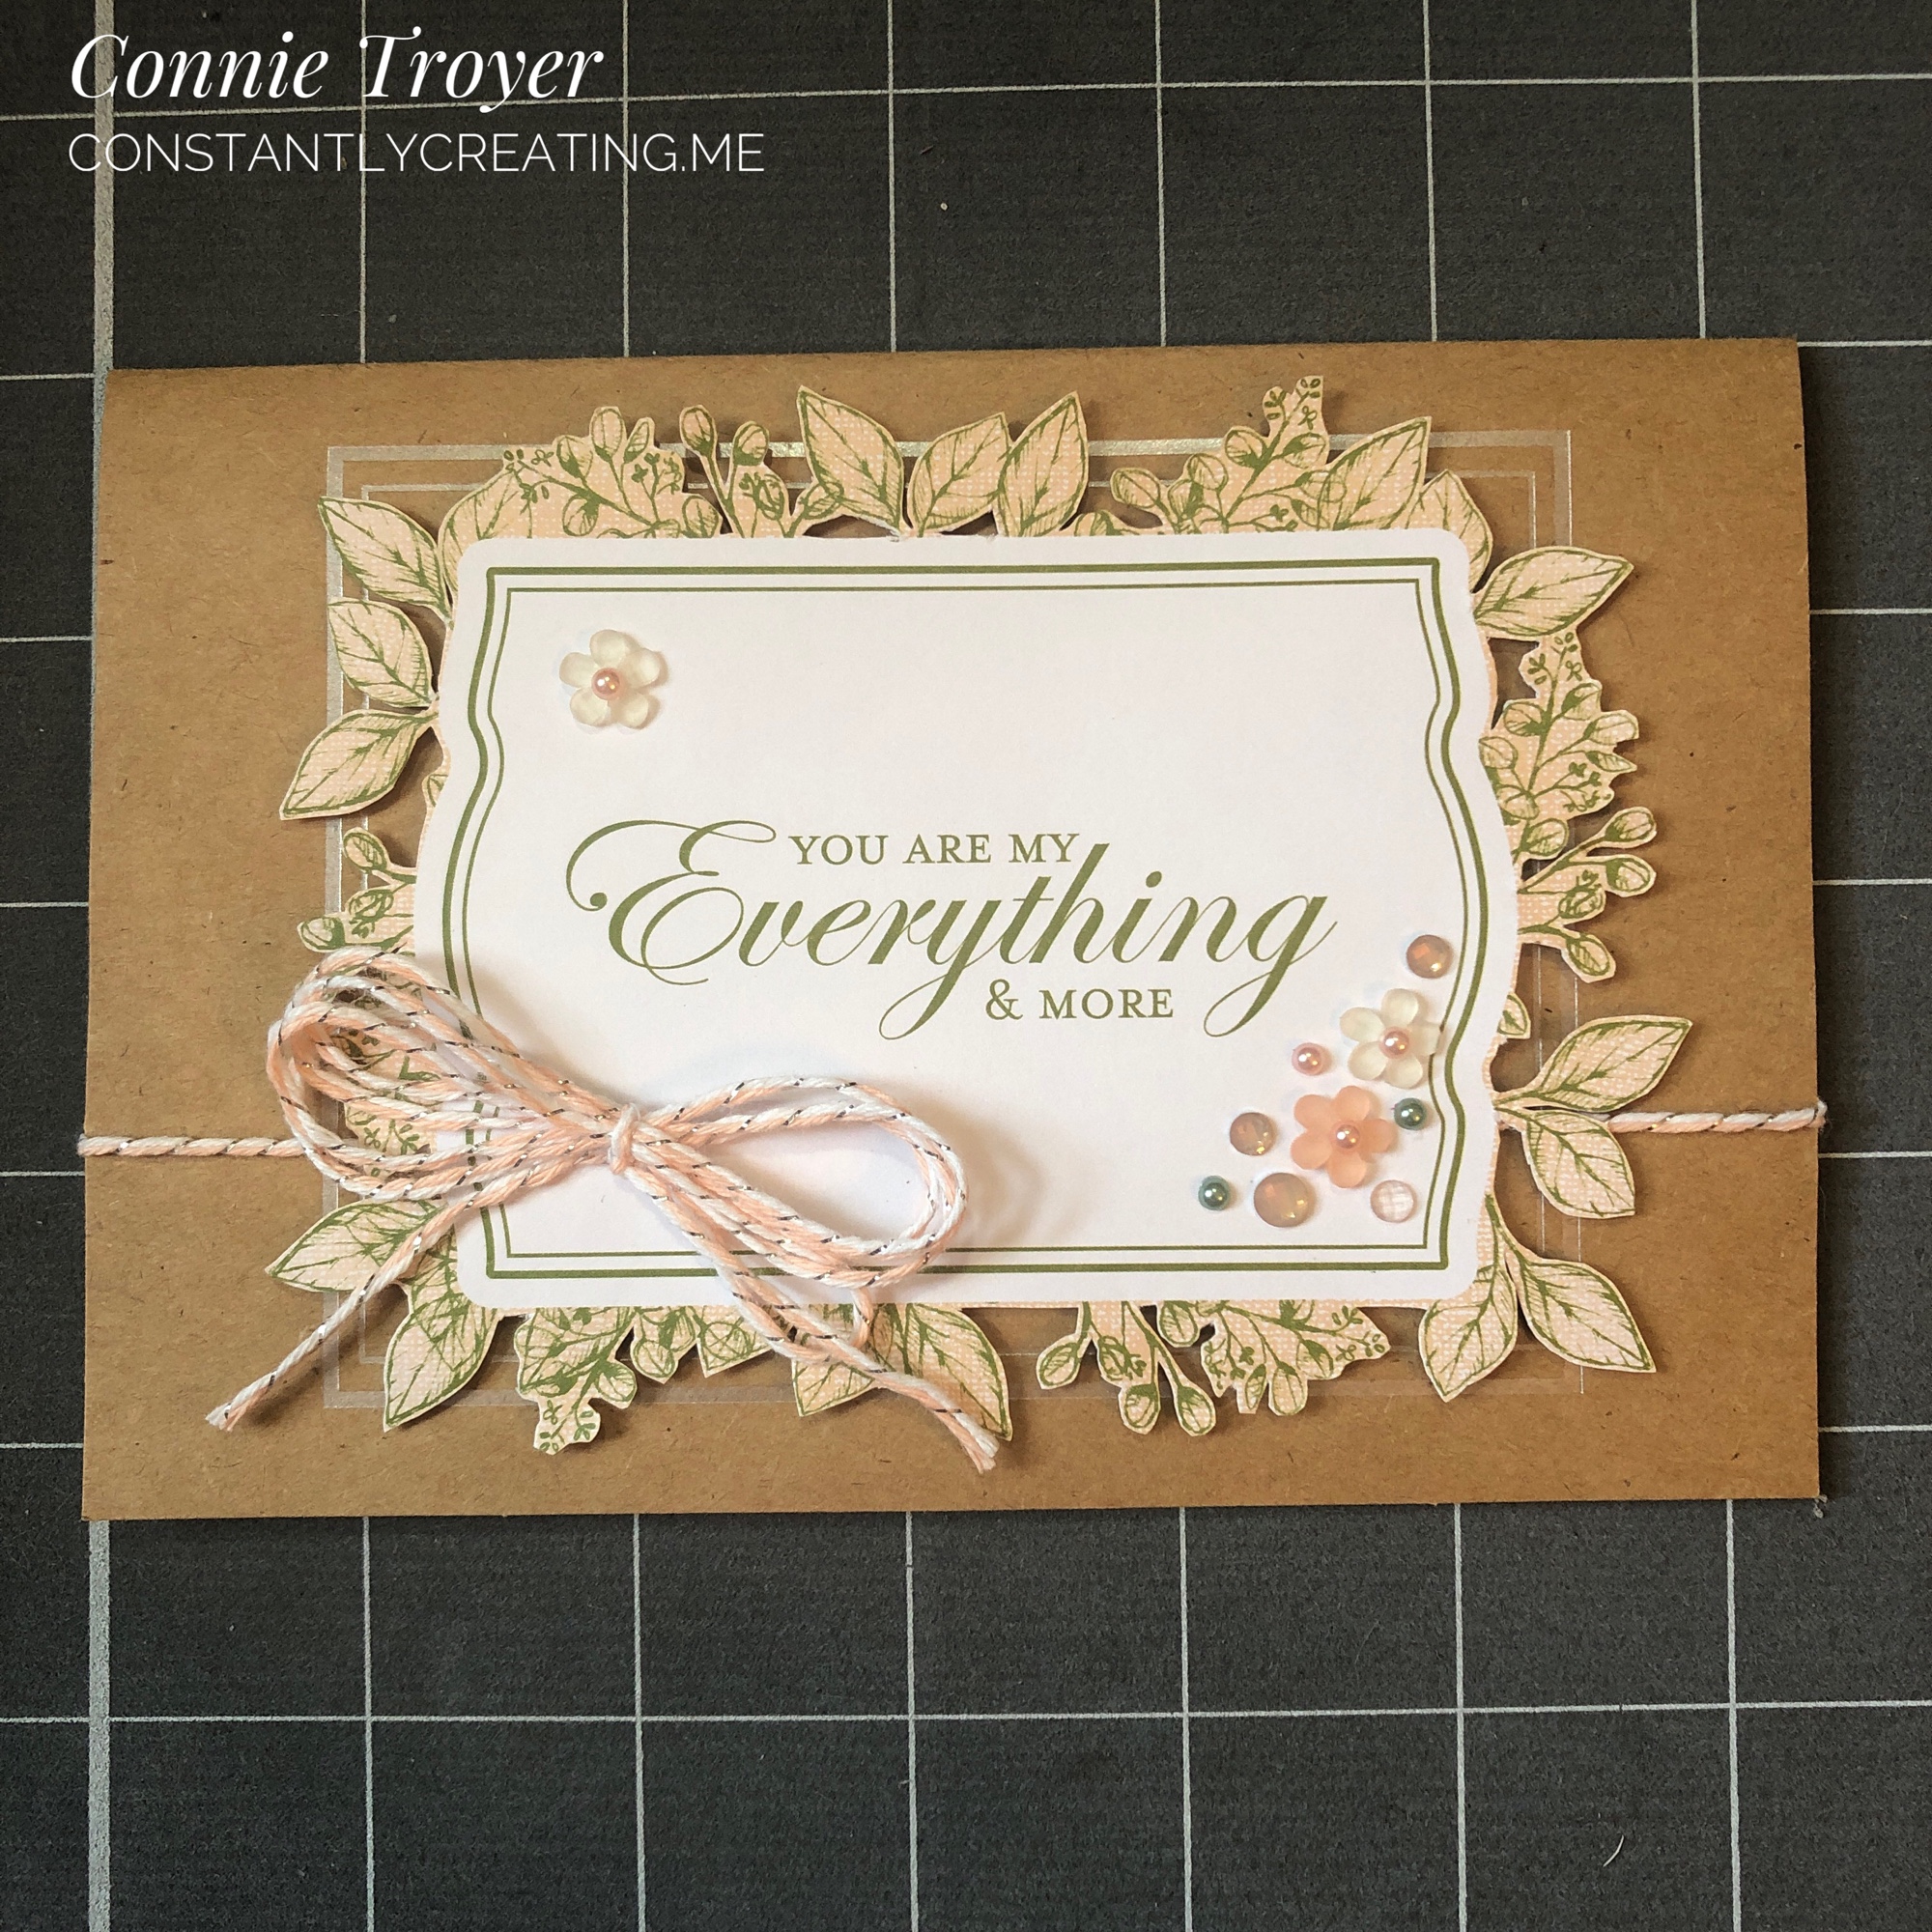
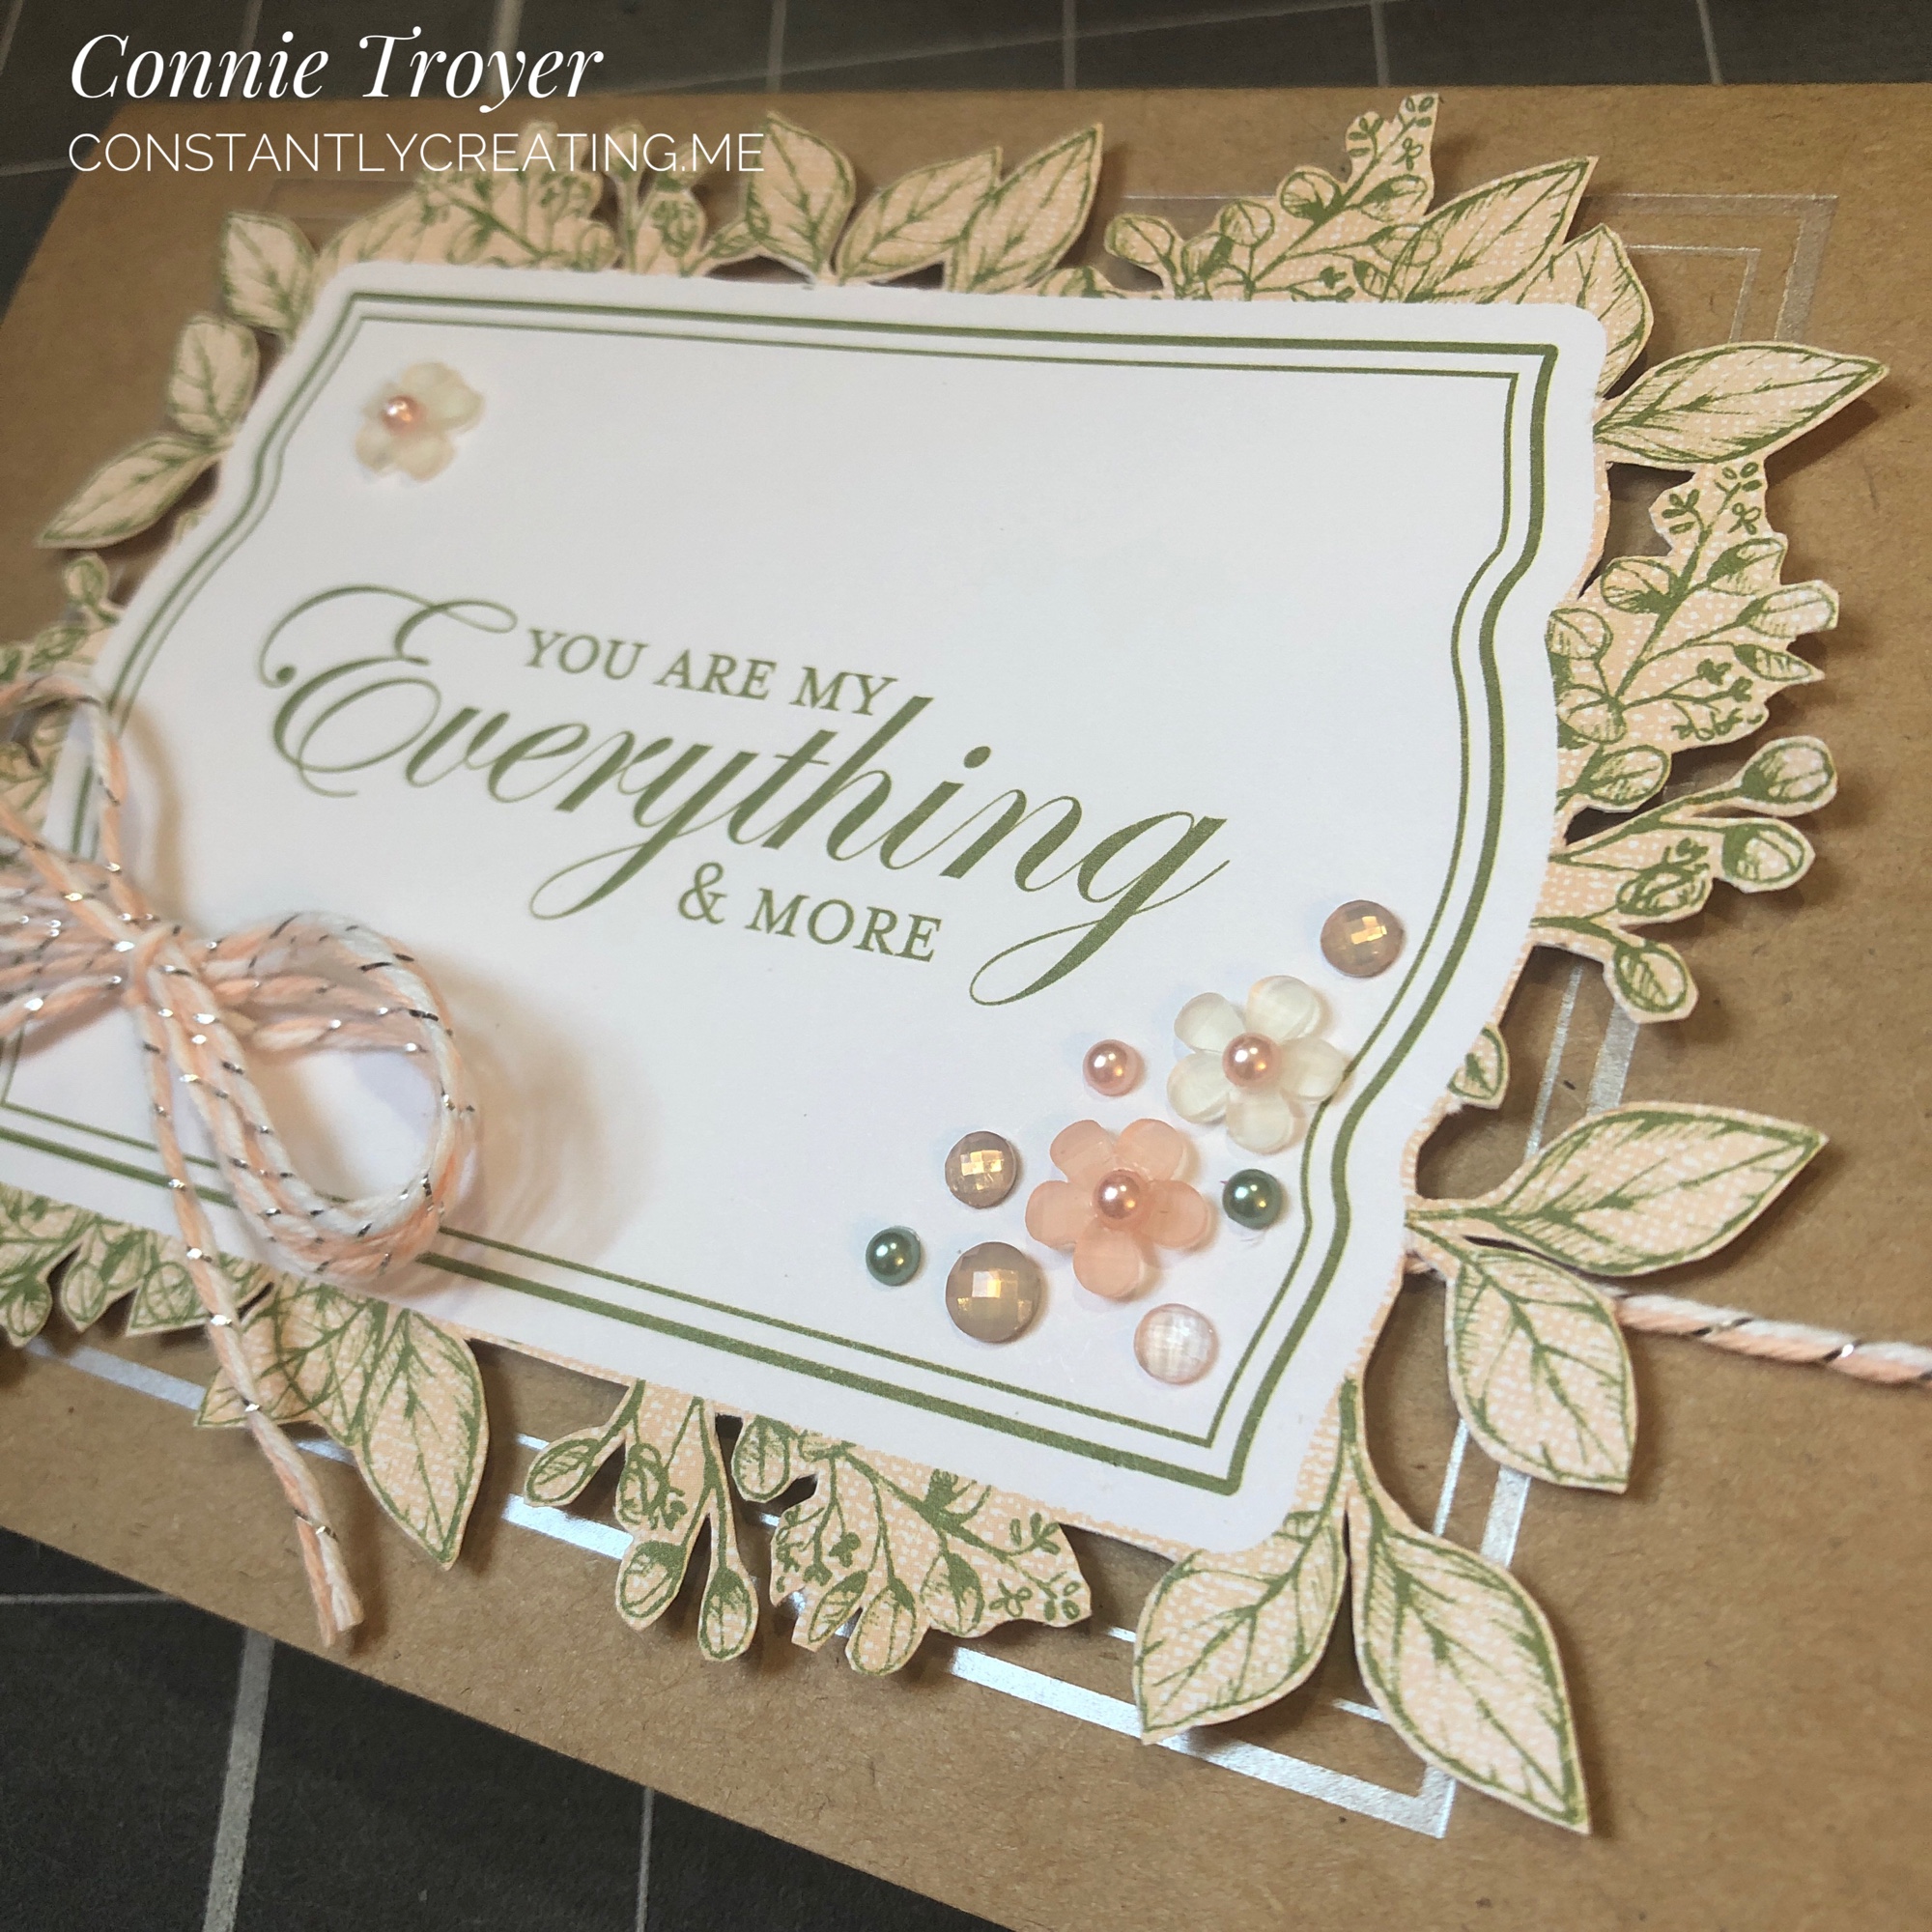
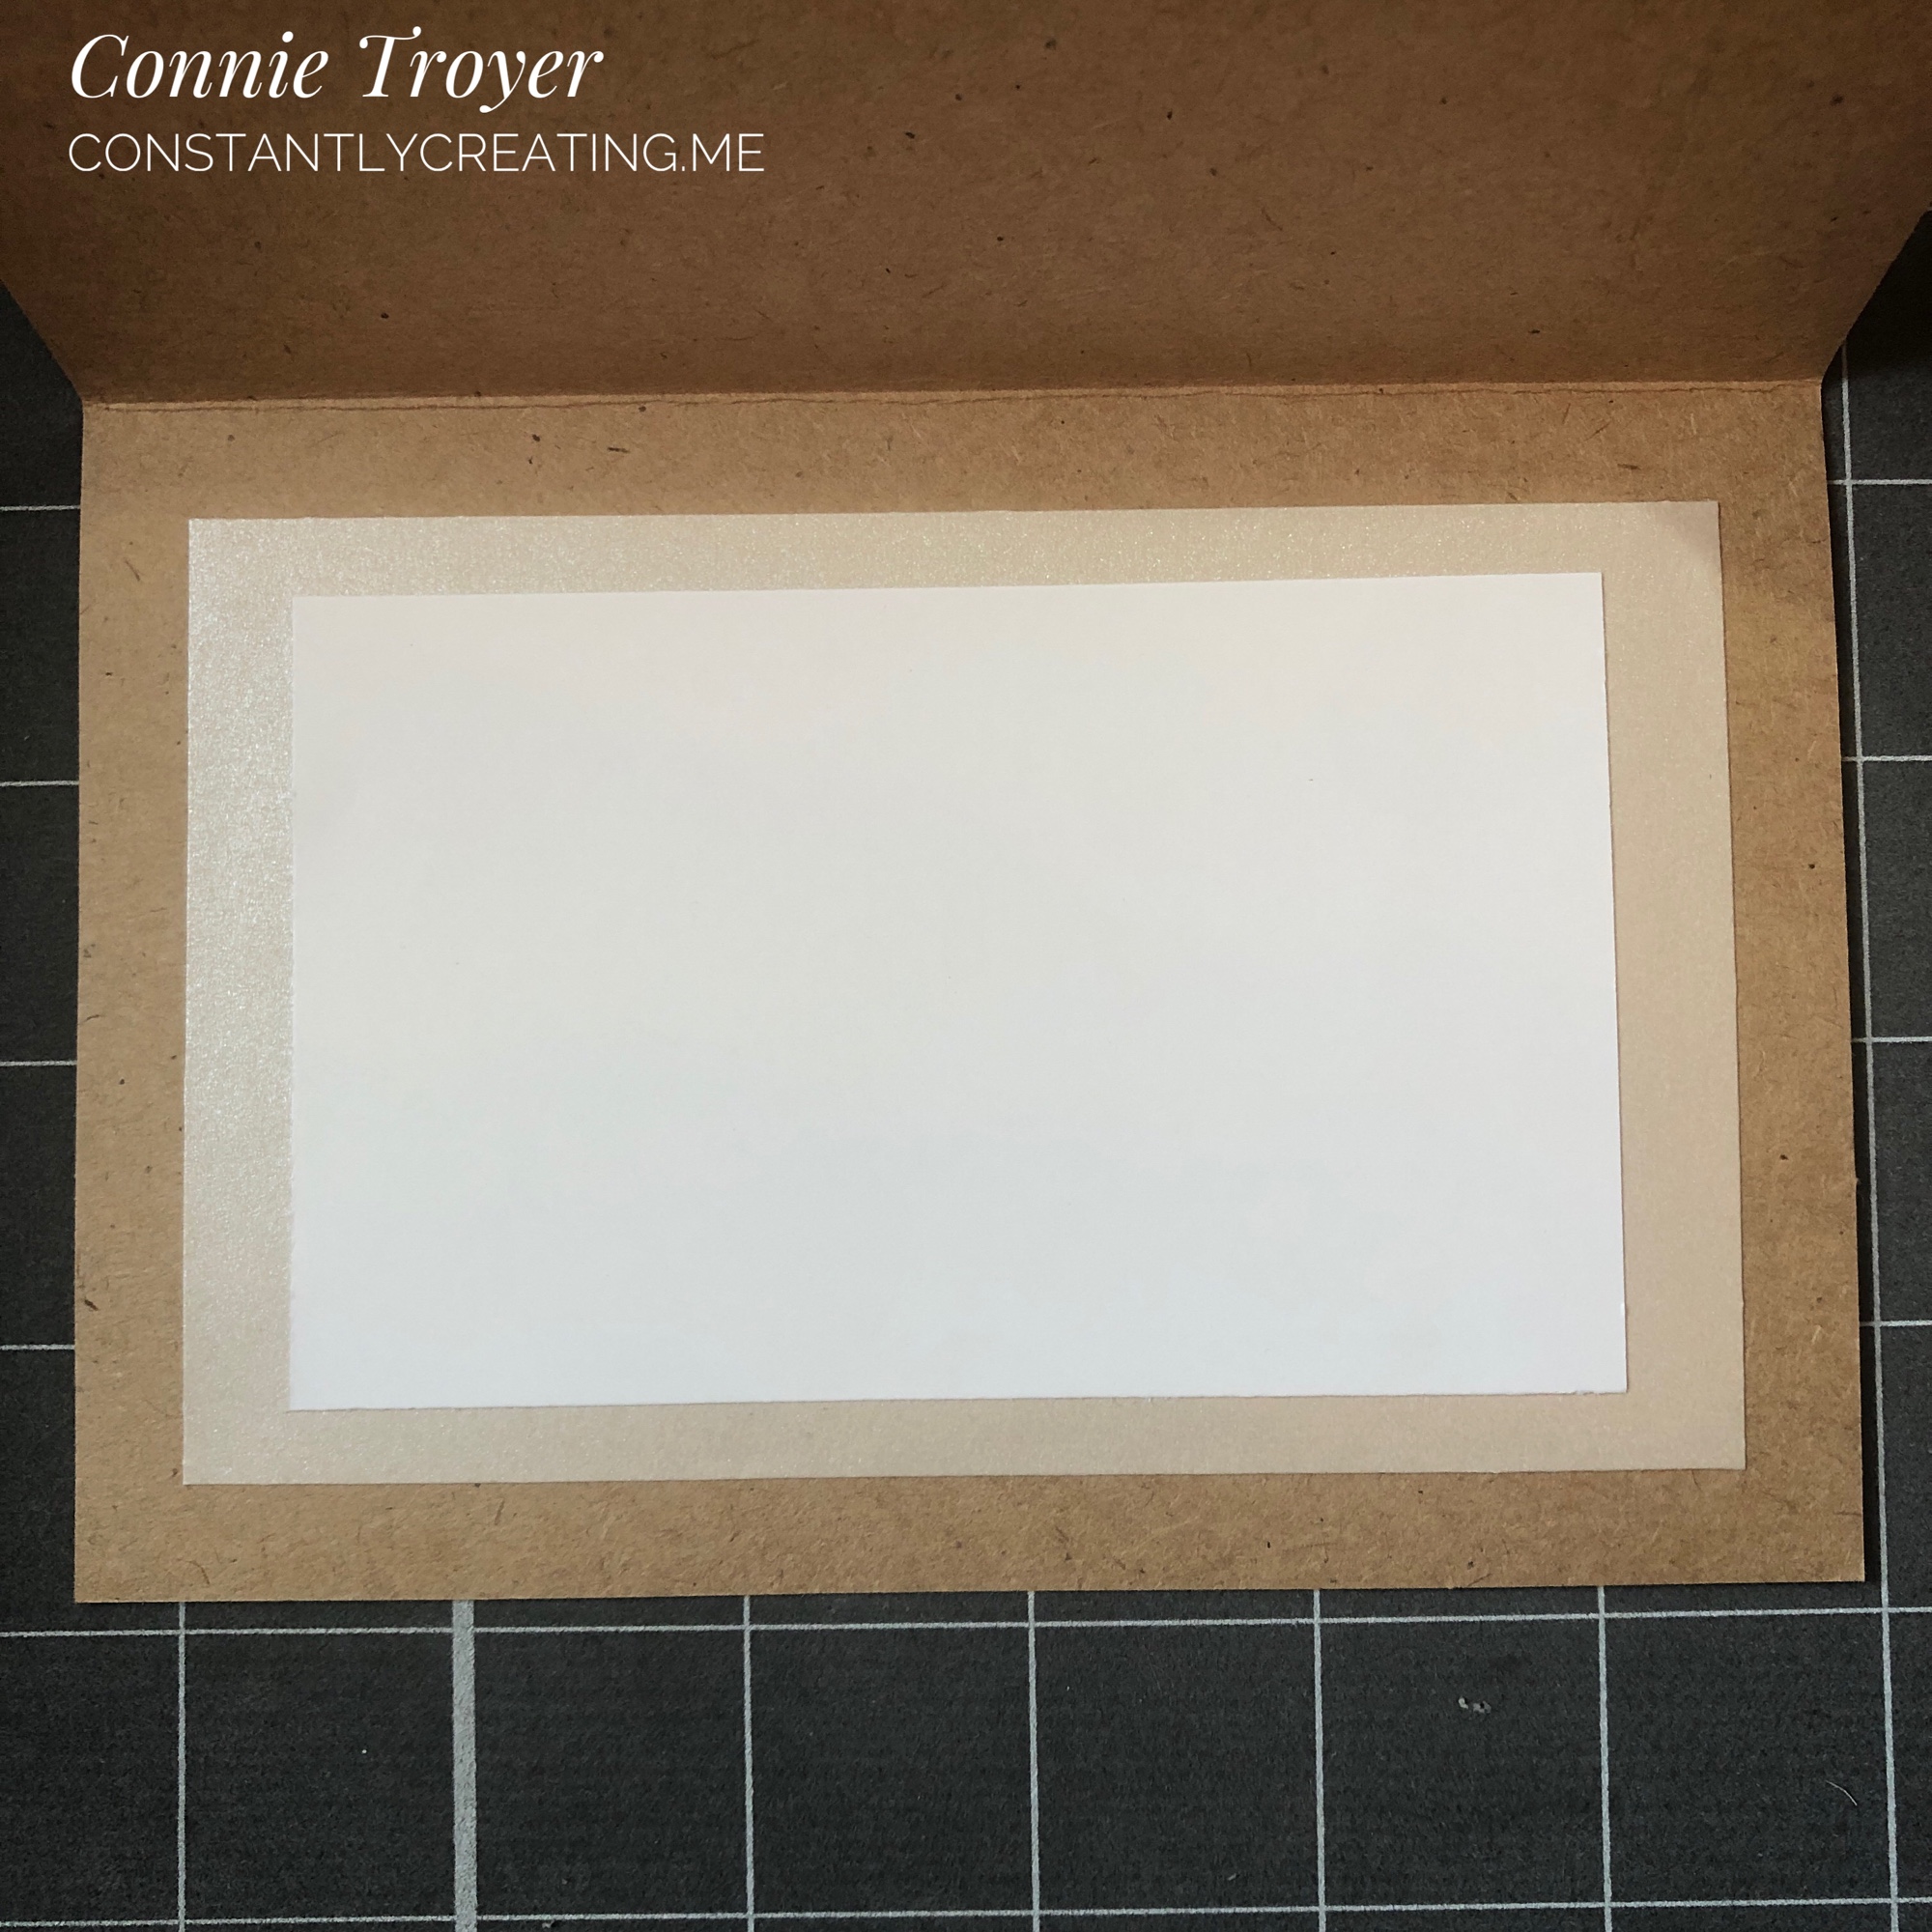
I fussy-cut around the foliage of a retired #stampinup Magnolia Lane Memories and More card before popping it up on Dimensionals and running some retired #petalpink and white baker’s twine behind it and for the bow. I’ve used a retired kraft Magnolia Lane Cards and Envelopes card base and used some retired #envelopepaper on the inside. Retired #su gems on the card front: Frosted Flower Embellishments and Share What You Love Artisan Pearls. Current gems: Elegant Faceted Gems.
Hello there and thanks for stopping by my blog! I’m sorry I’ve been quiet lately; I’ve had too many projects and people to please recently. (You all knows how that goes, right? Maybe I’m not the only one? 😂)
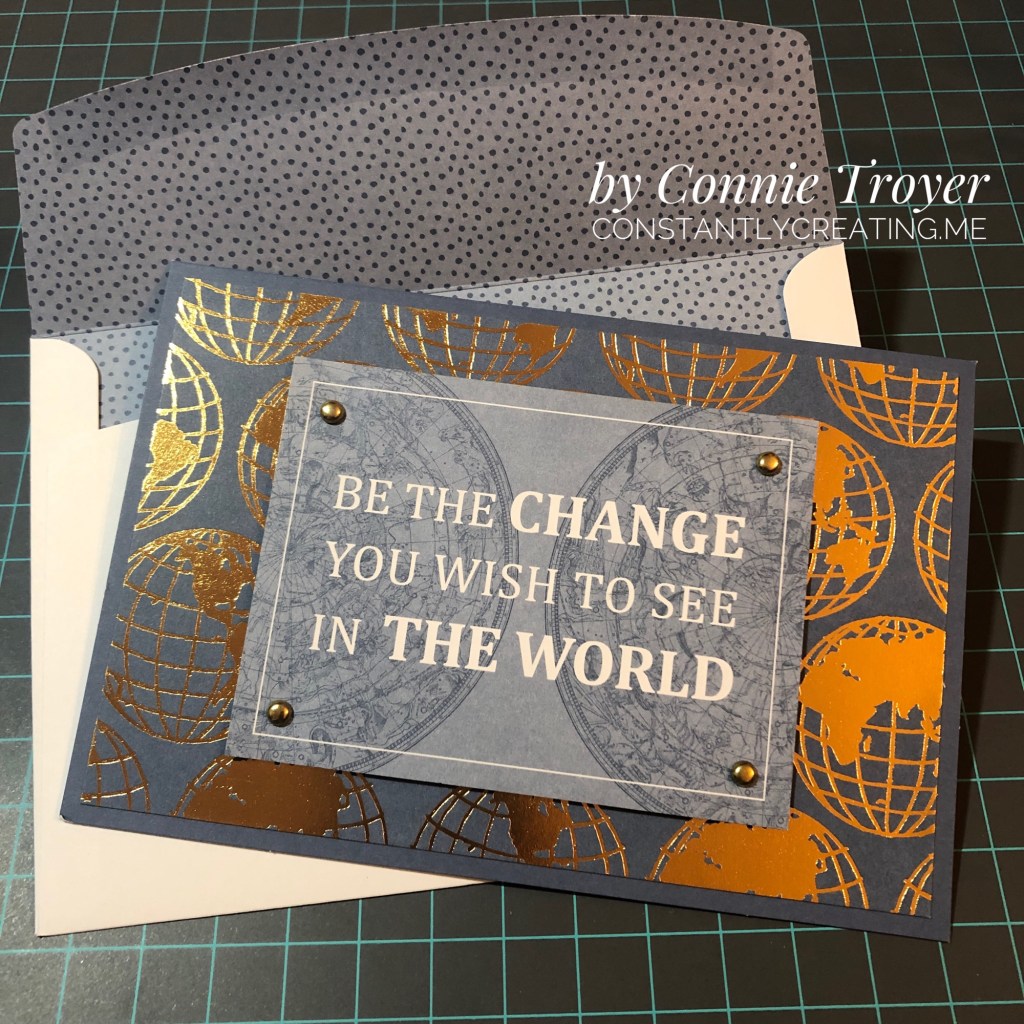
I haven’t had a lot of time in the craft room this month but I did sneak in there a couple of evenings recently to try to finish a batch for my local gift shop/employer. I’ve done a few grad cards and some easy cards. Here’s an easy one you can duplicate if you have or can find the World of Good Memories and More Card Pack and the Flowers for Every Season Cards and Envelopes.
I used a piece of Misty Moonlight cardstock for my A6-sized base first and then picked the large foiled globe card and the smaller 3×4 “Be the Change” card out of the card pack. I adhered the largest card with my preferred glue, and then I measured (yes, I actually measured!) and punched 3/16” holes in the corners for some 3/16” gold brads. Once I had the brads fastened, I popped up the card on foam dimensionals. And that was it! I used a Misty-Moonlight-lined envelope from the Flowers for Every Season Cards and Envelopes and called it done. 😂 I guess simple and easy really is the best. (The next post about a fancy grad card I did this week will be the opposite!) Most of all, I liked the sentiment on this card. I think it could even be used as a grad card, a masculine card, or one of encouragement. Thanks again for visiting, and stay tuned for more when I get time!
Hello and thanks for stopping by my part of this Stamp with Amy K’s Tuesday team blog hop! We’ve made cards “for the ladies” today.
One of my favorite things to do is to encourage my girl friends and other women on my life’s path. I had a Mother’s Day card in mind to create, but I’ve had an excess of other work during the last couple of weeks—so I went with this butterfly one instead. It’s a card I would send to one of my dear friends as a thinking of you or a birthday or a card of encouragement, to brighten their day and make them feel special.
I began the card really just wanting to use up some of my scraps of Flowers for Every Season 6×6 DSP (item #152486, currently on sale for $6.90 on stampinup.com during the Annual’s Last-Chance sale). I found three long and skinny scraps that were around the same size and had a pretty pattern among them that I could use as a center strip.
I decided touse the Misty Moonlight color in two of the strips as the color of my card base, and I glued a mat of Very Vanilla cardstock(item #101650) atop the card base, leaving about an 1/8″ border, to give some separation and definition to the colors in the papers that would be on top. (Forgive me for the guesstimate, but I don’t really measure things; I just work with things until they feel right.)
Once I glued the patterned DSP, I felt the strips also needed some Very Vanilla to break the color clash. Those strips are definitely an 1/8″ each becauseI cut them with my trimmer intentionally. 🙂 I also measured the smaller edge of the DSP strips so that Icould place the floral pieces in exactly thecenter. I use a ruler on my work mat and inch inward by eighths and quarters until I figure out where the middle is. (I do better with seeing physical measurements than with abstract figures.)
To add the butterfly, I first took a piece of recently sold-out Bijou ButterflyDSP and fussy-cut the largest butterfly with my Paper Snips before popping up the butterfly on foam Dimensionals (item #104430) in the top half of the card, leaving room for a sentiment below.
To create that sentiment, I used one of the Stitched with Whimsy Dies (item #155314) and Misty Moonlight ink (item #153118) with a sentiment from the Friends Are Like Seashells stamp set (item #158203).
I first took the die to a scrap of Very Vanilla, which impressed the stitching into the paper. The die does not cut around the stitching; I fussy-cut around it myself with my Paper Snips (item #103579) using the edge of the impression as a guide and then edged it with a Misty Moonlight Stampin’ Write Marker (item #153125 for the In-Color Pack of five).
Then I placed my sentiment stamp on my Stamparatus stamping platform (item #146276), created a few test sentiments forplacement, and finally stamped it where it would fit before decorating the sentiment box with embellishmentsfrom Wonderful Gems, Blue Adhesive-Backed Gems (item #153547), 2020-2022 In Color Enamel Dots (item #152480), and Playing with Patterns Resin Dots (item #152467).
I was able to pull out each of the colors used on the card with those embellishments, so Iwas pleased. (The white space in the corner was just too much for me. If you follow my blog posts, you’ll have heard that I’m not a big fan of white space.) I alsofelt that doing something different with the gems in that way spoke to the “unique” idea of the card.
I plan on decorating the inside of the card with a thinner strip of the floral paper and then selling the card to my local gift shop so one of their buyers canencourage a friend or relative too.
I hope you’veenjoyed my card today. To continue on with the hop, press the Previous and Next buttons or click on the linked names in the list. My team members always come up with inspiring and beautifulprojects! Thanks again for hopping with me. If you like this card, please leave a comment orconsider following my blog for future posts. 🙂
Hello again! I am trying to blog more often. I just have a quick-and-simple notecard to share today. Things fell into a card again when I saw pieces next to other pieces that I hadn’t actually intended on putting together, until I realized they worked as such. In this case, it was a card sentiment piece by Graphic 45 next to some paper that came out of a UK magazine.
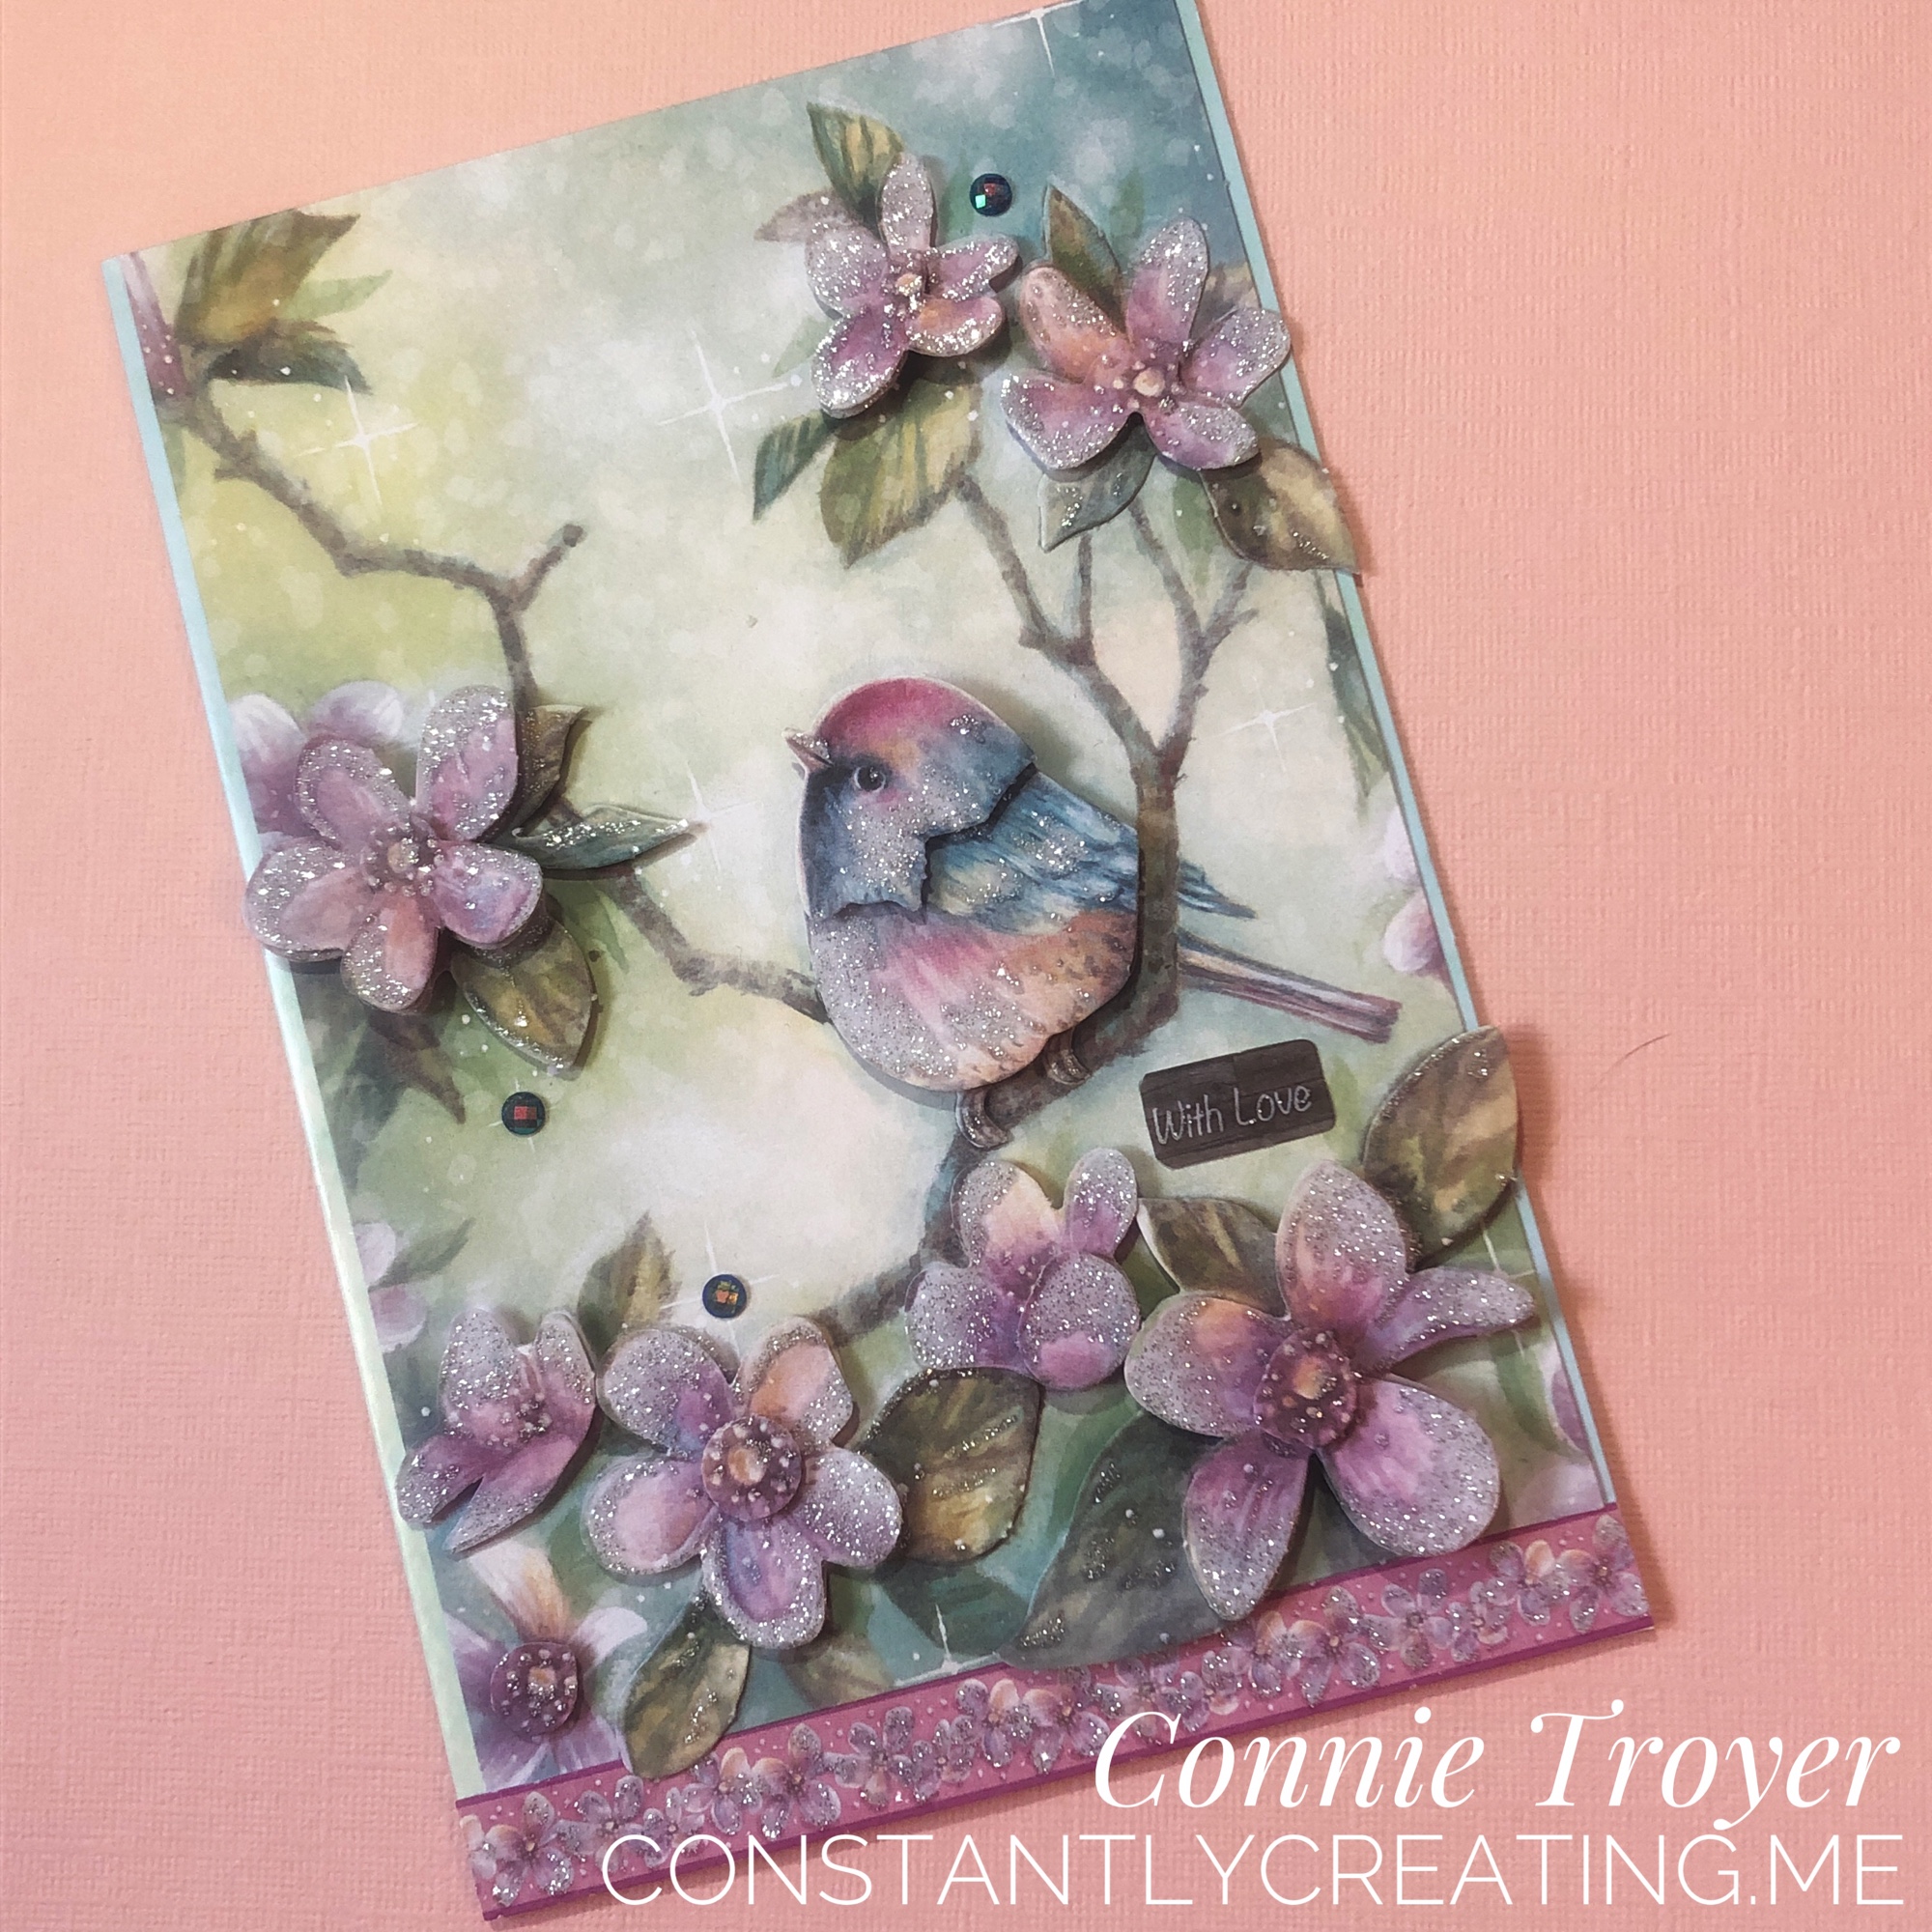
I had pulled the papers from my UK stash for at least a couple of other cards. One of those became the bird-with-flowers decoupage card I’ve already blogged about. I started this notecard by selecting one out of my premade/prescored Stampin’ Up notecards and envelopes pack (item #159232 for Basic White and item #144236 for Very Vanilla), and then I cut the two papers for the background. The purple layer may have already been a scrap that was smaller; I don’t recall now. But I’m not a huge fan of taking papers to the edges of cardstock anyway. They are hard to line up (especially these thin UK papers) and even if I use liquid glue, there’s rarely enough slideability to move it around, for my liking.
I have some Scotch ATG tape that didn’t peel off the correct way to be able to use it in the tape gun, so I’m laying it and using it a piece at a time as I cut it, and that’s what I did to the background papers here. It is too easy to tear or wrinkle the thin UK papers with some kind of handheld glue gun. (Thankfully, the Stampin’ Up patterned paper I sell isn’t like that at all, and our adhesive is better too!) But this method worked for applying adhesive in that specific card situation. And I’m slowly using up the rolls that won’t work in the gun as well. Wish I’d thought of it years ago.
I tied some retired Crushed Curry Baker’s Twine from Stampin’ Up around the front image piece from Graphic 45 before mounting the piece to foam dimensionals (item #104430 for the full size or item #144108 for the mini size. Black dimensionals are also available if that is your preference.).
Once I took the backings off the foam dimensionals and stuck the topper to the card base/patterned papers, I then took my Wink of Stella Clear glitter brush (item #141897) to the butterflies. Some sparkle is visible in the card photo, but it’s hard to capture the glimmer well on camera. It makes a much bigger impact in person.
I haven’t added any bling yet and I may not. I try not to cause rhinestones-through-the-envelope issues. 🙂 (Though if you like to include those, one tip is to put the rhinestones under the back flap of the envelope so that there are two layers of paper to burrow through first. 😉 )
So that’s it for this card. Clean and simple, fast and easy, the kind of card I’m beginning to appreciate with a full schedule. 🙂 Hope you try one too! Below are some suggested items you can use to put together a card like mine.
I made a sweet little 3D dry decoupage card from a UK magazine kit last week when I was supposed to be cleaning off my desk. It was just too irresistible not to make! Silver glitter accents the bird, flowers, and bottom border. Foam pads pop up various levels of flowers and the bird for definition. I modified the “Made with Love” label they gave me so it could be used with several kinds of cards. I think I will add matching paper and a butterfly to the inside. It’s the perfect little springtime card.
.
Currently for sale if someone wants to claim it – $5 plus first-class shipping or have me add it to a stack already in process for you! 🙂
Using up a favorite piece of paper with a favorite technique—and it’s so easy that anybody can do it!
Hi, everybody! I’ve had quite a good run on cardmaking lately. I need to be reorganizing my craft room too but can’t seem to stay away from the desk! I know my schedule will be changing soon with springtime, so I’m thankful the creativity is here while it’s here.
One of the challenges I have in my craft room (just a secondary bedroom) is the amount of stuff—consumables like paper, embellishments, and more—due to the number of years I’ve been crafting (paper crafting for about 30 years now; other types, longer). I do confess: I LOVE paper and embellishments. I love having just the right special little thing to add to a card or scrapbook layout to top it off and make it perfect (or as perfect as the receiver will believe it to be 😉). And don’t even get me started on all the beautiful patterns and color choices I have in paper.
Sadly, as my “collection” grows and I fight losing space within four walls, I find myself striving more earnestly to use up my consumables to gain space. I’m not sure this will really work, considering how little room a few pieces of paper and gems take 😆, but I’m going with that for now in an attempt to feel as if I’m progressing somewhere. But that theory is why I made the card I’m sharing today.
I don’t actually know the name of the company who made today’s beautiful background. Sometimes I get papers from other crafters in destashes or swaps or RAKs (Random Acts of [Craft] Kindness). I had only two pieces of this one and always thought them beautiful but I’d moved them around a few times—in and out of the “make these next” piles of card parts, different storage options, and the like. The day I made this card, they moved from “make this sometime” to “make this NOW.” The design was too pretty to put off any longer. But I wasn’t sure what I wanted to do with it (the very reason, I suspect, that I kept moving it around in the first place). I first made a card base out of Stampin’s Up’s Misty Moonlight cardstock(item #153081), which matched the roses perfectly, while I continued to think. I use their cardstock for 99% of my card bases; this color is the regular 80-lb weight.
I must have had 3D things still in my subconscious after making the bird/flower card from a UK magazine kit in a previous post, because I was suddenly willing to sacrifice BOTH pieces of this pretty paper. I latched onto an idea of popping up some of the roses from one sheet on foam dots to give them dimension and make them 3D on the actual card. I cut out the two trio bunches for this and used Stampin’ Up’s self-adhesive Dimensionals underneath (item #104430, current). And then I used my Wink of Stella White and Clear glitter pens on top of all the lightest blue roses, because it’s been my go-to thing lately. I recently opened a new Clear one (item #141897, current) and am loving the amount of glitter it puts out. So fast and easy with an “Ooh, pretty!” punch. 🙂 The White one gives a nice whitewashed look (I only used it on the centers), but I didn’t think it was dramatic enough since the roses were already sketched with white too. It just softened the middles a little.
I was arbitrarily chatting while making this card (“Attempted Multitasking” is often my middle name), so I wasn’t feeling like complicating things further by sorting through my stamp sets, finding a sentiment that fit, hoping to ink and stamp the thing properly in between the dimensional roses—I needed more fast and easy. And then my eyes fell on some recent Paper Pumpkin sets I have stacked nearby. (Yes, Connie should make an effort to use these up more quickly—it will save space! 😂) I hadn’t even opened February 2021’s “Bouquet of Hope” kit yet but I thought there was something in there (consumable) that I could use, from what I was remembering from the promo pictures. Sure enough, sentiments in three languages, in die-cut sticker form. Perfect. And the English one even fit. No mess, no fuss, and I could nestle it into place without worrying about accidentally inking up 3D roses.
I decided to cut apart the “of” and “you” words because I didn’t like how close to the edge the “you” was falling, right where a right-handed person would hang onto the card. But what to do to make everything fit? Well, I ended up sticking the “of” to the top of the bottom dimensional roses and thinly chopping up Dimensional pads to fit under the part of the “f” that hung over the flower. That was tricky, yes. But it’s possible.
Then, time for embellishments! Stampin’ Up to the rescue again (and more gems used up!). I have previously hesitated on adding the Matte Black Dots (item #154284, current) to the top layers of my projects because they’re about 1/8” thick and I often “card” in layers, stacking things even higher. But here I could use them on the bottom layer without fear because the top layer would be against the envelope. 😁 I also scribbled some fake black dots onto the topmost rose trio since I didn’t want to chance them poking through the envelope when mailing. I used my black glitter brush from Art-C for that (very similar to Wink of Stella). I also added three champagne-colored gems from the Elegant Faceted Gems pack (item #152464, current) to the bottom layer to pick up the yellow/gold tones of the smaller flowers in the background. And that took care of the outside of the card.
I kept the inside even simpler. I have several ongoing card orders to fill all the time these days, and one is for a lady who likes a simpler style. (That’s hard for me, but she’s helping me learn it!) I did think of her while making both the outside and the inside of the card, wondering whether she would want it, so I deliberately left the inside blank with just a strip of leftover background paper at the edge of miscellaneous white writing space (a substitute would be Basic White cardstock, item #159276, current).
And now I’ve used up all that pretty paper. But it was worth it. 😍
Here are the links for what I’ve used in today’s post:
If you’d like to own any of these Stampin’ Up products yourself, you can go to my online store and shop with me at http://www.stampinup.com?demoid=2202334. The retiring list for the current Annual catalog hits this Wednesday!! Lots of good stuff coming! (But the Mini is still active until May 3. 😉) Contact me if you’d like paper catalogs instead. 🙂 You can also use Host Code WMW62ECS during checkout and receive a free gift! Orders totaling $50 before tax and shipping can choose a free gift from me up to $8 retail value; I’ll ship it separately to your preferred address after the order is placed. You’ll also earn 1 reward point toward a total of 8, which will get you a free $40 order from me. (And once you hit 8 points, the counter starts over!)
If you’d like to join a Stampin’ Up team and become a demonstrator yourself, I’d love to have you! I’m working on achieving some “leveling up” requirements and would be thrilled to have someone new! No pressure about sales amounts from me, ever. I know what it’s like to lead and juggle a busy life around many priorities. If you’re interested, contact me any time or check out my joining link at http://www.stampinup.com/join?demoid=2202334.
Check back on Wednesday for the 2020-2021 Annual retiring list! And thanks for stopping by. 🥰
FREE SHIPPING Today Only at stampinup.com! Check out with me for a free gift!
Heads up, crafters! Stampin’ Up is offering FREE SHIPPING for one day only—March 17—till midnight, on orders of $50 before tax/shipping are figured out! (If you have coupons to add to your order to lower the price, the total you will actually pay still needs to be $50 or above before tax.
With the catalogs coming to a close in a couple of months, this is a great time to stock up on any retiring In-Colors you may need or cardstock, which is heavy to ship. Bundled 10% off prices will generally be going away when the catalogs end too, so there’s not much time left to take advantage of that. Also, the retiring list for the Annual catalog hits next week, and things will start to fly off the online shelf quickly after that. This year’s retiring In-Colors are Purple Posy, Rococo Rose, Pretty Peacock, Seaside Spray, and Terracotta Tile.
To place an order in my online store, go to https://www.stampinup.com/?demoid=2202334, and you can use Host Code WMW62ECS for a free gift from me! You can choose your own gift of up to $8 retail with an order of $50 or more before tax and shipping (see how these numbers work out—free shipping and a free gift? Why not?!). Contact me if you have any questions!
Playing with pieces and parts can make something beautifully unexpected.
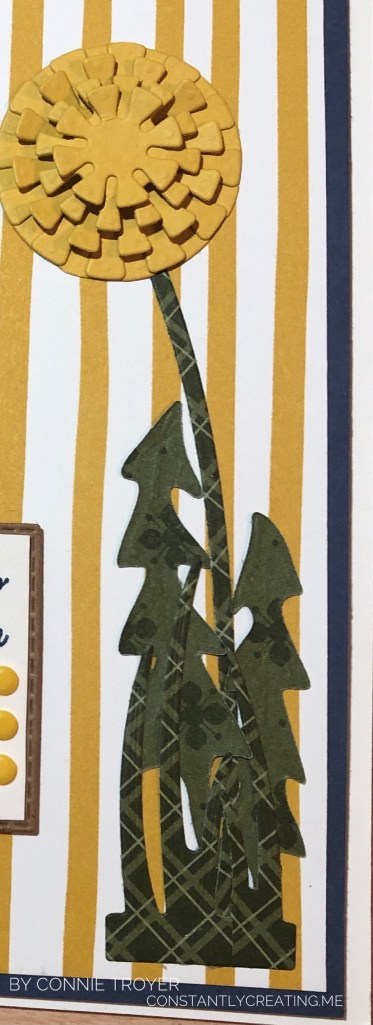
Hello again, and welcome back to my blog! I’m joining Amy Koenders and the rest of my Stampin’ Up team for Stamp with Amy K’s Tuesday Blog Hop group—and this month we’re celebrating spring with our cards! (Spring IS on its way, right? It may look all green right now in Ohio, but we’ve been fooled before!) One of the things my husband watches for as spring breaks is how high the grass grows (read: how soon he’ll have to mow). And what comes with the growing grass but dandelions? Sometimes lots of them, if you put off the mowing! 🙂 I always liked it when they turned white and round and seedy when I was a kid, but I’m featuring the younger yellow kind on my card today. 🙂
My card also works for the Paper Players challenge this week, as they are focusing on spring cards as well. I’m linking my card to their challenge too. 🙂
I started making my card a couple of weeks ago, but the blog deadlines pushed me to finish it. I knew what I wanted to do; I just picked up other things first. (In between, I made a baby card, a wedding card, and the Alice in Wonderland “Hello there” card I posted on Instagram [see it at annegirl77!].) Does anyone else work on several cards at once, or is it just me? My attention wanders where it wills, creatively, and then I finish a bunch of cards at once. I didn’t set out to do anything specific with this card. It was just that the scraps from the last couple of posted dandelion cards were still sitting nearby and I wanted to use them up. I was merely playing around with the products and liked what was developing. I do love those yellow dandelions on the blue background, though. 🙂
For this card, I started with one of the AssortedMemories and More Cards and Envelopes (item 159234). I’m still using up my old Whisper White ones, so since I was just playing and didn’t know what I was making, I didn’t intentionally grab one of the yellow-and-white card bases in the Dandy Garden Memories and More Cards and Envelopes. So you might decide to change that if you make a similar card.
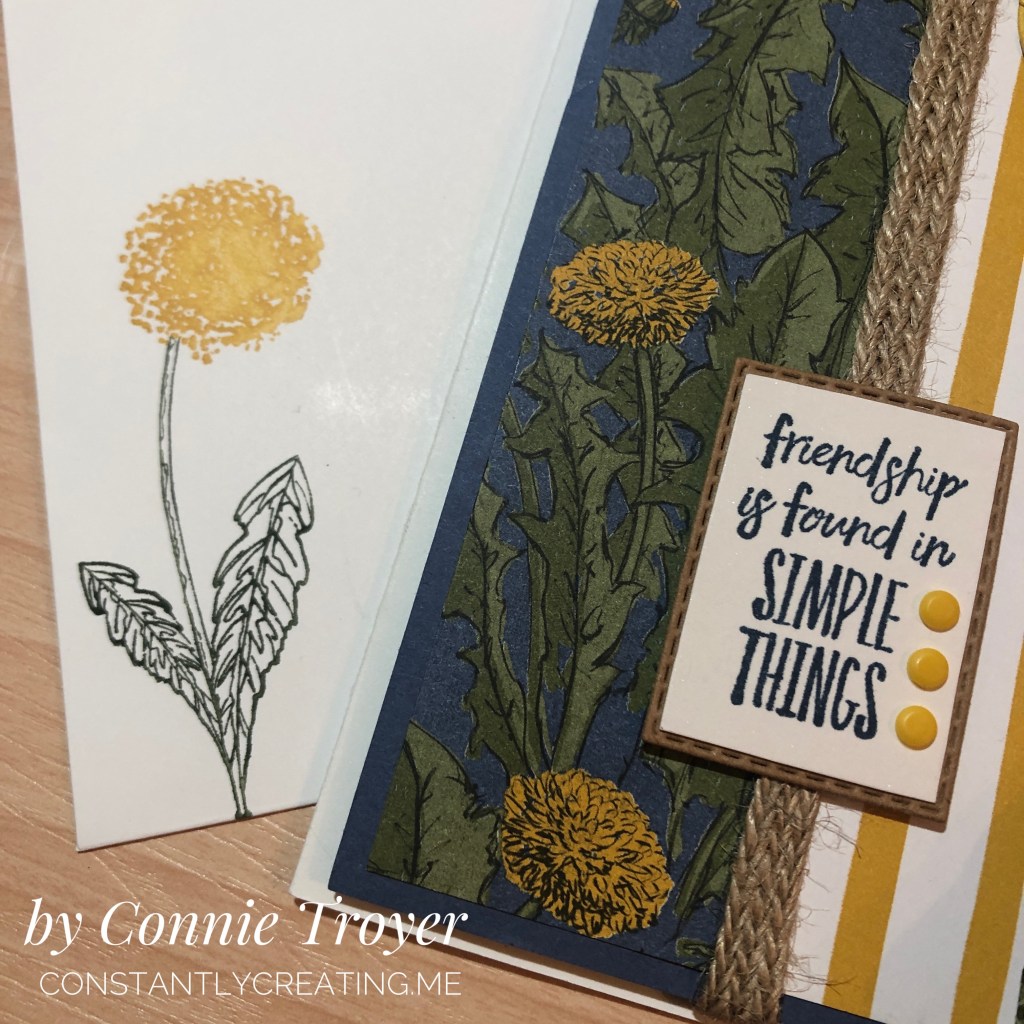
I made my bottom background layer out of a piece of Misty Moonlight Cardstock (item 153081). It measures 6″ by 4″. I didn’t adhere it right away, though. I built my scraps of Dandy Garden 6″ x 6″ Designer Series Paper (item 154297) on top of it instead. One side of the card, the DSP is 1.75″, and the other side is 2.25″. I love the Braided Burlap Trim I put with it, but it is retired. If you want to stay current, you could try the 3/8″ Fine Art Ribbon (item 154561). I used my burlap ribbon to cover the seam where the two papers met. When I did adhere the background assortment to the card base, I popped it up onto Foam Adhesive Strips (item 141825) so that the thickness of the Braided Burlap Trim wasn’t an issue with the papers below it in terms of bulges or strain on the pieces. The dimensional foam strips allowed me to tuck the ribbon under the cardstock without any worry that something would tear later or look funny.
Then I got to wondering what to put on the yellow-and-white striped DSP. I hadn’t used my Dandy Wishes Dies yet (item 154315), so I made a yellow dandelion to match the other side of the paper, which has three. I cut the five layers of the blossom from Bumblebee Cardstock (item 153077) and layered the two largest graduated sizes together, gluing them completely flat. But for the next three layered sizes, I curved the little squares of the outer rims (I’m sure there’s a better name for this) in opposite directions, and I put one Stampin’ Dimensional (item 104430) in between the middle layer and the second from the top. With my fingers, I curved the middle layer (the largest of the top three) up toward me, then the next smallest size down toward the card, and then up toward me again for the smallest layer. The smallest is about 3/4″ across. The bending of the square “petals” gives it a 3D look as it pops out at the recipient yet isn’t too high to mail. When I glued them, I made sure to stagger the squares onto the empty spaces of each layer under it. It looks pretty cool in person.
I cut the stem and the leaves of the dandelion from a double-sided piece of Mossy Meadow DSP from the Neutrals 6″ x 6″ Designer Series Paper (item 155226). This was one of the five DSP packs that new demonstrators got as their free gift when they joined during this passed Sale-a-Bration. One perk of already being a demonstrator is that we get to order these kinds of products too. 🙂 There are several great designs in the pack of ten colors (times five), so I will be using them a lot. (I’m sorry that this is now two non-current items on my card, but I didn’t have any blogging intentions at the time of creation. I’m sure that whatever you use will look wonderful too!) I wish I had reversed the direction of the two taller “toothy”-looking leaves, though, because I feel like they’re too close to the stem this way. Dandelions spread out more, I think. (Of course, since my husband is the one who mows the lawn, I haven’t had to look at dandelions recently. :-D) If I make the card again, I will switch them. I do like how the two different patterns give definition and individuality to the bunch. Everything blended in too much when they were all the same pattern. I cut and glued the two grass dies on and under the leaves for an illusion of dimension.
For the sentiment, I held up several and determined that the friendship one from Enjoy the Moment (item 154452) fit best in the die I’d already selected from the Rectangle Stitched Dies (item 151820). I didn’t want one that was too tall or too wide, just something that nestled in there quietly between the art elements. I stamped the sentiment in Misty Moonlight ink (pad item # is 153118) on Shimmery White Cardstock (item 101910) because I just love the sparkle in the latter! I use it often. I die-cut the white cardstock and also decided to die-cut one in kraft cardstock (another retired item). Then I manually cut off the stitched border of the white, along with a bit more with my Paper Snips (item 103579) so I could layer the two cardstocks together. I thought the kraft cardstock looked nice against the burlap ribbon and gold/brown tones of the card. Last, I added three of the smallest Playing with Patterns Resin Dots (item 152467) in Crushed Curry on the sentiment. I almost went with two, but three filled up all that white space beside the sentiment. You may choose to do something else.
I guess that’s it for how I did the outside. I made the inside sentiment (“I’m So Happy I Found You”) from the Friends Are Like Seashells stamp set (item 154368) on Shimmery White cardstock, which was stamped in retired More Mustard ink since I don’t own the In-Color Bumblebee ink pad or refill yet. I also matted the white piece with Misty Moonlight cardstock so it would pop off the page better. I cut out the words with the smallest longest die in the pack and chose the next size up for the Misty Moonlight layer. I off-centered them against the middle to save some room. On my border piece, the blue cardstock was left over after I cut two horizontal edges to use on other projects. It was tidy enough that I thought I could use it here too. I used stickers from the sticker packs in the Dandy Garden Memories and More Card Pack (item 154302) to decorate the inside border.
I also decorated the envelope by stamping two pieces of flowers from the Garden Wishes stamp set item (item 154408) with my Stamparatus (item 146276). I used my Stampin’ Write markers to color them since I only have the Bumblebee color in a marker (it’s a current In-Color, and I purchased that set of five markers). I stamped on the front of the envelope, which I rarely remember to do, because the matching 6″ x 6″ DSP was not large enough to cover the entire flap in this size of a card. 🙂
Well, that’s all I have for you today. This card was pretty easy overall. I hope you enjoy making one of your own. Thank you for visiting my blog today; I love readers! Be sure to hop down the list of my teammates to see the beautiful “spring” cards they’ve made for you!
Click the Previous button to go back to Donna Leonard’s blog!Click the Next button to go forward to Jillian Good’s blog!

![IMG_E3143[1]](https://constantlycreating.me/wp-content/uploads/2023/06/img_e31431.jpg?w=840)
![IMG_E3144[1]](https://constantlycreating.me/wp-content/uploads/2023/06/img_e31441.jpg?w=840)