Thinking of You Card in Blue Roses (Stampin’ Up Embellishments and Paper Pumpkin Sentiment)

Using up a favorite piece of paper with a favorite technique—and it’s so easy that anybody can do it!

Hi, everybody! I’ve had quite a good run on cardmaking lately. I need to be reorganizing my craft room too but can’t seem to stay away from the desk! I know my schedule will be changing soon with springtime, so I’m thankful the creativity is here while it’s here.

One of the challenges I have in my craft room (just a secondary bedroom) is the amount of stuff—consumables like paper, embellishments, and more—due to the number of years I’ve been crafting (paper crafting for about 30 years now; other types, longer). I do confess: I LOVE paper and embellishments. I love having just the right special little thing to add to a card or scrapbook layout to top it off and make it perfect (or as perfect as the receiver will believe it to be 😉). And don’t even get me started on all the beautiful patterns and color choices I have in paper.

Sadly, as my “collection” grows and I fight losing space within four walls, I find myself striving more earnestly to use up my consumables to gain space. I’m not sure this will really work, considering how little room a few pieces of paper and gems take 😆, but I’m going with that for now in an attempt to feel as if I’m progressing somewhere. But that theory is why I made the card I’m sharing today.

I don’t actually know the name of the company who made today’s beautiful background. Sometimes I get papers from other crafters in destashes or swaps or RAKs (Random Acts of [Craft] Kindness). I had only two pieces of this one and always thought them beautiful but I’d moved them around a few times—in and out of the “make these next” piles of card parts, different storage options, and the like. The day I made this card, they moved from “make this sometime” to “make this NOW.” The design was too pretty to put off any longer. But I wasn’t sure what I wanted to do with it (the very reason, I suspect, that I kept moving it around in the first place). I first made a card base out of Stampin’s Up’s Misty Moonlight cardstock (item #153081), which matched the roses perfectly, while I continued to think. I use their cardstock for 99% of my card bases; this color is the regular 80-lb weight.

I must have had 3D things still in my subconscious after making the bird/flower card from a UK magazine kit in a previous post, because I was suddenly willing to sacrifice BOTH pieces of this pretty paper. I latched onto an idea of popping up some of the roses from one sheet on foam dots to give them dimension and make them 3D on the actual card. I cut out the two trio bunches for this and used Stampin’ Up’s self-adhesive Dimensionals underneath (item #104430, current). And then I used my Wink of Stella White and Clear glitter pens on top of all the lightest blue roses, because it’s been my go-to thing lately. I recently opened a new Clear one (item #141897, current) and am loving the amount of glitter it puts out. So fast and easy with an “Ooh, pretty!” punch. 🙂 The White one gives a nice whitewashed look (I only used it on the centers), but I didn’t think it was dramatic enough since the roses were already sketched with white too. It just softened the middles a little.

I was arbitrarily chatting while making this card (“Attempted Multitasking” is often my middle name), so I wasn’t feeling like complicating things further by sorting through my stamp sets, finding a sentiment that fit, hoping to ink and stamp the thing properly in between the dimensional roses—I needed more fast and easy. And then my eyes fell on some recent Paper Pumpkin sets I have stacked nearby. (Yes, Connie should make an effort to use these up more quickly—it will save space! 😂) I hadn’t even opened February 2021’s “Bouquet of Hope” kit yet but I thought there was something in there (consumable) that I could use, from what I was remembering from the promo pictures. Sure enough, sentiments in three languages, in die-cut sticker form. Perfect. And the English one even fit. No mess, no fuss, and I could nestle it into place without worrying about accidentally inking up 3D roses.

I decided to cut apart the “of” and “you” words because I didn’t like how close to the edge the “you” was falling, right where a right-handed person would hang onto the card. But what to do to make everything fit? Well, I ended up sticking the “of” to the top of the bottom dimensional roses and thinly chopping up Dimensional pads to fit under the part of the “f” that hung over the flower. That was tricky, yes. But it’s possible.

Then, time for embellishments! Stampin’ Up to the rescue again (and more gems used up!). I have previously hesitated on adding the Matte Black Dots (item #154284, current) to the top layers of my projects because they’re about 1/8” thick and I often “card” in layers, stacking things even higher. But here I could use them on the bottom layer without fear because the top layer would be against the envelope. 😁 I also scribbled some fake black dots onto the topmost rose trio since I didn’t want to chance them poking through the envelope when mailing. I used my black glitter brush from Art-C for that (very similar to Wink of Stella). I also added three champagne-colored gems from the Elegant Faceted Gems pack (item #152464, current) to the bottom layer to pick up the yellow/gold tones of the smaller flowers in the background. And that took care of the outside of the card.

I kept the inside even simpler. I have several ongoing card orders to fill all the time these days, and one is for a lady who likes a simpler style. (That’s hard for me, but she’s helping me learn it!) I did think of her while making both the outside and the inside of the card, wondering whether she would want it, so I deliberately left the inside blank with just a strip of leftover background paper at the edge of miscellaneous white writing space (a substitute would be Basic White cardstock, item #159276, current).

Connie Troyer, ConstantlyCreating.Me

And now I’ve used up all that pretty paper. But it was worth it. 😍

Here are the links for what I’ve used in today’s post:

Product List

If you’d like to own any of these Stampin’ Up products yourself, you can go to my online store and shop with me at http://www.stampinup.com?demoid=2202334. The retiring list for the current Annual catalog hits this Wednesday!! Lots of good stuff coming! (But the Mini is still active until May 3. 😉) Contact me if you’d like paper catalogs instead. 🙂 You can also use Host Code WMW62ECS during checkout and receive a free gift! Orders totaling $50 before tax and shipping can choose a free gift from me up to $8 retail value; I’ll ship it separately to your preferred address after the order is placed. You’ll also earn 1 reward point toward a total of 8, which will get you a free $40 order from me. (And once you hit 8 points, the counter starts over!)

If you’d like to join a Stampin’ Up team and become a demonstrator yourself, I’d love to have you! I’m working on achieving some “leveling up” requirements and would be thrilled to have someone new! No pressure about sales amounts from me, ever. I know what it’s like to lead and juggle a busy life around many priorities. If you’re interested, contact me any time or check out my joining link at http://www.stampinup.com/join?demoid=2202334.

Check back on Wednesday for the 2020-2021 Annual retiring list! And thanks for stopping by. 🥰

Birthday Wishes with Stampin’ Up’s Dandy Garden Memories and More for Amy’s Inkin’ Krew Blog Hop

Make an easy birthday card (or any other occasion!) with the Dandy Garden Memories and More Card Pack!

Hello again, and welcome back to my blog! Thanks so much for being here. I’m hopping with my teammates from Amy Koenders’s Inkin’ Krew, and we are showcasing birthday cards this month.

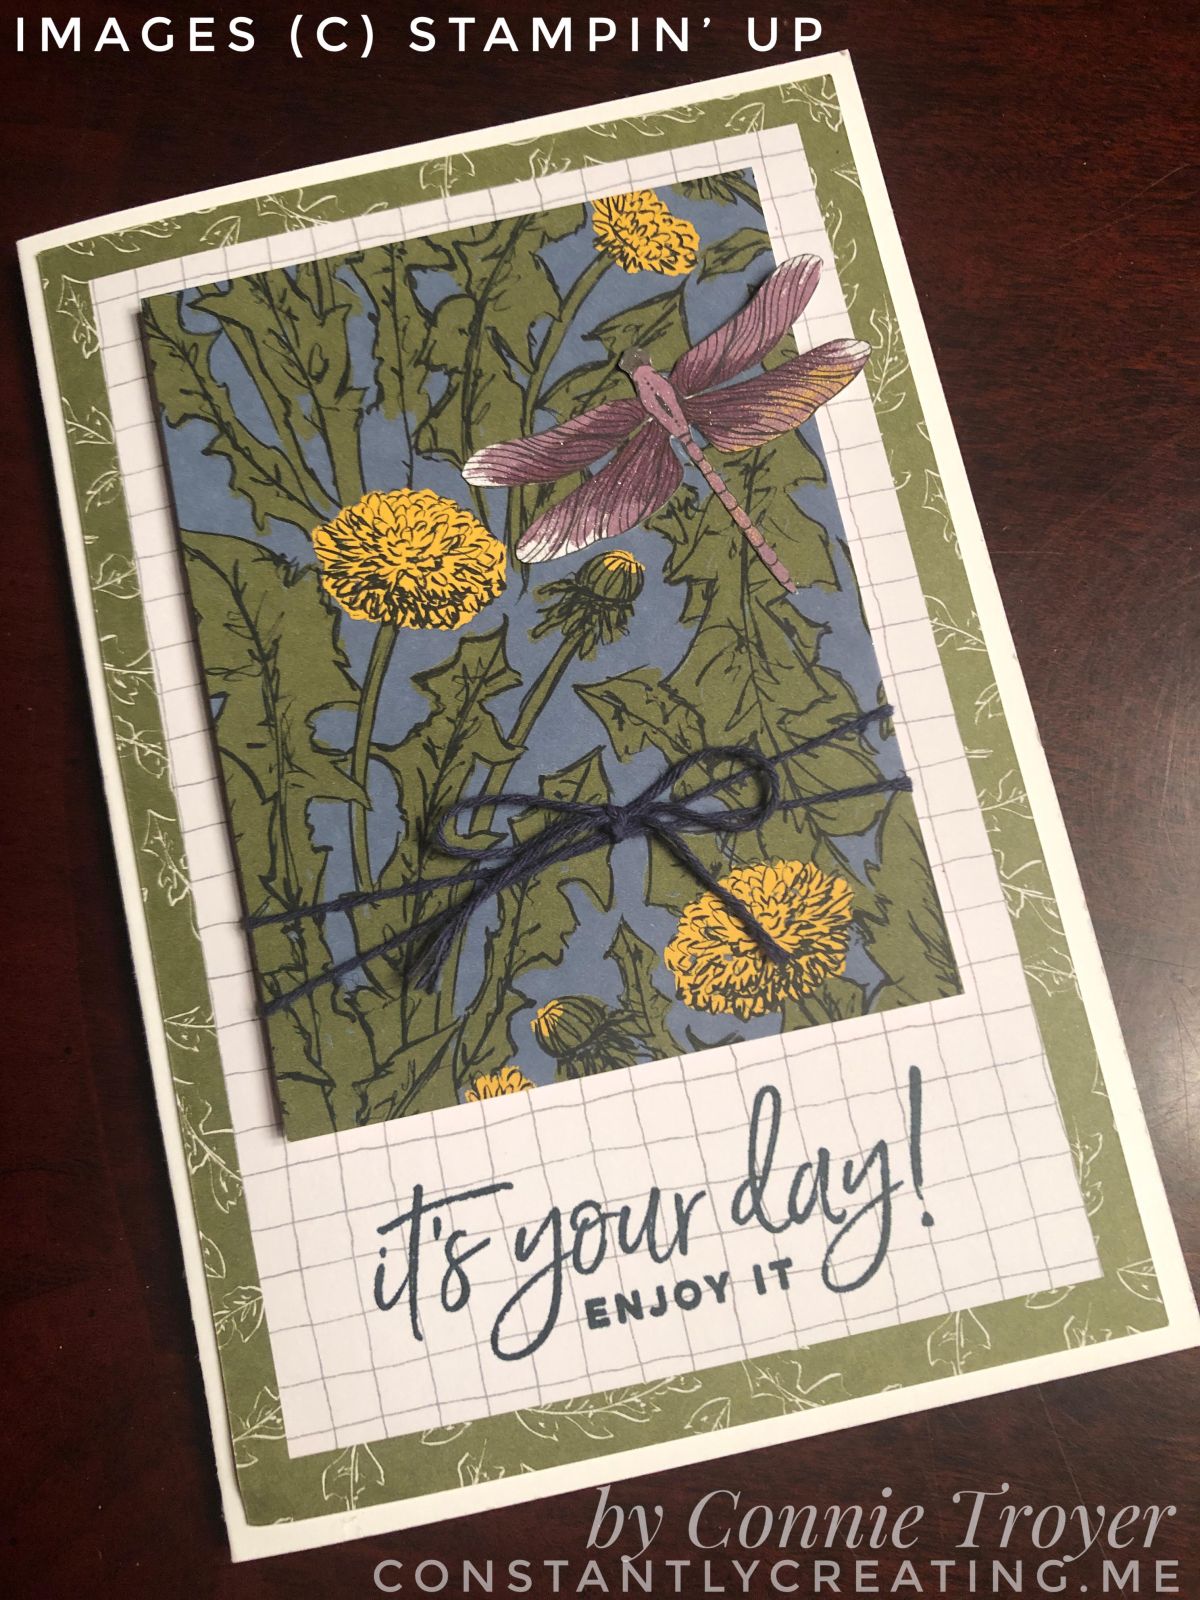
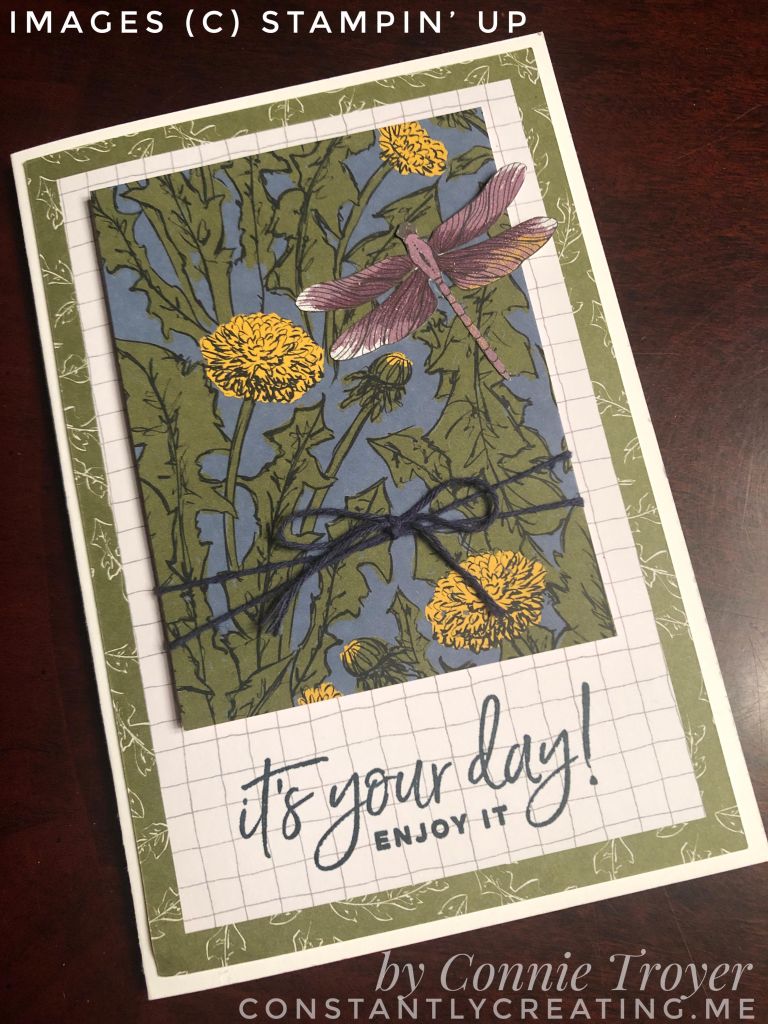
I unexpectedly put most of this card together while gathering some supplies to gift another Stampin’ Up demonstrator friend. As I pulled cards for my friend to use from the Dandy Garden Memories and More Card Pack (item 154302), I realized that the larger grid card (which I consider the back of a “prettier” one) went well with the smaller colored dandelion card I’d also pulled. They just looked so nice beside each other that I had to do something about it. 🙂 Since there are two of each card in the card pack, I sent her one and made mine into a card right away.

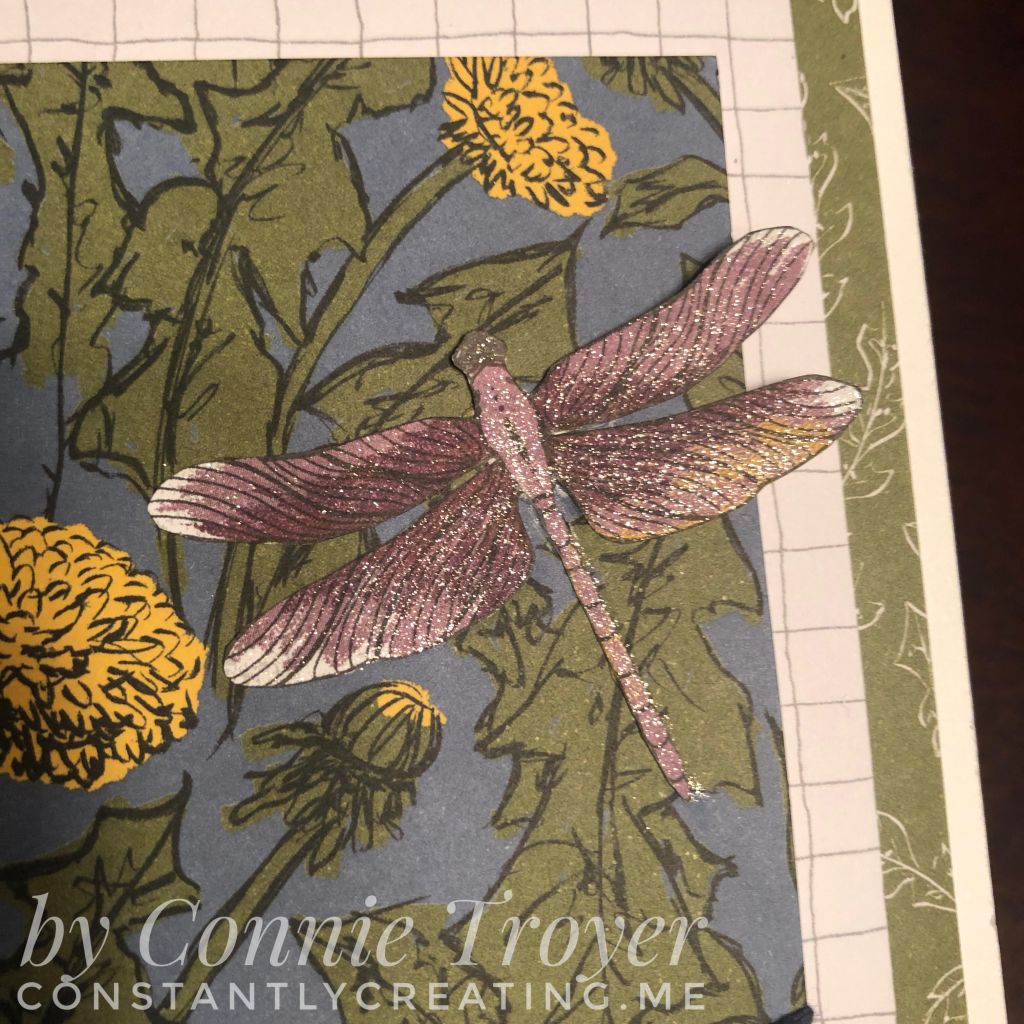
I appreciate how the grid has that colored “frame” around it, which makes it look like another layer. It is just one card from the pack. I used the Night of Navy twine from the Well Suited Twine Combo Pack (item 154566) and wrapped it around the focal card, offsetting it, before adding Mini Stampin’ Dimensionals (item 144108) onto the back. Then I centered the dandelion card high inside the grid. I took a piece of dragonfly paper from the Dandy Garden 6×6 Designer Series Paper (item 154297) pack and my Dragonflies Punch (item 154240) and punched a dragonfly that I could hover over a dandelion. I used the Clear Wink of Stella Glitter Brush (item 141897) over the entire dragonfly before adding cut-down Mini Dimensionals on the tips of the wings that are above the grid. Since I often do things out of order, I then added the cards to a card base from the Assorted Memories and More Cards and Envelopes pack. My pack happens to be the now-retired Whisper White version, but the Basic White pack is available now (item 159234). I do have some of the Basic White items to use later.

Close-up of Wink of Stella on the wings

I decided to use what I’d made thus far for the birthday blog hop, so I searched my shelves for an appropriate sentiment that would fit in the space under the dandelion/dragonfly card. (Yeah, I didn’t plan ahead. But it still works.) I had several sentiments to choose from and went with the Happiest of Birthdays stamp set (item 152539), which is a new set to me. I love the size and fonts of the sentiments in it. I see me getting a lot of uses out of this particular stamp set. I picked the “It’s your day! Enjoy it” sentiment, lined it up on the grid of the card with my Stamparatus (item 146276), checked that the stamp was also straight on the grid of the plate, and inked it up with the In-Color Misty Moonlight ink (item 153118). Stampin’ Up’s In-Colors are only available for two years from the beginning of their release period. Luckily for me (because it’s one of my favorite colors), Misty Moonlight will be here through mid-2022 since it just came out last summer. I secondarily tested my inked stamp for alignment by first bringing the plate down to a sheet of the Small Grid Paper (item 149621), which fits the Stamparatus perfectly. I’ve found I’m happiest with my stamping that way. I cleaned my stamp with our Simply Shammy (item 147042).

I haven’t made the inside of the card because I’m not sure where it’s going yet. I’ll likely carry over some of the matching Designer Series Paper to the inside before I pick a sentiment.

To see the other birthday cards my team members made, check out their links below or use the “Previous” and “Next” buttons. This team never fails to impress and inspire!

If you’ve seen something you like, a purchase of $50 before tax and shipping through my online store gets you a free gift and a point to my reward system. And don’t forget that during the rest of the month of February, you’ll also get to choose a free gift from Stampin’ Up if you order in increments of $50 or more! Who doesn’t love free stuff?!

Thanks again for stopping by, and comment if I can help you!

  1. Mary Deatherage – https://wp.me/p5snyt-gFY
  2. Jaimie Babarczy – https://wp.me/p79UhD-4Pn
  3. Jillian Good – http://dyedwith.love/?p=126
  4. Karen Ksenzakovic – https://wp.me/paaNf4-41V
  5. Leslie Larkin – https://leslielarkin.com/a-touch-of-ink-stamp-set/
  6. Akiko Sudano – https://wp.me/paOv8E-2pi
  7. Connie Troyer – https://constantlycreating.me/2021/02/09/birthday-wishes-with-stampin-ups-dandy-garden-memories-and-more-for-amys-inkin-krew-blog-hop/
  8. Sue Prather – https://wp.me/p5yitZ-2qO
  9. Terry Lynn Bright – https://tlsbrightspot.com/2021/02/09/stampin-up-you-are-amazing/
  10. Donna Leonard – http://stampdabbles.com/?p=4327
  11. Tara Carpenter – https://tarabethstamps.blogspot.com/2021/02/stampin-up-prettiest-birthday-card-for.html
  12. Krista Yagci – https://www.thestampingnook.com/post/stampin-up-hey-birthday-chick-and-stitched-whimsy-dies-birthday-card
  13. Amy Koenders – https://wp.me/p2SFwf-m62

A “For the Ladies” (Friendship) Card Using Stampin’ Up’s Beautifully Braided and Path of Petals (Tuesday Blog Hop with Stamp with Amy K)

Missing friends lately? Here’s an easy card you can make to remind your special relationships that they’re not forgotten!

Welcome, welcome! Despite coronvirus and economic shutdown and crazy March/April weather nationwide, it is somehow once again time for the Tuesday Blog Hop hosted by Stamp with Amy K (Amy Koenders). I’m back today with a friendship card that’s perfect for reaching out during this very odd time in our lives. Today’s blog hop is “for the ladies,” so it was created with my best friends in mind, to celebrate those relationships we’re grateful for and miss having in person right now.  Thanks for following along today and stopping in on my page.

img_9128

I woke up with a layout idea in my head about corner designs that I’ve never really tried before, and I was determined to give it a go. I’ve been working on an editorial project this week, so I didn’t have a lot of extra time to play around with creativity. It was more like “I only have [this much time], so I need to come up with something doable the first time around, and I need to do it now.” No pressure, right? With the layout and only the sketchiest of ideas in mind, I set to finding things that fit. I knew I wanted flowers. I always go to flowers, especially for women. They just brighten up my whole day and make me smile, and who wouldn’t want to make their friends smile?

Side note: you know, it’s always interesting to think about the creative process. At which points do you make decisions and proceed with them regardless of what happens during the interim? When do you redirect and try a different idea, after the first one brings contention? That’s sort of what happened to me here. In my head, I saw a landscape card with the top left and bottom right holding the flowers with the sentiment piece in the middle of the front. I had different options I could use for the background, embossing folders and stamps alike. And though the creative soul in me wanted to try several of the options to see what I liked best, I just kind of had to start with something and go with it.

I tried the Birch background stamp in Sahara Sand first since flowers make me think of trees and the rest of nature. (And because the embossing folder I really wanted to use is no longer current.) Here’s where I had to decide whether to proceed or redirect. I just could not get that stamp to line up correctly to do two beside each other in a horizontal fashion—the pattern on birch trees go horizontally, but the stamp is a portrait. The stamp isn’t big enough to cover one horizontal card front. And it’s not a photopolymer stamp to be able to line it up correctly. I tried to stamp it freehanded. I tried to do it using the Stamparatus. I both eyeballed and measured and frowned when necessary. I came close—but not close enough. And I decided I was tired of ruining cardstock. So rather than waste more time, I picked the one that came out the best and decided it was time to head a different direction.

The cardstock happened to be Very Vanilla, so that determined which shade and style I was going to be using. I cut off the cardstock and glued it on top of a new portrait card base (because I’d gotten ink on the other side of the first card base, of all things). I was suddenly stumped about how to arrange the rest of this card. It shouldn’t have been that hard, but the layout flip was messing with me and I couldn’t agree with myself about what would look like my original idea or what to use. I didn’t like any of it. The size was wrong. There was too much white space behind where I imagined the flowers (that I couldn’t commit to). Or the flowers were warring with the Birch background. All I knew was that I wanted to visibly set off the corners and perhaps also see a smaller diagonal strip and edge border extending from them. So I redirected again.

I kept the card base portrait style but started looking for Designer Series Paper to cover up the corners instead. As a longtime scrapbooker, I tend to fall back on DSP. I grabbed my 6×6 paper shares of current DSP, looking for something that would provide balance and grounding behind flowers. I thought one of the designs in the Perennial Essence DSP—one of the ones that remind me of a galaxy—would work for that job. So I took my little 6×6 square and looked for two blue corners that didn’t include many flowers on it, lopped off a corner where it worked, and then measured that corner against the rest of the DSP square to mark off and cut another for the opposite side. I glued down the blue corners on top of the birch background and stared at it. And decided that I didn’t like the stark color difference of the light background and the very dark corners. Any flowers I tried on top just didn’t please me. Frustration was building once more.

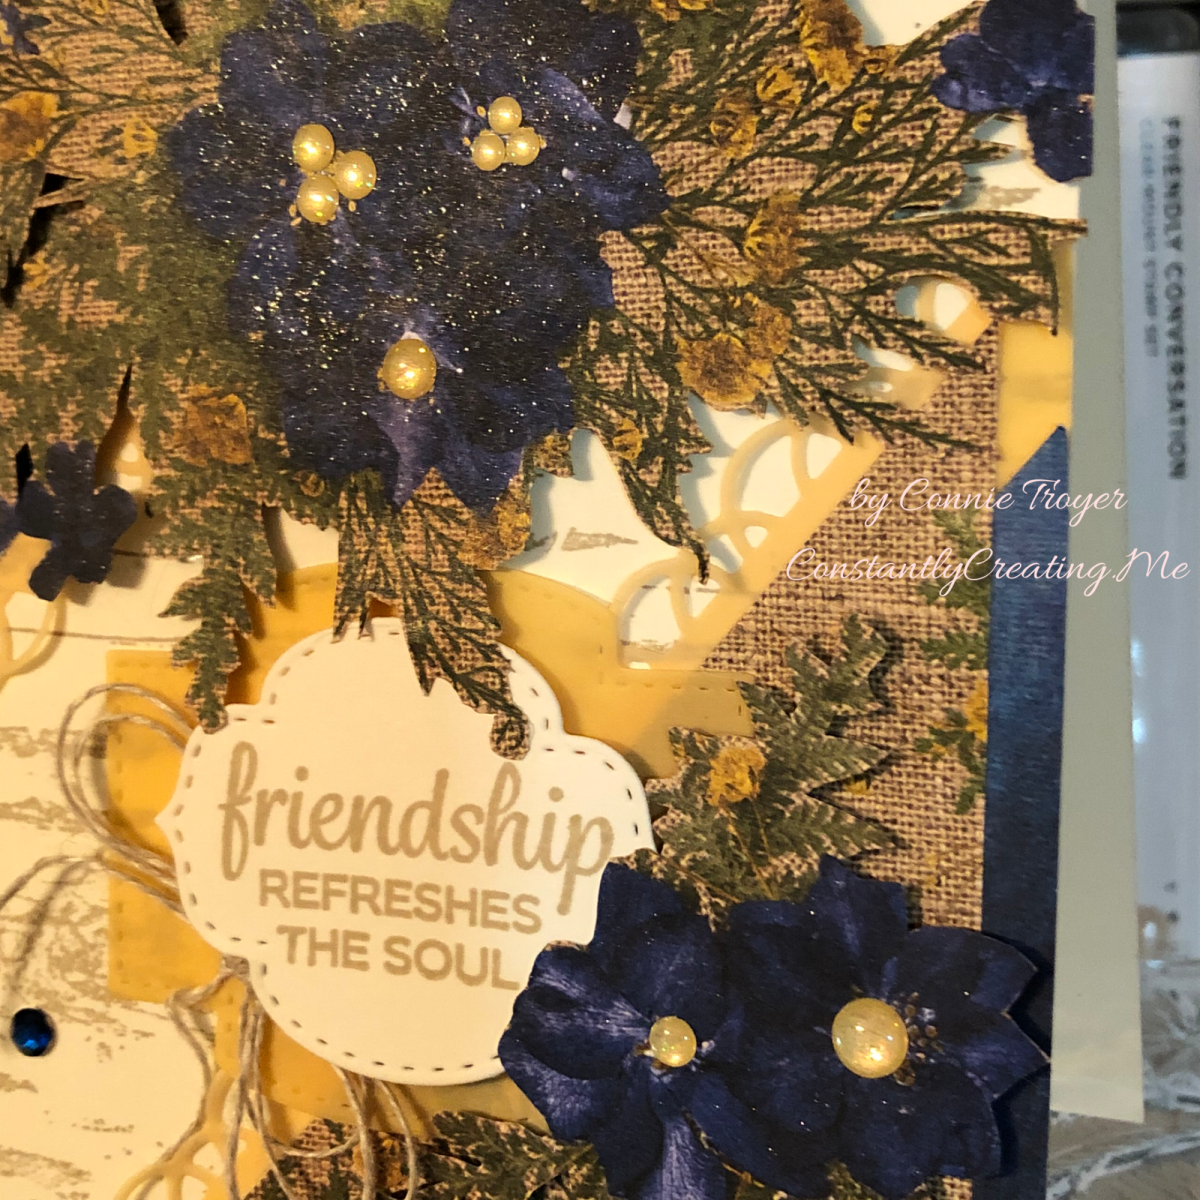
And then I saw it—paper that is so pretty, I almost want to weep. I’ve barely used it myself, other than cutting up some of the papers to give away at a party I demoed last fall. The Pressed Petals Specialty DSP has a paper in it with gorgeous blue flowers on burlap. Blue flowers that matched my Perennial Essence corners. …And then I realized that my last two little squares of that paper had flowers on them. Yes, I know I just said that. Light bulb moment—problem solved. No stamping needed! (This is why I love paper. 🙂 ) Rather than stamping and/or die-cutting flowers, I could merely cut out the ones in front of me and use those on the card, saving time and frustration! And so I did. I rough fussy-cut around one of the smaller blue flowers on my paper and one of large focal flower bunches. Usually I’m much more precise but the non-exactness went well with the rustic feel of the paper and I didn’t worry about it.

Then I had to finish the corners. With the blue galaxy already glued down, I did some mental aerobics and finally decided to offset the corners to show some of the blue and also work in the burlap. I took the square I’d cut into and sliced off the parts of the burlap paper left for the corners (which had a little bit of flowers too) by measuring it up against the corners already on the card. I then left a quarter of an inch margin showing when I glued them down. But that left a jagged edge on each side of the two corners, which felt odd. Here I went back to the layout in my head—I had already been thinking of using vellum to provide another smaller border coming out of the corner toward the center, along with some sort of decorative edge. But the elements were starting to fill up the card, and I wasn’t sure the sizing would work. Since I couldn’t quit looking at the jagged edges of both corners together, I decided to fill in those places with Petal Pink vellum from the Perennial Essence Vellum pack instead, so that’s why the corners are a little different. Accidentally on purpose, I guess. I also used that same vellum shade for the decorative border extending from the corners, and the die is from the Painted Labels dies.

After that it was just a matter of arranging where the bouquet and smaller flower went. I’m still not wild about my final placement of the large bouquet and my tags, but I love the location of the smaller flower next to the tag. In the end I saw that the large bouquet had a straight edge on it from where the paper was cut, so I just lined that up against my card edge, popped it up with 3D foam dots, and stuck it down, after figuring out the placement of the two tags from the Stitched So Sweetly dies with the smaller flowers. I should have brought the tags to the left a little more but I liked how the smaller flower sizes fit neatly into the corner and overlapped the tag. I did pop up the top layer of the tag with the sentiment. 🙂 I cut a piece of the Petal Pink vellum for the larger sentiment tag to give the Very Vanilla sentiment a bit of border and color as well.

I stamped the “Friendship refreshes the soul” sentiment from the Beautifully Braided stamp set in Sahara Sand ink as well as the inside sentiment (“Here’s to always finding joy in one another’s laughter, warmth in one another’s embrace, and love in one another’s love”) from the Path of Petals stamp set. I’ve used the inside sentiment for wedding cards before, but tonight, at least, I think it works for special friendships too. I “painted” the fussy-cut flowers with Clear Wink of Stella to give them some sparkle and added a little bow with our Linen Thread. And I used the Night of Navy Noble Peacock Rhinestones on the card front as well as little Gold Glitter Enamel Dots for the flower centers just for fun.

In the inside of the card, I used the Petal Pink vellum as a background for my sentiment. I just put a little bit of liquid glue underneath the words so that the glue wouldn’t show through. The glue on the back side of the Petal Pink, attaching it to the card base, doesn’t seem to be showing at all because of the layers. The inside sentiment is actually stamped in Blueberry Bushel ink on the tiny-flowered vellum and was heat-set on both sides briefly so that the vellum wouldn’t warp. And then I fussy-cut one last little flower and glued it with a Gold Glitter enamel off the side of the sentiment.

It was nice to feel that my forward progress and my redirections finally made something I actually liked to see. The card has a shabby chic sort of feel to it, which I haven’t made for a while. I may make more of these now that I’ve worked out all the kinks in placement logistics. Hope it inspires you to do one of your own (without all the creative grief!). You can find all the supplies I used on my card in my online store at https://www.stampinup.com/ecweb/default.aspx.

Please continue through the hop to see the awesome projects some of my teammates have made for you this week! It’s a very talented team. Pressing the “Previous” button will take you back to Karen, and “Next” will move you on to Mary. Thanks again for visiting!

https://wp.me/paaNf4-1V2https://wp.me/p5snyt-cpO

  1. Karen Ksenzakovic–https://wp.me/paaNf4-1V2
  2. Connie Troyer–You Are Here!
  3. Mary Deatherage–https://wp.me/p5snyt-cpO
  4. Akiko Sudano–https://wp.me/paOv8E-13G
  5. Leslie Larkin–https://leslielarkin.com/young-at-heart/
  6. Karen Finkle–https://karenscardkorner.blogspot.com/2020/04/stampin-up-garden-lane-quilted-card-for.html
  7. Julie Johnston–https://wp.me/p8SzmQ-2jk
  8. Amy Koenders–https://wp.me/p2SFwf-j9H


My First Twist-and-Pop Card, for a Special Birthday

I try to continue to push myself to learn new things about cardmaking and papercrafting. This is the first card I attempted in the Twist-and-Pop style.

I’m happy to say that I’m branching out and learning new things about crafting all the time.

When I wanted to make a “wow” birthday card for a woman who has always been quite special to me, I decided to give this style a go, as something different. It’s called a Twist-and-Pop card (though I believe it has other names as well). This had been one of those kinds of cards that I viewed with some trepidation, thinking it looked impossibly hard to manage. I mean, the thing folds in on itself and somehow still fits in a normal envelope. 🤔🤷‍♀️

I confess that I had it easy this time, because in my May 2018 Papercraft Inspirations UK subscription magazine (a gift from my mom), there were two prescored and precut card bases and middle parts along with these flower cards and directions on where and how to put them all together.

I was glad there were two also, because I glued the wrong thing to the wrong side at first. 🤦‍♀️ So now that will be my template when I go to cut another card base and middle to use up the second (different) set of flower pieces they included.

by connie troyer constantlycreating.me

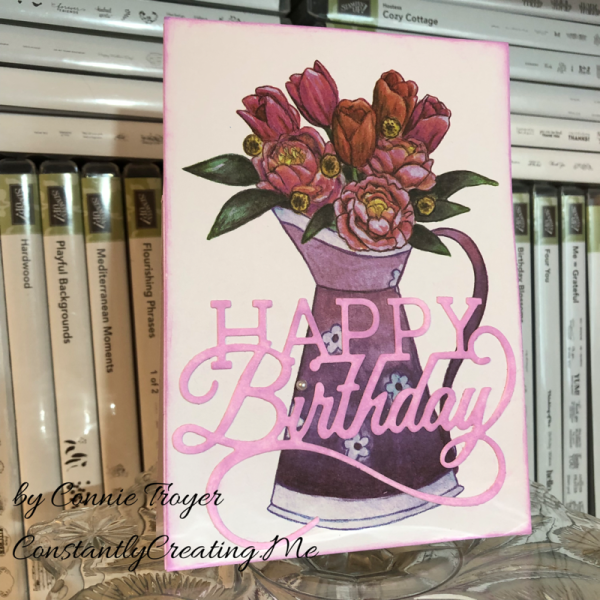
I inked around all of my flower cards with Sweet Pea quick-drying chalk ink from Ingvild Bolme and also used it atop a white “Happy Birthday” die-cut from one of my crafty peeps. The best part for me was adding Clear Wink of Stella to all the flowers so they would sparkle (which never picks up in photos very well).

img_9373
This is how it folds up on the inside of the card, where it sort of twists around and pops out when you open the card fully.

img_9371

And as usual, I forgot to take photos of my card before signing it.

untitled design

Anyway, my recipient seemed delighted, so I achieved my goal. (I’m sort of just happy it got to her on time, as I struggle with that.) And now I have little fear about making another Twist-and-Pop card! I actually made this card back in April and have done a few others in this style as well. I’m going to be blogging about one of them—a special 20th anniversary card—so stay tuned. 🙂

Red Foxes in Winter Special Birthday Card

Back in the summer, I was asked to make a special birthday card for a special friend’s son who has a fondness for foxes—all shades and types. She gave me free creative rein and said she didn’t care what I did with the idea, but that he might like a red one. I considered several different fox stamps and stickers but finally chose a particular stamp that shows foxes in a wintry scene since his birthday was in February (“300-16 Red Foxes and Birches,” Stampa Rosa).

I’ve never really thought much about foxes in my life, other than thinking they’re beautiful animals in general, so I had no idea how to shade one. Coloring is something I’m still not comfortable with, because I feel like the concept of shading is one I haven’t begun to learn. Luckily for me, the wooden stamp I was using had a colored picture on the front that I just had to attempt to recreate! 🙂

First I had to choose the right paper, though, which evidently was not the bumpy watercolor paper I tried to stamp on first (twice). I knew that, but I was thinking of using my water-filled Aqua Painter on it and felt the paper would handle it. I liked the textured look of the watercolor paper too, but the image was too detailed to stamp cleanly with the bumps in the paper. Then I remembered Stampin’ Up’s Shimmery White cardstock, a must-have in my collection. It’s not any thicker than the rest of their cardstock (other than the aptly named “Thick” cardstock in the line), but it’s smooth and somehow holds up great with watercoloring–and it’s sparkly to boot (hence the “Shimmery” part of the name). Bonus for me was that the paper helped my snow scene sparkle.

Once I had the paper figured out and the stamp stamped correctly, I took my watercolor pencils and tried to emulate what I saw on the wooden stamp block. I had to mix a few shades to get that red fox coat color with the darker spots. After using the watercolor pencils, I took my Aqua Painter to it as planned and went back and forth between the two tools a few times until it felt right (because I have no idea what I’m doing, really. I’m assuming I’ll get better as I learn by trial and error).

After I was satisfied with the colors and the paper had basically dried, I went over the snow and snow-covered branches with my Clear Wink of Stella brush marker to bring back the sparkle to the snow that I’d ended up coloring over with the white pencil. (The sparkle shows through the color a little, but I really wanted the snow to glimmer.) Then I set aside the piece to dry while I figured out the rest of the card.

My favorite crafty thing to use these days are metal cutting dies. They’re simple, quick to use, and make things prettier or more elegant than I could come up with on my own. (They’re also faster for me than my Cricut.) I hang most of them on my wall and the back of my door on large magnetic sheets or vent covers so that I can easily walk over and try different sizes and shapes with whatever I’m wanting to cut out, rather than taking time to flip through a box and take die sets out of envelopes.

For this card, I looked at a bunch of large shapes, trying to decide whether to cut it into a type of oval or a fancy square or a rectangle. I ended up using one of my new sets from Spellbinders that hadn’t yet made it to my wall (Art Nouveau Designer Series “Water Lilies Decorative Element”), because it fit the image perfectly without making me cut it down too much (after all that hard work in coloring, I hated to do that!).

I debated whether to use a SU Cajun Craze cardstock base or a white base and which color to set off where. I ended up cutting several different colors of cardstock with the frame die to test them and see what worked. The card finally fell together color-wise when I brought in the darker wood-grain paper (SU “Country Lane” DSP) as a background to echo the dark shading in the picture. The dark complements the darker orangish-brown Cajun Craze well enough while keeping the same tones. With the white base, there was too much contrast and the frame jumped out at me rather than letting me focus on the colored image. So I ended up using a Cajun Craze base but covering the entire front with the wood grain and using a Cajun Craze frame on top and beneath the white colored image. (It’s a solid piece that gives a mat to whatever is inserted into the sides.)

This particular frame die acts like a gift card holder where the center flowers are, gently opening up and holding whatever is placed in the solid middle. That took some thinking, trying to measure and cut down the colored image so that it fit into that space under the flowers just right. The opening/middle rectangle is much larger than a gift card, but it’s the same idea…though this is only one way to use it.

The one thing I forgot to do to the test pieces was to make sure they were embossed well also. (One reason I love Spellbinders is because they have awesome sections of the dies that are intended to be embossed to give it a little something extra. I miss that feature when I use other brands.) So the embossing could have been done a little better in parts here, because I forgot to take that step to make it pop. I didn’t remember it until I’d mailed the card and noticed it in the pictures. In the photos above, perhaps you can see that the center flower pieces are more deeply etched than the corners above and below them. Next time…I shall remember next time. 🙂

My customer wasn’t picky about what to say on the inside either, other than asking me to write his name and theirs in it and mail it straight to him. So I had to dream up something based on other things she had said to me. After adding fox washi tape to the bottom of a white piece and then matting the paper onto a different kind of wood-grain patterned paper from a 6×6 pad (can’t remember which one now), I used three different stamp sets and another die to make the sentiment section. “A little expression of love” is from SU’s “Painter’s Palette,” “just for you” is from SU’s “From the Herd,” and “Happy birthday” is from MFT’s “LJD For the Boys” (part of the “Happy Birthday, Handsome” stamp). The die is among those in a retired nested set from SU called “Deco Labels.”

I used my stamping platform and its grid to line up the sentiments on the die-cut and stamp out a couple of test pieces in Cajun Craze ink to make sure they sat where I wanted them. (I had tried stamping right on the matted liner paper but I accidentally got ink where I shouldn’t have, so at that point I just had to cover it up because it was already adhered.)

After the sentiment box was stamped, I edged around the die-cut with my Cajun Craze Stampin’ Write Marker so it would stand out against the white paper. And, once again too late, I saw that the double fox spot on the washi piece. I didn’t create that intentionally; it’s just how it came off the roll. I wish I had seen it sooner; it bothers the part of me that prefers symmetry. 🙂 I also added two gold glitter hearts from MME (“Niche/On Trend Foam Stickers”) in the white space of the sentiment box.

I like how this one turned out even though it tested me at times and there are a couple of things I wish I could do differently. It’s always easier to make a similar card a second time. Maybe I’ll try to do one for the local gift shop. After all, I’m not completely convinced that winter is over with where I live.

Some of the Stampin’ Up items I used on this card are retired, but you can purchase the ink, cardstocks, and other current items through my online store if you want to try them (please use code 6WPHJ2MC at checkout unless your order is over $150). The thumbnails below will take you right there…and this is an awesome time to get them since Sale-a-bration is still going through the end of March. For every $50+ order before tax and shipping, you get to pick an item out of a select group of almost two dozen items and Stampin’ Up will send it to you for free with your order! Plus you’ll also get a free gift from me. 🙂 Please contact me if you have questions.

Thanks for visiting my blog! I truly appreciate my readers. ❤️ Have a lovely day! #neverstopmaking #mftstamps

Product List


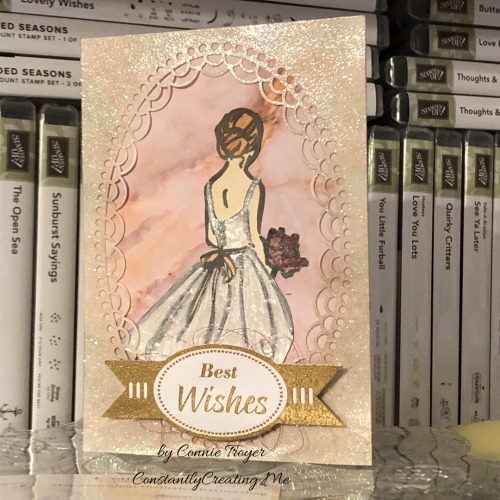
Wonderful Moments Bride Card for Bridal Shower, Wedding, or Anniversary

A bridal card for love-themed needs!


Welcome to another post for Amy K’s Inkin’ Krew Blog Hop for Tuesday, January 8! This month we are featuring the theme of love with Stampin’ Up products.  I’m making wedding and anniversary cards for my local gift shop right now (along with other themes and random custom orders), so I was very excited to join this hop!

For several days now, I thought I knew what I was going to create for this blog. In the end, I did stick to my original (barely fleshed-out) idea, but did I ever find ways to complicate it. (I always do.) I definitely should have started on it earlier. But I had craft room organization on my mind this week and I got to it when I got to it.

I was able to use several current SU products as well as a couple of retired products and ones from other companies (oops!). The focal point of the card is the bride stamp from the “Wonderful Moments” stamp set, set off by a lace oval from the Delightfully Detailed Laser-Cut Specialty Paper pack and a background of Petal Promenade DSP.

The laser-cut paper is vanilla on one side and white on the other. Since my card base was white and the bride’s dress would be too, I chose to use the vanilla side of the lace oval. And then I decided it needed something else. It felt too plain and too neutral. I kept “seeing” pink with this stamp and card, but the last two wedding cards I created had pink hues in them, so I tried to use other colors.

I have to keep trying. I did manage to sneak in an orange and a dark purple…but there’s still pink. So when I was looking at the oval and trying out colors in my head, I started sponging Bundled Sage Distress ink onto it, thinking winter colors. But then I picked up Tattered Rose and sponged it on too. (Evidently those colors should have gone on in the reverse order.) I added a second layer and different sponging before I was done. And then I got an idea, when I realized that the ink was drying slowly enough to get onto my hand as I held the card. (This is subconscious Pinterest at work in my brain, I think. Lol!)

One of the retired products in my stash that I need to use more of is our Iridescent Ice Stampin’ Emboss Powder. I’ve only used it in small bits until now…but I remembered seeing others do a whole-scene kind of treatment with it. I wasn’t even entirely sure I remembered how this product worked since I bought it late in the game, but the paper was definitely ready to be treated – it was still inky. My friend E assured me that I could indeed use Distress inks for embossing. So I got out my catch-all tray and my coffee filter and proceeded to pour the Iridescent Ice powder overtop (hoping I was making the right decision and not ruining a lovely piece of paper) and then heat embossed it, as the label suggested, three times  before I finally saw the powder changing and understood what it was going to look like or do.

Turns out I love this look. It reminds me of our Dazzling Diamonds Glimmer Paper except it’s not as thick and has slightly different colors. I’ll have to try this technique again sometime. I also appreciate how the pink and green sponged inks are still coming through the translucentness of the embossing powder. It’s faint, but it works.

With the lace oval paper finished, I turned my attention to the bride stamp. I chose Archival Basic Gray ink because it felt like black would be too harsh and bold against the soft oval. I had to stamp the bride several times with my stamp platform because it was the first time I’d used the stamp and I hadn’t prepared it even though I know better. So my outline got a little thicker than I’d intended.

After she was stamped, I watercolored the bride’s hair, skin, bow, and flowers with watercolor pencils and used an AquaPainter on those places afterward. For the dress, I decided to experiment with some Nuvo Crystal Drops (Ivory Seashell color) new to my stash. Since that is also translucent, I was hoping it would soften the lines of the dress if I covered them with the liquid. I later went back over the dress again, using a paintbrush to smooth out the Drops on the paper. I also took Wink of Stella to the bride’s bouquet (though I erred first and grabbed my White instead of my Clear. Once it dried, I realized what I had done and went back over the bouquet with Clear as well.) It sparkles more in person than in the photo.

So I had one finished oval and one watercolored, Nuvoed bride. I wasn’t sure how to treat the background behind her. In my mind I had seen her on white, but that seemed far too plain now. I thought of putting a watercolor pencil down as a background but couldn’t settle on which color. Blue for sky? (So she’s out in the open, looking at nothing?) Or some kind of background stamp to imitate wallpaper or wood planks? I then decided to think about the Graceful Glass vellum and hit upon an idea I’ll use at a later date, before the vellum led me to looking through my current DSP. I ended up fussy-cutting around her and placing her on patterned paper so I wouldn’t have to mask her for a background stamp or risk ruining something.

The paper I chose to use feels most like a sunset in front of my bride, and it even matched the flowers, hair, and bow I had colored before viewing this paper pack. (That actually happens to me a lot!) Because that was my best background option thus far, I cut (and then recut, due to first error) a notecard/A1 size of paper where the jagged stripe in the paper best flowed beside her dress and body posture. Once I had the background paper glued to the notecard card base, I played with the placement of my bride, attempting to center her and play off the “sunset stripe” to its best advantage while trying to cover the bottom of the dress with the sentiment I intended on using. (Many thanks to patient E for this stage, who was with me on video chat while I created the card!)

Something then made me think about the Rose Metallic Thread I had stored with my baker’s twine, and I decided to do a bow of some sort.  I’m not very good at bows with delicate threads yet. I ended up laying ATG tape on the back of the sentiment and looping it around and sticking to the tape however it looked the best to me.

The gold-and-white “Best Wishes” sentiment came from a resist coloring pack from another maker. I just left it as is, since I had enough color going on already. It fit with the “brown” tones of the card anyway. The gold on the sentiment appears to have been embossed, though it came that way in the pack and I merely cut it out. I popped up the sentiment with its new metallic loops with Stampin’ Dimensionals foam dots, placing it right above the hollow circles at the bottom of the oval.

The last touch on the front of the card was the tiny little mini pearls I used on the buttons of her bridal dress. I had SU’s white mini pearls from the Notes of Kindness card kit on her dress originally but later changed to even smaller ones from Recollections.

The inside of the card has been kept simple to be size-appropriate for the notecard and also to leave room for the sender to write. I used the retired Petite Pairs stamp set with its “for the new Mr. and Mrs.” sentiment on a bit of the Petal Promenade DSP (from the first piece I’d cut the wrong direction by accident), the current Fresh Fig ink pad, and the gorgeous Stitched Labels Framelits Dies. And then I added two more mini Recollections pearls on the sides of the inside tag. 🙂 (Side note: the Petal Promenade DSP pack is one of my favorite things in this catalog. The papers are just so beautiful!)

If I had set out to create this exact card, even with all the detail, it wouldn’t have taken me very long. But creating from scratch and using trial-and-error means that sometimes happy accidents have to happen to lead the creator to the next step, which later seems so obvious. 🙂 I’m really quite happy with this card now, but there were moments when I wondered where I was going with it. Maybe you’ll find even faster ways to recreate this card. I’d love to see what you come up with! I think this card could be used for a bridal shower, a wedding card for the couple, or an anniversary card. It just depends on which sentiments we use.

Below are the current Stampin’ Up products I used on this card. If you need any of the supplies, just click on the thumbnail to go to my store or visit this link. I’d be happy to become your demonstrator! Sale-a-Bration (from now until March 31) is the best time of the year to stock up on products and earn others for free! Please use code JJBCPS4W for a free gift when you shop with me! (You can continue with the hop participants below the thumbnails.)


Delightfully Detailed Laser-Cut Specialty Paper, 146907

Wonderful Moments stamp set, 147529

Rose Metallic Thread, 146915

Fresh Fig Classic Stampin’ Pad, 147144

Petal Promenade Designer Series Paper, 146913

Stitched Labels Framelits Dies, 146828

Stampin’ Dimensionals, 104430


Thanks for stopping by my blog! To continue with the hop, see what Karen Finkle created by clicking on the Next button or visiting her link below. To go back to see Sue Prather’s card, click Previous or her link above mine. See you next time!

  1. Shirley Gentry: https://stampinwithshirleyg.com/?p=3079
  2. Jaimie Babarczy: https://wp.me/p79UhD-2sD
  3. Julie Johnston: https://wp.me/p8SzmQ-29L
  4. Karen Ksenzakovic: https://wp.me/paaNf4-h4
  5. Mary Deatherage: https://wp.me/p5snyt-70J
  6. Sue Prather: https://wp.me/p5yitZ-XU
  7. Connie Troyer: You are here!
  8. Karen Finkle: https://karenscardkorner.blogspot.com/2019/01/stampin-up-nine-lives-for-amys-inkin.html
  9. Amy Koenders: https://wp.me/p2SFwf-cTD

Cards from the Notes of Kindness Kit with Variations

A bit about the Notes of Kindness card kit I made up recently – twenty cards in one night!

I promise that I make more than card kits these days – and I’ll have some individual cards blogged about soon – but right now I’m trying to accumulate some stock for my local gift shop and get ahead on cards I need to send myself. 🙂

I recently found myself looking at another card kit I had waiting, and before I knew it, I had a bunch done! As a matter of fact, I made all twenty cards in one sitting (though I did go back and add sentiments to a few insides the next night). That’s just not me. I take way too long to make cards with my level of detail. What a freeing, productive feeling it was to have that many done at once! And I didn’t feel like the designs were too simple for my style, either.

This particular card kit, the Notes of Kindness All-Inclusive Card Kit, is current in the 2018-2019 Annual Catalog from Stampin’ Up, on page 7. The kit itself is $35 but it comes with a clear stamp block, an Archival Black ink spot, a 6-piece set of photopolymer stamps, Copper Baker’s Twine, adhesived mini pearls, Stampin’ Dimensional pop-up dots, die-cut sentiment stickers, die-cut flowers, lined envelopes, twenty printed card bases, and a kraft box you can store or gift them in. Full-color picture instructions are also included. All you need is your choice of adhesive and anything extra or different that you want to do.

There is also a refill kit you can purchase for $21 that includes all this except the stamp set, block, ink, and box – and the refill makes another twenty cards. (I know what is on my wishlist!)

I snuck another stamp set into my work so that I had “Best Wishes” wedding and anniversary cards as well as thank-yous. I also used some Wink of Stella Clear on some of my flowers to make them sparkle and shine. I made the card fronts the way the kit suggested otherwise. I did use some retired thank-you stamps on the insides where appropriate, just so I had some variation. And I was even able to use one of the German sentiments that are included. I live in a Pennsylvania Dutch area and thought I’d test one and see if it sells. (There are French sentiment stickers too!)

The colors in the kit are some of my favorites: Blushing Bride, Blackberry Bliss, Soft Seafoam, Mint Macaron, Mossy Meadow, and Basic Black and Whisper White. Though the sentiments inked up well, I love that they are photopolymer – for just in case I needed to realign something.

I think this one is my favorite. I turned it into a 5-piece card set complete with acetate box and pen!

You can see some Wink of Stella shimmer on the dark parts of this flower too.

I used the current Stitched All-Around stamp set for the “Best Wishes” cards (inside and out).

For this tiny thank-you sentiment with the twine behind it, I laid down some ATG tape first, to keep the twine controlled, before adding the Stampin’ Dimensionals and sentiment.

You can really see the Wink of Stella shimmering on this succulent. I varied where and how much I used it on the succulents but ended up loving them all!

Anyway, I’m not usually a card-kit user, but I’ve been beginning to change my mind about them. As long as they don’t feel too simple to me, I’ll probably give others a try now too. I also still have the Lots of Happy kit to finish sometime. 😉

If you’re interested in trying this kit or others, or if you need some supplies, I’m happy to be your Stampin’ Up demonstrator! Sale-a-Bration just started this week, which means you can get a free select product with any $50 purchase. And they even have a couple of amazing products for $100 orders! SAB goes through March 31. Let me know if I can help! ❤️

Thanks for reading!

Superhero Batman Card for a Super Birthday

Thanks for the click! I feel like the proverbial broken record these days: “I’ve been on book deadline, so I haven’t had a lot of time in the craft room.” And when I’ve been there, I’ve had to do simple cards, which isn’t my true style. It’s been like this for months. Not really enough time to post either, but I try to keep up when I have to. Therefore, my post about Batman will be as short as I can make it. (There’s about another week until I think I can finally create for days on end again, and I can’t wait!)

Despite book deadlines and ASAP work and regular old “life” stuff, our family has birthdays in the latter half of the year, so I find myself away from home more often and scrambling for time beforehand to make birthday cards. I heard that the nephew wanted a superhero party this time around, and even though my gifts didn’t match that, I made sure my card would. I actually bought the “Let the Good Times Roll” roller coaster stamp and dies set months ago for his card. I guess I’ll make that another year. 🙂

I was randomly browsing Pinterest when I was killing time away from home one day, and I stumbled upon a seemingly easy Batman card. It looked simple enough to emulate (or CASE: Copy and Share Everything or Copy and Selectively Edit), which was perfect for my lack of time, but of course I had to put my own style to it too. I knew I had the oval punch and alphabet set she used, so using hers as a guide was perfect. Many, many thanks to the designer for bailing me out when I needed a quick card! You can see the original here: https://www.pinterest.com/pin/250372060519376773/.

As cute as I thought the original card was, I missed the light in the sky – you know, the one that always shows up as a beam whenever they cast the bat sign into the air from the spotlight. So I had to add that to my card, leading to my little bat. (I didn’t have room around the bat to punch the holes like the original designer did.)

To create the light beam, I first used Wink of Stella White and then layered another coat over most of it with either Wink of Stella Clear or Gold. The Wink of Stella line (Clear especially) is a favorite product in my craft room. I love that little bit of shimmer without the mess, and it dries quickly. I kept layering the colors, trying to keep my freehanded lines straight and also get both colors into the beam without one overpowering the other.

Wink of Stella Clear. Photo from StampinUp.com

The oval punch used was Stampin’ Up’s Extra-Large Oval Punch and I just used a scrap of yellow with it. Once I had it punched, I laid it onto my card and marked with a pencil the places the beam of light should theoretically end. I’ve never been very good at drawing 3D things, but I thought this turned out all right.

I do not (yet) own the new Spooky Bats Punch from Stampin’ Up and I’m not a huge Halloween person, so my choices for bats in the oval were limited. I’ve hand-drawn them before when I needed one, but I chose to fussy-cut one out of my paper share of current DSP for this card. It comes from the Toil and Trouble line in the current Holiday catalog. I looked for one that seemed most like the bat sign we know and love and cut it out using my beloved CutterBee microscissors.

Toil and Trouble Designer Series Paper. Photo from StampinUp.com.

Although the original poster used Stampin’ Up’s Labeler Alphabet (and I had intended to as well), for the sake of time, I opted for my SMASH Label Maker, which would save a lot of time of inking and trying to get the letters straight and cutting out the words before gluing them. There wasn’t much in the way of instructions on the packaging, so I still hold my breath and count when I operate it, and I’m still not entirely sure of the best way to keep the words fastened once I have them imprinted, but I keep working with it and learning.

For “To a super nephew,” I added extra spaces between the words and cut apart the words evenly when I was done before haphazardly affixing them first with Scor-Tape (which has mostly worked before). Before I was finished, I went back and reglued them with Tombow Multi, though, and that seemed to keep them where I wanted them, since the edges still wanted to curl up a little with the Scor-Tape.

Labeler Alphabet. Photo at StampinUp.com.

I don’t seem to have a picture of the inside. Maybe I forgot to take one. I thought I used a “Happy Birthday” stamp of some kind since I didn’t say that on the front. Regardless, that’s all there is for this card and blog post! Back to my regularly scheduled edit… Thanks for stopping by!

If you’re in need of craft supplies from Stampin’ Up, I’d love to be your demonstrator! You can shop with me at https://www.stampinup.com/ecweb/default.aspx or find me on Facebook at Constantly Creating / The Little Whatnot Shop. The current Annual and Holiday catalogs have some amazing products this year, and we’ll soon be making cards using the November-only special called the Snowflake Showcase! I recently got some of the flocked “White Velvet Paper,” and it is gorgeous! You don’t want to miss this special!

A Simple Hello Card Using the Sweet Soiree Memories and More Card Pack

View on Instagram https://ift.tt/2xsyLs0
I grabbed a 4×6 printed piece from my Sweet Soiree Memories and More Card Pack from Stampin’ Up and adhered it to an Old Olive card base for this clean-and-simple hello card for Stacy. The peach ribbon is from Recollections but matched perfectly, and I also colored in the “Hello” and the centers of the flowers with a Clear Wink of Stella glitter brush pen. Quick and easy card.
#thelittlewhatnotshop #forstacy #hellocard #glimmers #flowers #sweetsoireememoriesandmore #a6 #customcardorders

One Embossing Folder, Three Looks (Including SU Hanging Garden)

View on Instagram https://ift.tt/2GJF3Yv
Three different looks to using the same Darice embossing folder and SU Orchid Opulence cardstock. Two of the cards have embossing, and my favorite has debossing. All were glittered with Wink of Stella Clear, white, and/or gold glitter pens. All ribbon and twine is Stampin’ Up too. Sentiments are Sticko stickers, a Stampin’ Up stamp (from “Hanging Garden”), or gold Dazzles. The card with the lace has a set-on, popped-up front.
#thelittlewhatnotshop #forstacy #fordixie #darice #embossingfolders #stampinup #winkofstella #orchidopulence #etsysellerofinstagram #bakerstwine #laceribbon #coloringwithmarkers #embossing #debossing #flowers #dazzles #hanginggarden #sticko #customorders
Pat's Blog Site

One place to fit it all!

Stamp Dabbles

Donna Leonard | Independent Stampin’ Up! Demonstrator | Huntsville, AL

Niya Scrap

Démonstratrice indépendante Stampin' Up!®

From Pole to Pole

Adventures in the Land of the Pierogi

Stampin' in the Meadows

Akiko Sudano - Independent Stampin' Up! Demonstrator Downingtown, PA

Creative Stamping Designs

Karen Ksenzakovic, Independent Stampin' Up! Demonstrator in Somerville, NJ Let's make some cards!!

Stamp it up with Jaimie

Helping you find a creative outlet through paper crafting.

Stamp With Amy K

Amy Koenders, Independent Stampin' Up! Demonstrator in Mendham, New Jersey...Let's make some cards!

The Daily Post

The Art and Craft of Blogging

WordPress.com News

The latest news on WordPress.com and the WordPress community.