Happy Birthday, Magnolia Lane

Happy Birthday, Magnolia Lane—two quick cards using the Magnolia Lane Memories and More Card Pack from Stampin’ Up.

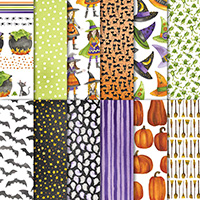
Hello again! It’s time for another Stamp with Amy K Blog Hop! Our focus is on birthday cards this time. I’ve had some busy, busy weeks here. Hope yours has been quieter. It’s time for another handmade-card delivery to my local gift shop, so I took a few hours last weekend to churn through some cards and prepare them. Stampin’ Up’s gorgeous Magnolia Lane Memories and More Card Pack and the complementing Magnolia Lane Large Specialty Memories and More Cards and Envelope Pack made it very easy to have two cards done in record time.

I was really just looking through the Magnolia Lane card pack to see what there was to work with, and, as often happens to me, I began “seeing” cards in my head as different combinations of pieces flashed in front of my eyes. So even though I had intended to only create one card, I liked the final front combination and the 3×4 card I used on the inside so well that I decided my mom needed a birthday card too, no matter how long I had to wait to give it to her. 🙂

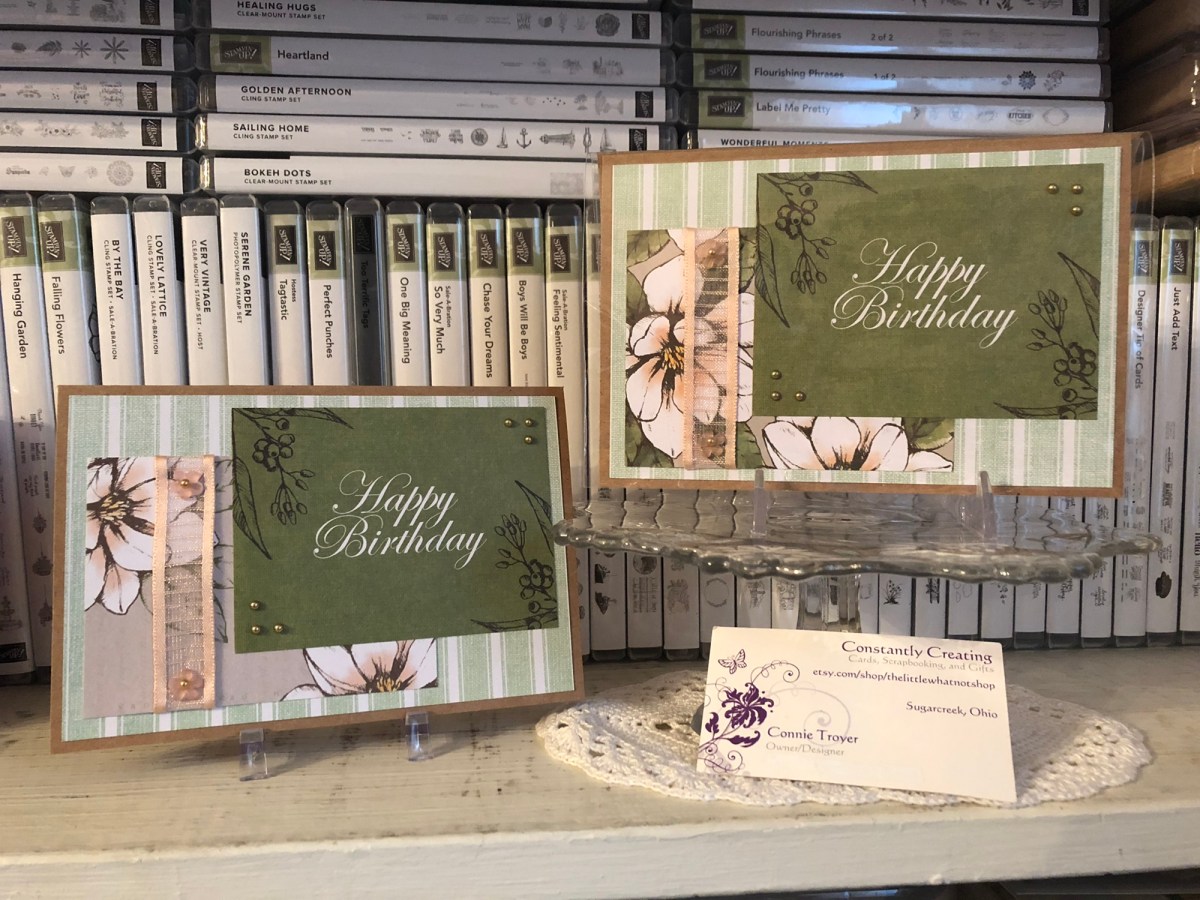
The cards in the Magnolia Lane card pack are just so pretty, and there are quite a few with sentiments on them. The “Happy Birthday” one is elegant and classy in its design and font without being over-the-top. Although I could have die-cut the sentiment out of the card, I liked it just the way it was (which was faster anyway).

After choosing a large striped “Project Life”-style card for the background and two flowery smaller background ones to match the “Happy Birthday” card, I then adhered the leafy envelope liner into the kraft envelope and creased the flap. Then I glued the background card I’d chosen onto one of the kraft card bases from the Large Cards and Envelope pack.

My first card, shown in the clear jacket it will be sold with.

I played around with the placement of the Petal Pink 5/8″ Striped Organdy ribbon on the coordinating 3×4 “background” card, decided where I wanted it, and put adhesive on the back before wrapping the length there tightly, since the ribbon would show the adhesive through it. Then I just staggered the two smaller cards on top of the larger striped card and glued them.

My second card.

I accented the top and bottom of the ribbon with the Frosted Flower Embellishments and then added gold Metallic Pearls in the little divots of the flowers. And then the corners of the sentiment piece looked just a bit bare to me, so I added the pearls there too. 😁

On the inside, I used the “You Are Loved” 3×4 card, some white paper for a message, and a few of the stickers from the sticker sheets included in the Memories and More pack. Easy-peasy!

The inside of both cards (this one is shown inside a protective jacket).

Thanks for stopping by to see my creations. These are great products not only for scrapbooking but for cardmaking too. With everything matching, creating is a breeze! To see what the rest of my teammates have made this month, you can follow the list or “Previous” and “Next” buttons to “hop” from one blog to the next.

inkin-krew-blog-hop-previous2inkin-krew-blog-hop-next2


  1. Jaimie Babarczy: https://wp.me/p79UhD-2SZ
  2. Karen Finkle: https://karenscardkorner.blogspot.com/2019/06/stampin-up-heartland-birthday-card-for.html
  3. Karen Ksenzakovic: https://wp.me/paaNf4-Gn
  4. Shirley Gentry: https://stampinwithshirleyg.com/?p=5794
  5. Connie Troyer: You are here!
  6. Mary Deatherage: https://wp.me/p5snyt-8nX
  7. Sue Prather: https://wp.me/p5yitZ-1hJ
  8. Akiko Sudano: https://stampininthemeadows.com/?p=593
  9. Amy Koenders: https://wp.me/p2SFwf-fPE


If you don’t have a Stampin’ Up demonstrator yet and want to order or receive a catalog, please feel free to contact me for help. If you want to order, use code DWFPUKPH and I’ll happily send my thanks and a free gift! Make it a great week!

Connie

Superhero Batman Card for a Super Birthday

Thanks for the click! I feel like the proverbial broken record these days: “I’ve been on book deadline, so I haven’t had a lot of time in the craft room.” And when I’ve been there, I’ve had to do simple cards, which isn’t my true style. It’s been like this for months. Not really enough time to post either, but I try to keep up when I have to. Therefore, my post about Batman will be as short as I can make it. (There’s about another week until I think I can finally create for days on end again, and I can’t wait!)

Despite book deadlines and ASAP work and regular old “life” stuff, our family has birthdays in the latter half of the year, so I find myself away from home more often and scrambling for time beforehand to make birthday cards. I heard that the nephew wanted a superhero party this time around, and even though my gifts didn’t match that, I made sure my card would. I actually bought the “Let the Good Times Roll” roller coaster stamp and dies set months ago for his card. I guess I’ll make that another year. 🙂

I was randomly browsing Pinterest when I was killing time away from home one day, and I stumbled upon a seemingly easy Batman card. It looked simple enough to emulate (or CASE: Copy and Share Everything or Copy and Selectively Edit), which was perfect for my lack of time, but of course I had to put my own style to it too. I knew I had the oval punch and alphabet set she used, so using hers as a guide was perfect. Many, many thanks to the designer for bailing me out when I needed a quick card! You can see the original here: https://www.pinterest.com/pin/250372060519376773/.

As cute as I thought the original card was, I missed the light in the sky – you know, the one that always shows up as a beam whenever they cast the bat sign into the air from the spotlight. So I had to add that to my card, leading to my little bat. (I didn’t have room around the bat to punch the holes like the original designer did.)

To create the light beam, I first used Wink of Stella White and then layered another coat over most of it with either Wink of Stella Clear or Gold. The Wink of Stella line (Clear especially) is a favorite product in my craft room. I love that little bit of shimmer without the mess, and it dries quickly. I kept layering the colors, trying to keep my freehanded lines straight and also get both colors into the beam without one overpowering the other.

Wink of Stella Clear. Photo from StampinUp.com

The oval punch used was Stampin’ Up’s Extra-Large Oval Punch and I just used a scrap of yellow with it. Once I had it punched, I laid it onto my card and marked with a pencil the places the beam of light should theoretically end. I’ve never been very good at drawing 3D things, but I thought this turned out all right.

I do not (yet) own the new Spooky Bats Punch from Stampin’ Up and I’m not a huge Halloween person, so my choices for bats in the oval were limited. I’ve hand-drawn them before when I needed one, but I chose to fussy-cut one out of my paper share of current DSP for this card. It comes from the Toil and Trouble line in the current Holiday catalog. I looked for one that seemed most like the bat sign we know and love and cut it out using my beloved CutterBee microscissors.

Toil and Trouble Designer Series Paper. Photo from StampinUp.com.

Although the original poster used Stampin’ Up’s Labeler Alphabet (and I had intended to as well), for the sake of time, I opted for my SMASH Label Maker, which would save a lot of time of inking and trying to get the letters straight and cutting out the words before gluing them. There wasn’t much in the way of instructions on the packaging, so I still hold my breath and count when I operate it, and I’m still not entirely sure of the best way to keep the words fastened once I have them imprinted, but I keep working with it and learning.

For “To a super nephew,” I added extra spaces between the words and cut apart the words evenly when I was done before haphazardly affixing them first with Scor-Tape (which has mostly worked before). Before I was finished, I went back and reglued them with Tombow Multi, though, and that seemed to keep them where I wanted them, since the edges still wanted to curl up a little with the Scor-Tape.

Labeler Alphabet. Photo at StampinUp.com.

I don’t seem to have a picture of the inside. Maybe I forgot to take one. I thought I used a “Happy Birthday” stamp of some kind since I didn’t say that on the front. Regardless, that’s all there is for this card and blog post! Back to my regularly scheduled edit… Thanks for stopping by!

If you’re in need of craft supplies from Stampin’ Up, I’d love to be your demonstrator! You can shop with me at https://www.stampinup.com/ecweb/default.aspx or find me on Facebook at Constantly Creating / The Little Whatnot Shop. The current Annual and Holiday catalogs have some amazing products this year, and we’ll soon be making cards using the November-only special called the Snowflake Showcase! I recently got some of the flocked “White Velvet Paper,” and it is gorgeous! You don’t want to miss this special!

Pat's Blog Site

One place to fit it all!

Stamp Dabbles

Donna Leonard | Independent Stampin’ Up! Demonstrator | Huntsville, AL

Niya Scrap

Démonstratrice indépendante Stampin' Up!®

From Pole to Pole

Adventures in the Land of the Pierogi

Stampin' in the Meadows

Akiko Sudano - Independent Stampin' Up! Demonstrator Downingtown, PA

Creative Stamping Designs

Karen Ksenzakovic, Independent Stampin' Up! Demonstrator in Somerville, NJ Let's make some cards!!

Stamp it up with Jaimie

Helping you find a stress free creative outlet through paper crafting.

Stamp With Amy K

Amy Koenders, Independent Stampin' Up! Demonstrator in Mendham, New Jersey...Let's make some cards!

The Daily Post

The Art and Craft of Blogging

WordPress.com News

The latest news on WordPress.com and the WordPress community.

%d bloggers like this: