“Feminine” Blog Hop for Amy K’s Krew (If Friends Were Flowers…)

I’m part of Amy’s Inkin’ Krew Blog Hop with a “Feminine” theme for Tuesday, April 9. See what I created with some paper and dies for friendship and Mother’s Day!

img_9128

Hello, and welcome back to Constantly Creating/The Little Whatnot Shop! I’m blog hopping with Stamp with Amy K’s Inkin’ Krew today, and our topic is “feminine.” That gives a lot of options for card creation (men being much harder to design for)!

This is really the story of two cards. I’ve been traveling and freelancing again lately, so I haven’t had a lot of time in the craft room. But before I left the state, I started thinking about several different cards I need to send, and I decided to use a flowery piece of the Share What You Love Specialty Designer Series Paper (DSP) as a background for all of them. (I confess, I was also hoping to meet a 4-6-card “use it up” challenge on a Facebook group by doing so. Ambitious for someone who hasn’t been home!)

Last week I cut three card fronts out of one 12×12 sheet of the DSP and still have a couple of scraps leftover for another smaller notecard yet—maybe a thank-you. Of the cards with the bigger sections, one will be for a belated birthday, another became a Mother’s Day card, and the friendship card I’ve used for today’s blog title will likely go to the local gift shop upon my next delivery. I love how the same piece of paper works for each type of card.

I’ve acquired a few off-brand things recently as well, so these cards are not entirely made up of Stampin’ Up products (as my demo status would prefer). But the bulk of them are SU, and you could easily substitute SU’s vases or flower stamps or another sentiment where I’ve placed mine; the design works regardless. I grabbed the “other” products because they were near me (read: not yet put away) and I’m always trying to use up my consumables. (Plus, I needed to finish a card quickly to be able to blog!) In the products list at the end of the post, I’ll add some Stampin’ Up product suggestions you could use to change this card into one of “theirs” entirely, alongside what I did use from SU’s line. 🙂

So, diving into the cards I’ve finished…I have to confess first that I began a card for friendship, forgot what I was doing with it, and turned it into the aforementioned Mother’s Day card. I had the sketchiest of ideas when I started pulling things together—which is probably why I got distracted and it became something else—but sometimes one just has to go with the creative flow. After I finished the Mother’s Day card, it was easier to just emulate the structure for the actual friendship card, only tweaking the materials. As the two are similar, I’ll show the Mother’s Day one here as well. In the pictures, you can see how the flowers and leaves in the Specialty DSP have a pearlized, translucent finish.

For both the blog card and the Mother’s Day card, I began with a Mossy Meadow card base of 80-lb cardstock in an A2 (4.25″ x 5.2″ finished) size, and I cut down the Crumb Cake background with shimmery Rich Razzleberry/Mossy Meadow flowered piece from the Share What You Love Specialty DSP to mostly cover the card front, with a little Mossy Meadow border showing all the way around. The Mother’s Day border is slightly larger than 1/8″, whereas the friendship border is slightly smaller than 1/8″.

The other day, I sat down with my Cuttlebug, my Stained Glass Thinlits and Stitched Labels Framelits die sets, and pieces of Rich Razzleberry cardstock and a random cardstock I ended up with in an order that reminds me a little of Crumb Cake. It is just a shade lighter, so it matches the Share What You Love paper quite well (and it’s another consumable I can use up! Yay!). I made off several die-cuts out of the cardstock and put them on the desk with the rest of my card pieces until I had more time.

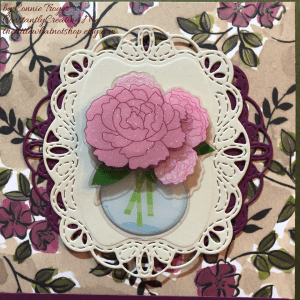
On Monday, I tried several of them (unglued) with different flower stickers to see what I liked best together. The Mother’s Day card uses two Stitched Framelits, one of each color, layered together perpendicularly so that the lighter cardstock has a bit more weight to it on the busy background. The additional Rich Razzleberry die-cut seemed to ground the top one and give a fuller look even though I also liked the simplicity of only one Framelit.

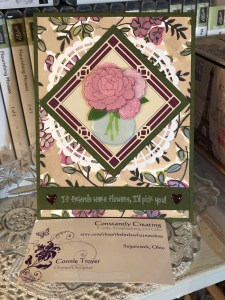
For the friendship (“If friends were flowers, I’d pick you”) card, I had originally chosen the vase idea (before I forgot what I was doing) because I saw the sentiment and the vase/flower stickers about the same time, and they made sense to use together. Since I had used the Stitched Framelits on the first card, I used one of the Stained Glass Thinlits Dies for the second. I adhered some sticky adhesive to the back of the die-cut and replaced the square that comes loose when first cut, and then I backed both the “stained glass” piece and the solid square onto some Rich Razzleberry cardstock, using my micro-tip scissors to cut around the edges once they were stuck.

Note: Keep track of how the solid square comes out of the die; it’s not completely symmetrical, and there is a spacing difference when it’s turned the “other” way.

When I positioned the flower/vase sticker and temporarily placed the diagonal onto the DSP, I then felt it was too simple (story of my crafting life), so I cut down a couple of the gorgeous Pearlized Doilies and glued them to the back of the sides of the diagonal, which fluffed out the center in a similar style to the Mother’s Day card. I got three out of one doily the way I cut them, and the center circle is still able to be used for something else.

I wanted to make sure I left room for a sentiment across the bottom on both cards, so I tested the placement and figured out how big the border strip at the bottom would need to be. For the Mother’s Day card, I added 1/8″ above and below the sentiment ribbon I planned on using to darken the ribbon a bit and make it look more finished; then I cut some vellum adhesive to fit inside the ribbon and carefully merged the two. Ribbon is tricky to glue, the way it’s so flexible. It’s not my favorite way of doing it. I was going to wrap the edges behind the DSP, but because of where I’d trimmed the ribbon around the words on the next repetition, I didn’t end up having enough room to tuck it around. So I took pinking shears to the ends instead since regular scissors and a straight cut would cause it to fray.

The solid Mossy Meadow border for the sentiment on the friendship card is about 3/8″, though I didn’t measure. Because the letters are close together on the stamp, I was leery of using embossing powder or getting things too juicy in case they would blur or blend together. I fell back on some old Craft White pigment ink to stamp it, and then I heat embossed it, hoping it would turn slightly puffy but still be readable (I remember doing that once somehow, but since heating it this time did nothing except dry it, I’ll have to figure out the “puffy” process again). And then because I had room at the sides of the sentiment for geegaws, I trotted out my new Heart Epoxy Droplets and colored them with my Light Blackberry Bliss Stampin’ Blends alcohol marker, the way I’ve heard others have done. It actually works!

I’ve made the inside of both cards the same—white paper to stamp and write on, an old random wooden stamp sentiment that fits both types of cards, a little writing room, and a strip of Specialty DSP running along the bottom. And I used some retired heart epoxy sticker gems on the inside of the Mother’s Day card as well. Both cards flip up to open rather than right to left.

I also added DSP to the envelope flaps since the cards are the nicer sort.

Now that both are done, I might like the simpler Mother’s Day card better, though I do love the Stained Glass die. But I’m thinking I should have kept the doilies closer to the diagonal on the friendship card so the overall look wouldn’t spread out so much. Well, next time, I guess. The sentiment may be my favorite thing about them anyway, the way it uplifts and encourages the recipients. The older I get, the more I see how important it is to do that for others. Whose day can you brighten this week?

Thanks again for stopping by to read and say hello! The products I used or suggested will be at the very bottom of the post, after the linked list of hop participants. Clicking on any of the thumbnails will take you right to my online store if you see something you’d like to purchase.

We have a great group with much talent hopping with us today! Be sure to go to the other blogs and see what my team members have created too. 🙂 You can follow the linking list through each person on each blog you visit.

To see what Terry Lynn Bright made this week, click the Previous button. To jump to Sue Prather’s blog, click Next.

inkin-krew-blog-hop-previous2inkin-krew-blog-hop-next2

  1. Karen Ksenzakovic: https://wp.me/paaNf4-wU
  2. Mary Deatherage: https://wp.me/p5snyt-7OG
  3. Jaimie Babarczy: https://wp.me/p79UhD-2E8
  4. Julie Johnston: https://wp.me/p8SzmQ-2db

Product List

Red Foxes in Winter Special Birthday Card

Back in the summer, I was asked to make a special birthday card for a special friend’s son who has a fondness for foxes—all shades and types. She gave me free creative rein and said she didn’t care what I did with the idea, but that he might like a red one. I considered several different fox stamps and stickers but finally chose a particular stamp that shows foxes in a wintry scene since his birthday was in February (“300-16 Red Foxes and Birches,” Stampa Rosa).

I’ve never really thought much about foxes in my life, other than thinking they’re beautiful animals in general, so I had no idea how to shade one. Coloring is something I’m still not comfortable with, because I feel like the concept of shading is one I haven’t begun to learn. Luckily for me, the wooden stamp I was using had a colored picture on the front that I just had to attempt to recreate! 🙂

First I had to choose the right paper, though, which evidently was not the bumpy watercolor paper I tried to stamp on first (twice). I knew that, but I was thinking of using my water-filled Aqua Painter on it and felt the paper would handle it. I liked the textured look of the watercolor paper too, but the image was too detailed to stamp cleanly with the bumps in the paper. Then I remembered Stampin’ Up’s Shimmery White cardstock, a must-have in my collection. It’s not any thicker than the rest of their cardstock (other than the aptly named “Thick” cardstock in the line), but it’s smooth and somehow holds up great with watercoloring–and it’s sparkly to boot (hence the “Shimmery” part of the name). Bonus for me was that the paper helped my snow scene sparkle.

Once I had the paper figured out and the stamp stamped correctly, I took my watercolor pencils and tried to emulate what I saw on the wooden stamp block. I had to mix a few shades to get that red fox coat color with the darker spots. After using the watercolor pencils, I took my Aqua Painter to it as planned and went back and forth between the two tools a few times until it felt right (because I have no idea what I’m doing, really. I’m assuming I’ll get better as I learn by trial and error).

After I was satisfied with the colors and the paper had basically dried, I went over the snow and snow-covered branches with my Clear Wink of Stella brush marker to bring back the sparkle to the snow that I’d ended up coloring over with the white pencil. (The sparkle shows through the color a little, but I really wanted the snow to glimmer.) Then I set aside the piece to dry while I figured out the rest of the card.

My favorite crafty thing to use these days are metal cutting dies. They’re simple, quick to use, and make things prettier or more elegant than I could come up with on my own. (They’re also faster for me than my Cricut.) I hang most of them on my wall and the back of my door on large magnetic sheets or vent covers so that I can easily walk over and try different sizes and shapes with whatever I’m wanting to cut out, rather than taking time to flip through a box and take die sets out of envelopes.

For this card, I looked at a bunch of large shapes, trying to decide whether to cut it into a type of oval or a fancy square or a rectangle. I ended up using one of my new sets from Spellbinders that hadn’t yet made it to my wall (Art Nouveau Designer Series “Water Lilies Decorative Element”), because it fit the image perfectly without making me cut it down too much (after all that hard work in coloring, I hated to do that!).

I debated whether to use a SU Cajun Craze cardstock base or a white base and which color to set off where. I ended up cutting several different colors of cardstock with the frame die to test them and see what worked. The card finally fell together color-wise when I brought in the darker wood-grain paper (SU “Country Lane” DSP) as a background to echo the dark shading in the picture. The dark complements the darker orangish-brown Cajun Craze well enough while keeping the same tones. With the white base, there was too much contrast and the frame jumped out at me rather than letting me focus on the colored image. So I ended up using a Cajun Craze base but covering the entire front with the wood grain and using a Cajun Craze frame on top and beneath the white colored image. (It’s a solid piece that gives a mat to whatever is inserted into the sides.)

This particular frame die acts like a gift card holder where the center flowers are, gently opening up and holding whatever is placed in the solid middle. That took some thinking, trying to measure and cut down the colored image so that it fit into that space under the flowers just right. The opening/middle rectangle is much larger than a gift card, but it’s the same idea…though this is only one way to use it.

The one thing I forgot to do to the test pieces was to make sure they were embossed well also. (One reason I love Spellbinders is because they have awesome sections of the dies that are intended to be embossed to give it a little something extra. I miss that feature when I use other brands.) So the embossing could have been done a little better in parts here, because I forgot to take that step to make it pop. I didn’t remember it until I’d mailed the card and noticed it in the pictures. In the photos above, perhaps you can see that the center flower pieces are more deeply etched than the corners above and below them. Next time…I shall remember next time. 🙂

My customer wasn’t picky about what to say on the inside either, other than asking me to write his name and theirs in it and mail it straight to him. So I had to dream up something based on other things she had said to me. After adding fox washi tape to the bottom of a white piece and then matting the paper onto a different kind of wood-grain patterned paper from a 6×6 pad (can’t remember which one now), I used three different stamp sets and another die to make the sentiment section. “A little expression of love” is from SU’s “Painter’s Palette,” “just for you” is from SU’s “From the Herd,” and “Happy birthday” is from MFT’s “LJD For the Boys” (part of the “Happy Birthday, Handsome” stamp). The die is among those in a retired nested set from SU called “Deco Labels.”

I used my stamping platform and its grid to line up the sentiments on the die-cut and stamp out a couple of test pieces in Cajun Craze ink to make sure they sat where I wanted them. (I had tried stamping right on the matted liner paper but I accidentally got ink where I shouldn’t have, so at that point I just had to cover it up because it was already adhered.)

After the sentiment box was stamped, I edged around the die-cut with my Cajun Craze Stampin’ Write Marker so it would stand out against the white paper. And, once again too late, I saw that the double fox spot on the washi piece. I didn’t create that intentionally; it’s just how it came off the roll. I wish I had seen it sooner; it bothers the part of me that prefers symmetry. 🙂 I also added two gold glitter hearts from MME (“Niche/On Trend Foam Stickers”) in the white space of the sentiment box.

I like how this one turned out even though it tested me at times and there are a couple of things I wish I could do differently. It’s always easier to make a similar card a second time. Maybe I’ll try to do one for the local gift shop. After all, I’m not completely convinced that winter is over with where I live.

Some of the Stampin’ Up items I used on this card are retired, but you can purchase the ink, cardstocks, and other current items through my online store if you want to try them (please use code 6WPHJ2MC at checkout unless your order is over $150). The thumbnails below will take you right there…and this is an awesome time to get them since Sale-a-bration is still going through the end of March. For every $50+ order before tax and shipping, you get to pick an item out of a select group of almost two dozen items and Stampin’ Up will send it to you for free with your order! Plus you’ll also get a free gift from me. 🙂 Please contact me if you have questions.

Thanks for visiting my blog! I truly appreciate my readers. ❤️ Have a lovely day! #neverstopmaking #mftstamps

Product List


Pat's Blog Site

One place to fit it all!

Stamp Dabbles

Donna Leonard | Independent Stampin’ Up! Demonstrator | Huntsville, AL

Niya Scrap

Démonstratrice indépendante Stampin' Up!®

From Pole to Pole

Adventures in the Land of the Pierogi

Stampin' in the Meadows

Akiko Sudano - Independent Stampin' Up! Demonstrator Downingtown, PA

Creative Stamping Designs

Karen Ksenzakovic, Independent Stampin' Up! Demonstrator in Somerville, NJ Let's make some cards!!

Stamp it up with Jaimie

Helping you find a stress free creative outlet through paper crafting.

Stamp With Amy K

Amy Koenders, Independent Stampin' Up! Demonstrator in Mendham, New Jersey...Let's make some cards!

The Daily Post

The Art and Craft of Blogging

WordPress.com News

The latest news on WordPress.com and the WordPress community.

%d bloggers like this: