April 2019 Sentimental Rose Paper Pumpkin

I enjoy these Paper Pumpkin kits more and more as I receive them each month. The kit for April 2019, “Sentimental Rose,” is simply gorgeous. The kit makes nine cards, three of each designs, with all accompanying pieces and parts and stamp set so you can make the cards as shown or change them however you like. This kit also comes with an acetate card box you can decorate and store your cards in or give them together as a gift set.

Sentimental Rose instruction sheet
The stamp set included with the Sentimental Rose kit.
Kit pieces (what I haven’t used yet).
Two of the three kinds of included envelopes, with fun liners too!

I made up one kind of card in the kit so far (all three cards of that type). It was the design I liked the best. I used one for my sister-in-law’s Mother’s Day card and have the other two going for sale once I add inside sentiments to them.

Sister-in-law’s Mother’s Day card
The inside of the Mother’s Day card
These kits are always so easy to create and give joy and satisfaction at making (and finishing!) something beautiful quickly during busy days. I was watching a movie with my husband when I made the box and the three cards I’ve completed so far. Can’t get much simpler than having the pieces already cut out and provided. 🙂

It’s time I go finish the other six cards. Best wishes to you and your families on this Mother’s Day, regardless of the emotions this day brings for you. Personally, it’s usually a hard one here, so I’m going to craft today and conveniently forget what day it is on the calendar. At least I can make beautiful cards, if nothing else, and tomorrow will be here soon enough.

If you are interested in receiving your own subscription to Paper Pumpkin, you can purchase a prepaid version from me here (you can choose from one month, three months, six months, or a year), or you can choose to be billed each month. Either way, I appreciate your business!

We are wrapping up the 2018-19 annual catalog as well—only a couple of weeks left! Ordering in the new catalog will begin on June 4. You can grab some of those remaining goodies at my online store here (stamps are available until May 24; everything else is while supplies last!).

Thanks again for stopping by my blog. Please feel free to email me if you need something!

Connie

A Special 3D Decoupage Unicorn Birthday Card (with Magical Day and Beautiful Peacock)

A Special Unicorn Birthday Card for a Special Birthday Girl

I’m on book deadline again, so I haven’t had a whole lot of craft time, but when one’s only niece is turning another year older and one is attending her party, one must also make a special birthday card.

The kiddo loves horses, so I remembered just in time that I had an internationally printed sheet of dry decoupage with a unicorn on it. Close enough, I hoped. Besides, who doesn’t love unicorns right now? And even better, making the decoupage card was simpler than dreaming up something new. I’d been having trouble deciding which direction to go anyway. These decoupage pieces make fabulous card fronts once they are put together. There’s not usually room for much else.

Unfortunately, this particular unicorn was not one of the easy, perforated, die-cut ones. I hate trimming off those little bumps, but they sure are faster. So I attacked this unicorn with my best CutterBee micro scissors and went to fussy-cutting. After that, I cut or attached appropriately sized pop-up (foam) pieces. I used the Stampin’ Up ones for this project, both the regular hexagon size and the mini hexagons. And when I needed smaller bits for the legs, I just cut one down to what I needed. The trickier part is lining up all the cut paper layers so the ones beneath don’t show. I may or may not have completely succeeded at that. 🙄

Once the unicorn was cut, fastened, and done, I just had to choose complimentary paper and cardstock. Kiddo also loves purple, I was told strongly on her birthday wish list (another reason this unicorn would work, because of the background). The Marvelous Magenta cardstock color was one of the best color-matching choices for the card base from my stash, and I had already pulled the ombré teal/purple geometric-patterned paper from a Recollections pad a couple of weeks ago, in case I wanted to use it for her card. I stumbled upon it again just in time. I rummaged a bit through my specialty paper drawer (a special unicorn for a special birthday deserves special paper, right?) and found a glittered corrugated cardboard/cardstock I’d never had the right feeling about before, and then I found a soft pink-and-purple paper that felt like it could be mulberry paper or handmade paper. Had to be extra careful not to crease it – they won’t come out! I decided how I wanted to layer them and cut each slightly larger than the last, for an A2 card base size. I cut the glittered cardboard from behind so I didn’t dull my blade – and I had to trim off the side fuzzies from the soft paper after I cut it.

I adhered all the layers together with my ATG tape gun, hoping it would hold over the glittered piece (so far, so good)…and then I sat back, looked at it, and wanted to tinker. I ended up using my clear Wink of Stella glitter pen on the unicorn’s mane and tail. It’s super difficult to see in photos, but it dried nicely and is visible in person. I didn’t think there was enough room for a birthday message on the front, and I didn’t want to interrupt the beauty of the scene, so I didn’t add anything else.

For the inside, I found a square piece of white cardstock laying in the random remnant pile that seems permanently next to my desk, but it wasn’t quite long enough, so I just trimmed off more geometric-patterned paper to put underneath it. It tied in with the front that way anyway. Then the square white piece looked too bland, so I took an old Marvy corner punch to all four corners.

I had thought about a different inside sentiment, but time was ticking and bedtime should have already been, so I went looking for something I wouldn’t have to custom-create. I had been reminded earlier in the day from Pinterest or one of my crafty FB groups about the “Magical Day” sentiment from a stamp set of the same name, so I figured a unicorn was “magical” enough to make that work. And the “Beautiful Peacock” stamp set from SU was right next to the first one on the shelf. So the “Today is all about you” line became a birthday sentiment. I used my Tim Holtz Stamping Platform to line up and stamp the two sentiments. Thankful I did, too, because I had to reink both. Then, just for good measure, I hand-stamped an 11 on the inside because I usually put what year she’s turning on her cards. I had just gotten that number stamp set free from White Rose Crafts LLC in my order with them. It arrived that day! So much fun when that happens. 😁

Cardmakers seem to remember to decorate the envelopes more frequently than I do…but I remembered this time! And I love how it turned out. I stamped the unicorn and the stars from the “Magical Day” stamp set in SU Coastal Cabana and Marvelous Magenta inks to match. I definitely need to remember to decorate them more often.

So there we have it, something that took me about two hours in the middle of the night – it looks crazy simple, doesn’t it? But the decoupaging can take some time to cut and fasten together if fussy-cutting is required. It’s okay. I enjoy it, and she’s more than worth it. ❤️

***

Personalized Wedding Card for Carolyn and Matthew

Throwback to a custom wedding card made last year for a couple I’ve never met.

In late 2015 I started accepting orders for custom-made cards. This fact still kind of boggles my mind. I never figured I’d be a cardmaker at all. I’m a scrapbooker–since the mid-nineties. Cards were confusing. Such a small canvas on which to put so much stuff! Give me a 12×12 page any day, thank you. But somehow with the purchase of my friend’s used Cricut, cards suddenly made sense, like that proverbial light bulb over the head. Someday maybe I’ll show those first three cards I made as I attempted to figure out the chirping machine.

So fast-forward a couple of years and suddenly I’m at the point of taking custom card orders…? Um, okay. If you say so. Indeed, it seems that’s what I mostly do now. Instead of creating cards for fun, for friends, for a local church group, for Hospice, etc., like I imagined I might do, family and friends and a particular lady in North Carolina have kept me very busy making cards for them ever since August 2015. And I’m grateful. (Though still boggling.) Here is one of the examples I made for a relative, so she could give it to a couple with a wedding gift. It is a twist on a version I made for my NC lady the year before that (why recreate the wheel if you don’t have to?), but in this version, I personalized it with the recipient couple’s names.

I used a premade, glittered card base from DCWV (5.5×5.5 size), added some light blue/grey patterned paper on top of it as a mat, and then ran some dark blue Recollections paper through my Fiskars handheld (hand-cranked) paper crimper tool. Their wedding color was dark blue, and I thought it would pair well with the Soft Sky color I’d used in the earlier NC version, which was still in my head.

On top of the now-corrugated dark blue paper, I placed a die-cut I’d made from a local friend’s Bloomin’ Heart Thinlits Dies from Stampin’ Up (she and I share supplies so we don’t have to buy as much individually and then have an excuse to get together to craft!). I used Stampin’ Up’s Silver Glimmer Paper for the heart – and found out the hard way (i.e., remembered) that it is best to cut on the back side of that glittered paper rather than trying to get the die to cut through the glitter on the front. (Let’s just say “Lesson learned”!)

2016-08-25 16.19.30

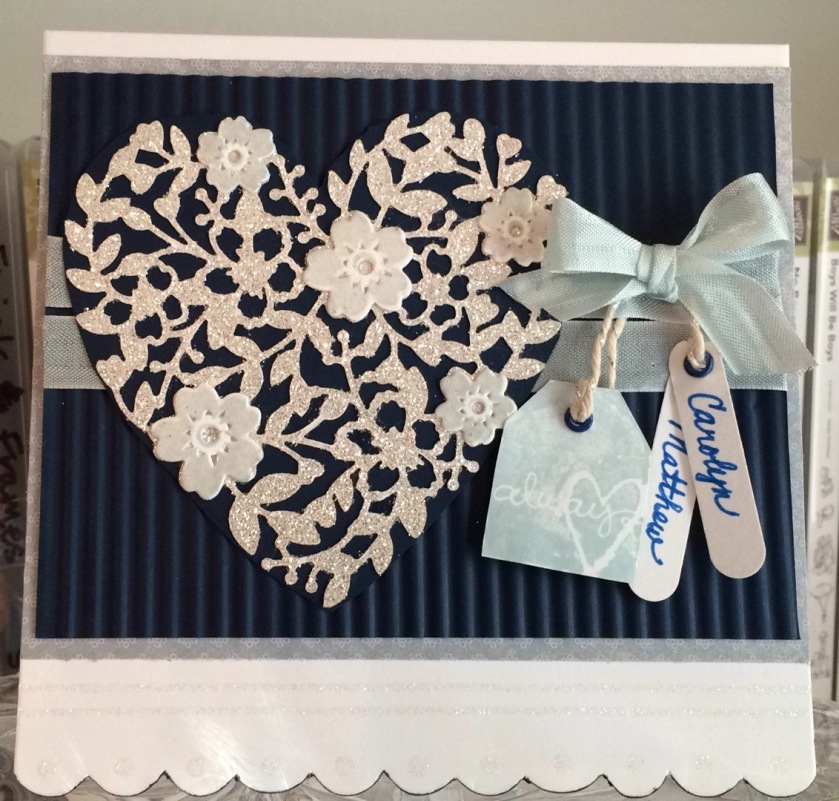
I decided I didn’t like the look of it by itself on the corrugated paper, not to mention that it is a delicate thing and would be hard to glue on top of the corrugation, so I glued the heart die-cut to another piece of the dark blue Recollections paper (that I did not run through the crimper). I then stamped out the little matching flowers of the corresponding Bloomin’ Love photopolymer stamp set in Soft Sky ink, die-cut them with the matching thinlit, and glued them on top in the appropriate places. I actually found it difficult to die-cut those without one edge or the other slipping and not staying centered where I put it. I have a number of rejects I didn’t deem “good enough” for the card. Must need more practice.

Before I glued the heart die-cut down, I laid it out to see where I wanted it, marked it, removed it, and then wrapped some Soft Sky Seam Binding ribbon twice around the corrugated paper and tried to tie a bow off to where the side of the heart would be. This step was trickier than I thought it would be, but I do like the effect. And I used up some of my seam binding ribbon, which pleased me immensely. I think it’s pretty as a whole, but I struggle with using it because it is so delicate. I feel like using the word “fragile,” actually. It catches on things easily, gets holes easily, and is almost see-through. I feel like glue or strip tape can be seen underneath it as well, so I have a hard time finding ways to use it that aren’t simply bows. So this worked. (And after I use up my seam binding stash, I will never buy any again.) I think I actually made the bow separately from the ribbon wrap because I couldn’t get it to lay right. I believe I attached the bow with Zots after gluing down the heart.

Then came the fiddly stuff. I stamped the tag that says “Always” from the retired SU Too Terrific Tags set in Soft Sky, cut it out (I don’t own the matching punch), and set it aside. Next I got out my retired Word Window punch and took it to some white cardstock. I then used some very retired SU Brilliant Blue eyelets from way back when, with my Crop-a-Dile at the tops of the “Always” tag and oval windows. I hand-wrote the couple’s names (more than once) and strung the three tags from the top ribbon with some SU Silver Baker’s Twine. I actually double-strung the “Always” tag to keep it the direction I wanted. And then because it was still not cooperating, I stuck a pop-up dot to the back of it and told it to stay put. The names still dangle sweetly as I imagined.

2016-08-25 16.20.36

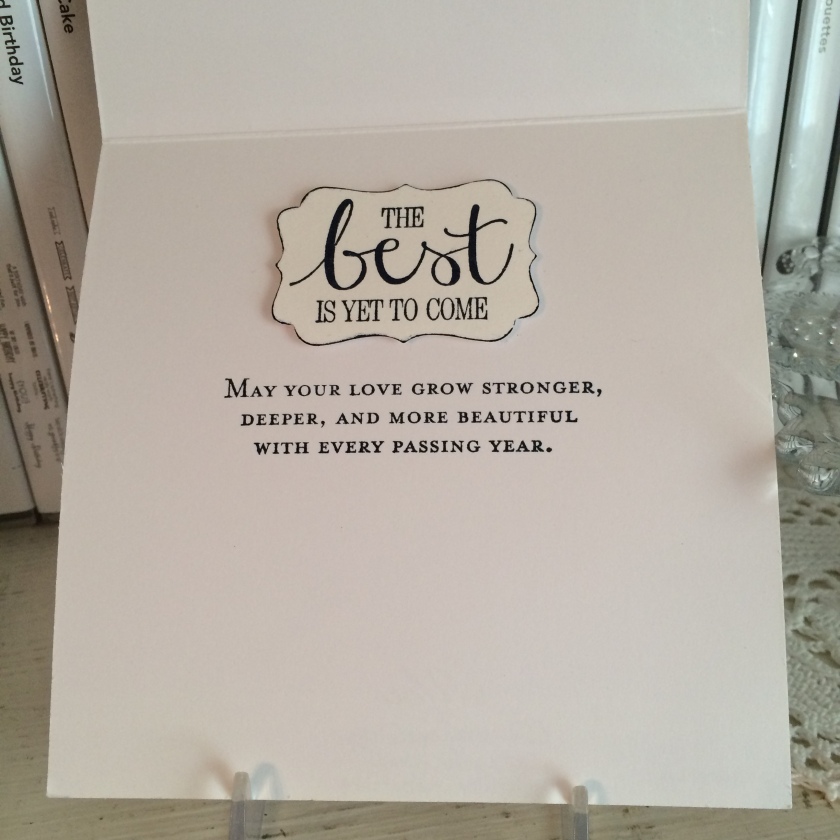
The inside of the card was simpler. “The best is yet to come” sentiment came from my retired SU “Best Thoughts” Hostess stamp set, which I stamped on white cardstock in SU Night of Navy ink and punched out with my retired SU Decorative Label punch. I edged around the punch with my matching Night of Navy marker to highlight the edges since it was white on white. Then I stamped the “May your love” sentiment from the current SU Floral Phrases stamp set. (Yes, I do have some current items! 🙂 )

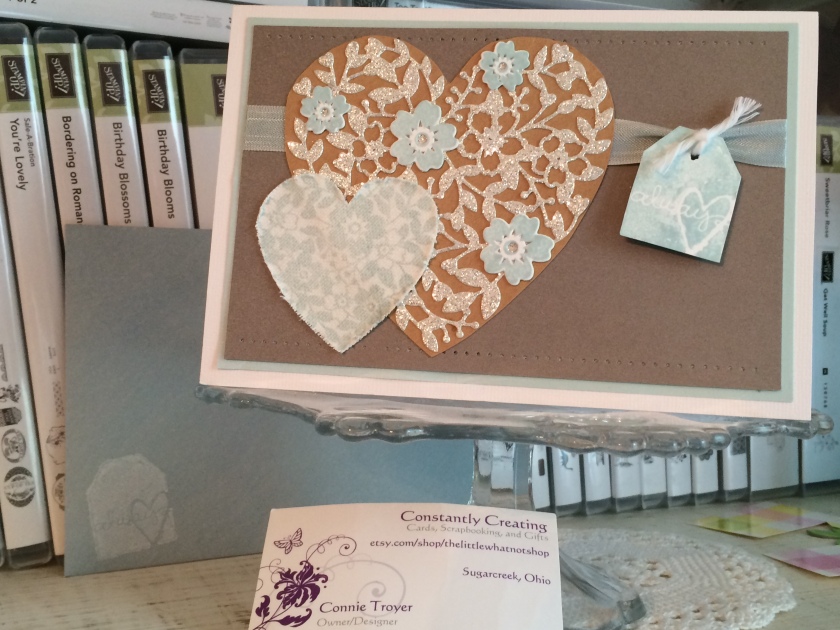
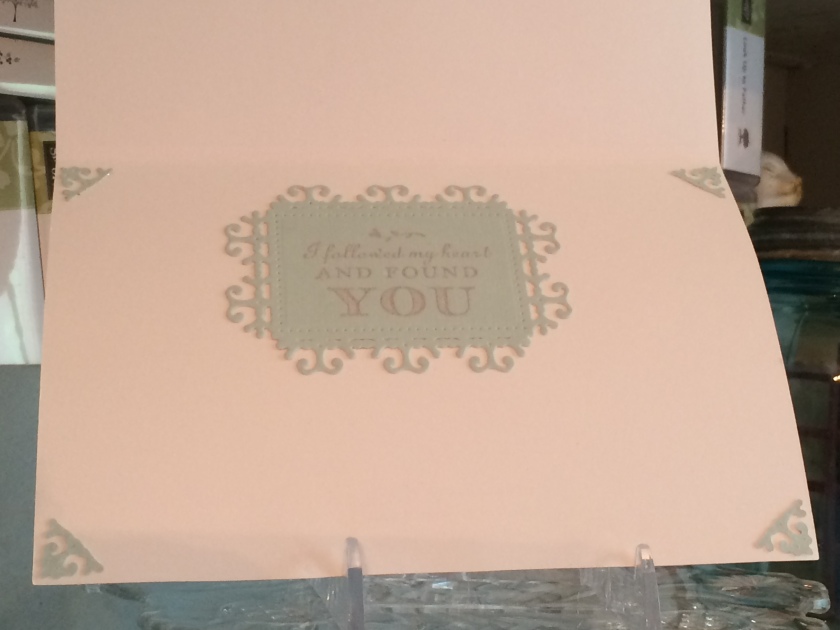
All in all, I was pleased with the way this “version 2” card came out. Just for fun, here’s “version 1” that went to NC, in Soft Sky, kraft, white, and Crumb Cake. Version 1 also uses some distressed, stamped-on canvas.

2016-05-14 15.22.02

2016-05-14 15.23.41

Thanks for stopping by! Hope I’ve given some inspiration for your own wedding cards. 🙂

Pat's Blog Site

One place to fit it all!

Stamp Dabbles

Donna Leonard | Independent Stampin’ Up! Demonstrator | Huntsville, AL

Niya Scrap

Démonstratrice indépendante Stampin' Up!®

From Pole to Pole

Adventures in the Land of the Pierogi

Stampin' in the Meadows

Akiko Sudano - Independent Stampin' Up! Demonstrator Downingtown, PA

Creative Stamping Designs

Karen Ksenzakovic, Independent Stampin' Up! Demonstrator in Somerville, NJ Let's make some cards!!

Stamp it up with Jaimie

Helping you find a stress free creative outlet through paper crafting.

Stamp With Amy K

Amy Koenders, Independent Stampin' Up! Demonstrator in Mendham, New Jersey...Let's make some cards!

The Daily Post

The Art and Craft of Blogging

WordPress.com News

The latest news on WordPress.com and the WordPress community.

%d bloggers like this: