Timeless Tidings Project Kit Samples

Sharing four Christmas card designs today from the Timeless Tidings Project Kit – an easy, fun way to make twenty Christmas cards quickly!

Hello, and welcome to my blog for Amy’s Inkin’ Krew’s blog hop for Tuesday, November 13! The theme for the month is holiday or Christmas, so I finished up some of my cards in Stampin’ Up’s Timeless Tidings Project Kit to show you.

When I got the kit in last month, I took a couple of hours to put the various pieces of the four card designs together (twenty cards total) – other than the banners and circle sentiment pieces, which I needed more time to do later. The kit looked so fun and festive that I had to tear into it right away. 🙂 The premade card bases have lines on them to show where to put the certain pieces, which is all outlined in the instruction guide. (Just look for the lines first so you don’t accidentally glue the layers to the back side of the card base, as I did. It’s easy to do because the front and back look the same other than that little guiding line!)

I had not ordered the Timeless Tidings stamp set that is made to fit perfectly on the sentiment spots simply because I ordered the kit when it was low inventory so I would be sure I got it. I figured I would think about the stamp set later. Later came last week when I started looking through my stamp sets to see if I already owned sentiments that would fit the four differently-sized areas…since my SU wish list was still plenty large with only two months left to order holiday products. (In hindsight, it would have been easier and faster to simply order the matching sentiment set, so keep that in mind! 😂)

I did find a current stamp in my inventory that fit the kit, and it is “Peace and Joy” from the photopolymer set that comes in the Christmas Traditions Punch Box. (Several would have fit, as they are all of similar size, but I liked that one best for the tree card.) The next time I use it, I may try to color various parts of the stamp with Stampin’ Up markers to draw attention to the pretty pine branches on it.

The decorative tree piece and the poinsettia were already watercolored and included in the kit – I just had to glue them down. (Also, that Christmas Traditions Punch Box really is delightful. The stamps are beautiful, and I love that the punch coordinates with them and other stamps in our catalog. Be sure to give this one a second look!)

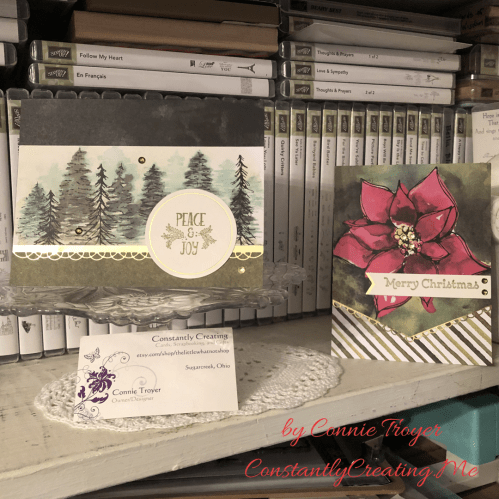
The “Merry Christmas” sentiment on the poinsettia card is from a retired Stampin’ Up set called Versatile Christmas. Both of the cards have been embellished with a gold foil border and the gold and green rhinestone gems that are included with the kit. On the poinsettia card, I put green stones on the edge of the sentiment and gold ones inside the flower center.

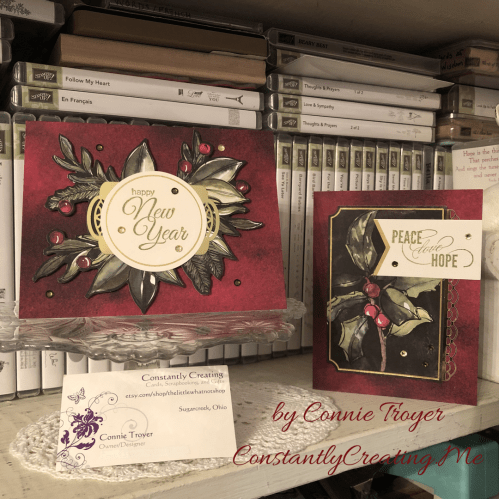
For the other two cards, I used sentiments from a Penny Black stamp set. These cards also have gold foil and gems for embellishment, and I popped up the piece under the largest circle with foam dots. The one says “Happy New Year” because it fit the large circle best, and truthfully I have sent New Year’s cards instead of Christmas cards at least twice. 🤷‍♀️ So I’m bound to use it at some point. 😂 I used Old Olive ink for all four cards.

Not buying the matching stamp set outright did end up taking more time than I would have liked. The kits are meant to be an easy way to get a bunch of Christmas cards done quickly, so scrounging in my stash sort of defeated the purpose. If you’re a budget buyer like I am and have unlimited time, sure, you can find ways to work around it and even create your own cards from various pieces rather than following everything exactly like I did (other than the bling)…but if you want a painless, faster way to get the job accomplished, it’s worth the extra money to get the set. I actually never thought I’d say that. 🙂 The sentiments are great ones to have on hand for later anyway, so I doubt you’ll regret the purchase.

The Timeless Tidings Project Kit is currently on backorder for a couple more weeks yet (it’s been popular!), but they have lots more coming soon if this is something you’re considering for a future purchase. If I can help you order it or other supplies, or if you just need a Stampin’ Up demonstrator, I’m happy to help! Feel free to contact me or go to my store website listed over in the right sidebar.

Thanks for stopping by and reading! Hopefully you’ll be finding a bit of time soon to make some easy Christmas cards, if that’s your thing. I have quite a few outsides finished (not counting the twenty in this kit!), but I still need sentiments on the inside. And as I didn’t get mine finished in time to send last year, I’ve determined that this year will be different! The weeks to Christmas are already counting down, though. I don’t know how it’s already mid-November. May your holidays (and your Christmas) be merry and peaceful and wonderful this year. ❤️

To continue “hopping” along with our group, just click the “Next” button to view Karen Ksenzakovic’s offering (or click this link), or go to the “Previous” button (or this link) to view Linda Richenberg’s project. For your convenience, the list of all our participants are listed in order below. Merry early Christmas, everyone!

Shirley Gentry

Karen Finkle

Linda Richenberg

Connie Troyer (you are here!)

Karen Ksenzkovic

Aurora Lopez

Mary Deatherage

Sue Prather

Amy Koenders

A Polar Bear Christmas

Playing along with a Stamps, Ink, Paper Challenge (128) with a Snowy Polar Bear Christmas card and matching thank-you note.

Here’s another adorable card with matching thank-you note that I created for a custom card order needing to be mailed soon. I think it fits the Stamp Ink Paper 128 challenge, shown below:

http://stampinkpaper.com/wp-content/uploads/2017/12/SIP-Challenge-128-Let-it-Snow-NEW-800.jpg

So here are my matching cards.


I’ll tackle the main Christmas card first. The embossed snowy background was given to me by a crafty friend, and I flipped it over so that the debossed side was showing. I matted it with some current SU Emerald Envy plain cardstock on a Thick Whisper White card base. The paper-pieced polar bears and trees are 3D stickers from a “Holiday Time” series – I think they might be from Walmart. They’re actually pretty cool, using poms for the tails and the ends of scarves, and the tree is glittered. 

I was having trouble fitting all three on the A2 card base, so I thought if I had one peeking over a snowbank as if he were watching the scene, I could put them a little closer together. My “snowbank” is made out of two strips of shimmery translucent vellum paper, which I cut by tracing a Card Creator Spellbinders die and then cutting it out by hand (hubby was sleeping and I was trying to minimize the noise, plus I wasn’t exactly sure where I wanted the mounds to go, so I traced/cut it especially long and then positioned them where I wanted them). I popped up the vellum in parts for effect and to fit the back polar bear in without squishing him (trying to reduce that whole “translucent” thing). 

I had thought of using white handmade mulberry paper instead of vellum, but I didn’t feel like making a bunch of noise and rooting around in my “specialty paper” drawer since it was late and I was only supposed to be “fiddling” (i.e., going to bed soon) as opposed to outright intentionally creating. 

The “Happy Holidays” sentiment above the scene is from a 2016 Hampton Art stamp and die set (SC0718). It bugs me a little that the font sizes of the two words is not the same, but as the set is either photopolymer or acrylic (read: see-through), it was easier to line up than others. I inked the stamps with Stampin’ Up’s Emerald Envy ink overtop a strip of polka-dotted paper from American Crafts/Dear Lizzy “5th and Frolic.”


I kept the inside of the main card simple with a “Warm Wishes This Holiday Season” sentiment from Close to My Heart’s “Scandinavian Wishes Stamp of the Month,” (SU Emerald Envy ink), punched it out with my retired SU Scallop Oval punch, and matted it with my SU Decorative Label punch in Emerald Envy cardstock. 

The thank-you note, on the other hand, is simply a SU Whisper White notecard size (3.5×4 7/8) with a background of gold snowflakes on vellum from SU’s “Winter Wonderland” Designer Vellum Stack. I laid an Emerald Envy cardstock piece embossed with  the “Thanks Words” Cuttlebug folder (371134) on top (putting the glue for the vellum underneath where the cardstock layer would hide the adhesive) and then cut another “snowbank” out of the gold snowflakes before finally adding the last sticker in the Holiday Time set. (Yay, another thing used up in my stash! I really am trying, hubby dear.)

These cards were ones that were simple, thought-provoking, and yet fun to create – my favorite kind. It was my first time trying to create “snowbanks” even though I’ve seen them used with regularity this season. And I’m fairly pleased with how it all turned out. Unfortunately, they’re another two cards I can’t duplicate unless I find another pack of stickers (thus then adding to my stash). 🙂

Hope you’ve enjoyed this offering! Thanks for stopping in. 

Season’s Greetings with Snow


Hello, all! It’s November now, but all I’ve been hearing for hours is rain. Still, there are Christmas cards to create. I have a couple of custom orders for them along with my own this year. This card, I’ll use for one of the orders. 

I feel like I made it out of practically nothing. Or, rather, it cost me practically nothing to do it, by the time I divide out all the pieces in the packs, etc. The card base from Die Cuts with a View was bought several years ago on clearance, and with this card I finally used up the pack (sad face here, as I loved them and have been hoarding them). It has a scalloped edge on the front of the card with two lines of glitter above the scallops and dots of glitter inside each curve. 

I have mentioned that crafters are a generous bunch. Both the embossed snowflake background and the die-cut snowman came free of charge from such generous crafters in one or two of my Facebook groups. (And the good news is that I still have a few more embossed backgrounds, though I am sadly out of snowmen.) I may have traded some of my own supplies for them, or perhaps they came as Happy Mail or a RAK (Random Act of Kindness). Either way, I’m happy to make use of them. Though I have no idea which companies to thank. The snowman looked as though he was exceedingly happy and welcoming something, so I figured he would like a snowfall. 🙂

I sized up the snowflake background to the card base and realized I’d have to cut it down a bit to keep it above the glitter lines. I backed the embossed piece with some textured purple/mauve Gauze Paper from DCWV. The snowman got a little color enhancement with some Stampin’ Up inks and a Blender Pen. I tried to give him a sort of muted vintage look to coordinate with the other colors. (And I wasn’t sure if he was stamped with archival ink that doesn’t bleed when touched with waterlike substances, so I had to color him carefully just in case it was a dye-based ink.)


I had a few sentiments that would fit the upper corner, but I had trouble deciding on one until my tiredness and the hour made the decision for me. (“Slap it down and move on,” my friend A likes to tell me. I actually listened this time.) I found this “Season’s Greetings” in a pack of rub-ons from American Crafts, so I put it on a scrap of vellum hanging out on my desk, punched it out with Stampin’ Up’s retired Word Window punch, ran it through my Xyron Sticker Maker, and then needed a way to make it show up, since vellum is see-through. Enter a remnant of gauze paper, which I’d cut out of the center of the mat for the embossed snowflake background. (Why waste perfectly good material and hide it where no one will ever see? Craft supplies aren’t cheap!) I used a Spellbinders Die to cut the simple border, which fit the vellum rub-on sentiment perfectly. And this way we got to see a little more texture of that cool paper, since the mat behind the snowflakes is small by necessity. 

To echo the glitter that came on the card base, once I knew how much room I had to play with at the sides around the front piece, I stamped a border (bought from Oriental Trading) in VersaMark, poured on some retired Iridescent Ice glitter embossing powder from Stampin’ Up, and heat set it, one on each side. 

I kept the inside of the card simple with a “Let It Snow” stamp from SU’s “Snow Place” stamp set and a couple of snowflakes from SU’s retired “Letterpress Winter” set. I used Pale Plum ink (also SU, retired) and more of the retired Iridescent Ice glittered embossing powder.

Fairly simple card overall, though some of the pieces took a bit of fiddling. I enjoyed this one and may try to make more of them with different snowmen and sentiments. Thanks for stopping by and reading!

Warmth and Cheer with Northern Flurry

It’s time to start making Christmas cards! Okay, it’s probably past time, and I’ve been creating them for a couple of weeks, but here’s my first blog post about one.


It may be October, but for crafters, it’s Christmas card season!

The other day, hubs and I figured out a new way to keep each other company while I remained productive with crafting. The result was the outside of four winter/Christmas cards finished. They’re pretty simple, but simple can be elegant sometimes. Our wedding, for example. (Or at least that’s what I was trying for back then.)

Pardon the mess behind my desk, but this is the only shot of the four together so far.

I have two custom Christmas card orders right now along with the niggle of something bigger in the works (we’ll see if it goes anywhere), so I figured all four would go one place or the other, or I could split them up.

I used all Stampin’ Up materials for these except for the bling – Whisper White cardstock, the retired Northern Flurry embossing folder, paper strips cut into banners from one of their retired 6×6 Christmas paper packs (I didn’t write down which one), Soft Suede and Early Espresso inks with matching cardstock, and the “Wishing you a season filled with warmth and cheer” sentiment from the set “Wrapped in Warmth.” The rhinestone bling is from Michael’s, SU, and CTMH.

I’m still stamping the insides of three of them. So far I have “Merry Christmas to You and Yours” (from SU’s “To You and Yours Too” set) on the inside of the Soft Suede version, shown below.


I love how the embossing just pops off the card. I had originally wanted the snowflakes to come cascading from the upper-left corner but realized after I cut the cardstock that that wasn’t going to be possible because of the direction I’d cut it. And I had thought to only have a smaller 1/4″ strip extending from top to bottom but didn’t like how that interrupted the little snowflake down there…so after some brainstorming with hubby, since he was in the room, this is what we decided looked best. And I’m pleased with it. I think it like it better than my original idea. (Not that I won’t try that original idea again some year. 🙂 )

Thanks for reading! If I can make Christmas cards for you sometime, send me a note or visit thelittlewhatnotshop.etsy.com. 🙂

Pat's Blog Site

One place to fit it all!

Stamp Dabbles

Donna Leonard | Independent Stampin’ Up! Demonstrator | Huntsville, AL

Niya Scrap

Démonstratrice indépendante Stampin' Up!®

From Pole to Pole

Adventures in the Land of the Pierogi

Stampin' in the Meadows

Akiko Sudano - Independent Stampin' Up! Demonstrator Downingtown, PA

Creative Stamping Designs

Karen Ksenzakovic, Independent Stampin' Up! Demonstrator in Somerville, NJ Let's make some cards!!

Stamp it up with Jaimie

Helping you find a stress free creative outlet through paper crafting.

Stamp With Amy K

Amy Koenders, Independent Stampin' Up! Demonstrator in Mendham, New Jersey...Let's make some cards!

The Daily Post

The Art and Craft of Blogging

WordPress.com News

The latest news on WordPress.com and the WordPress community.

%d bloggers like this: